Sourdough Tangzhong Milk Bread: The Pillowy “Japanese Cousin” of Brioche
“If you love brioche, you’re going to absolutely fall for its Japanese cousin.”
this is the sandwich bread of your dreams.
Same cozy, buttery vibes as Brioche … but with a crumb that’s cotton-soft, lighter, and basically made for elevated sandwiches. This is the bread that makes people ask, “Where did you BUY this?” and you just smile politely.
Why You’ll Love This Recipe
Pillowy-soft for days (tangzhong is the secret handshake)
100% sourdough (flavor depth + that “real bread” satisfaction)
Lightly sweet & golden—perfect with savory fillings
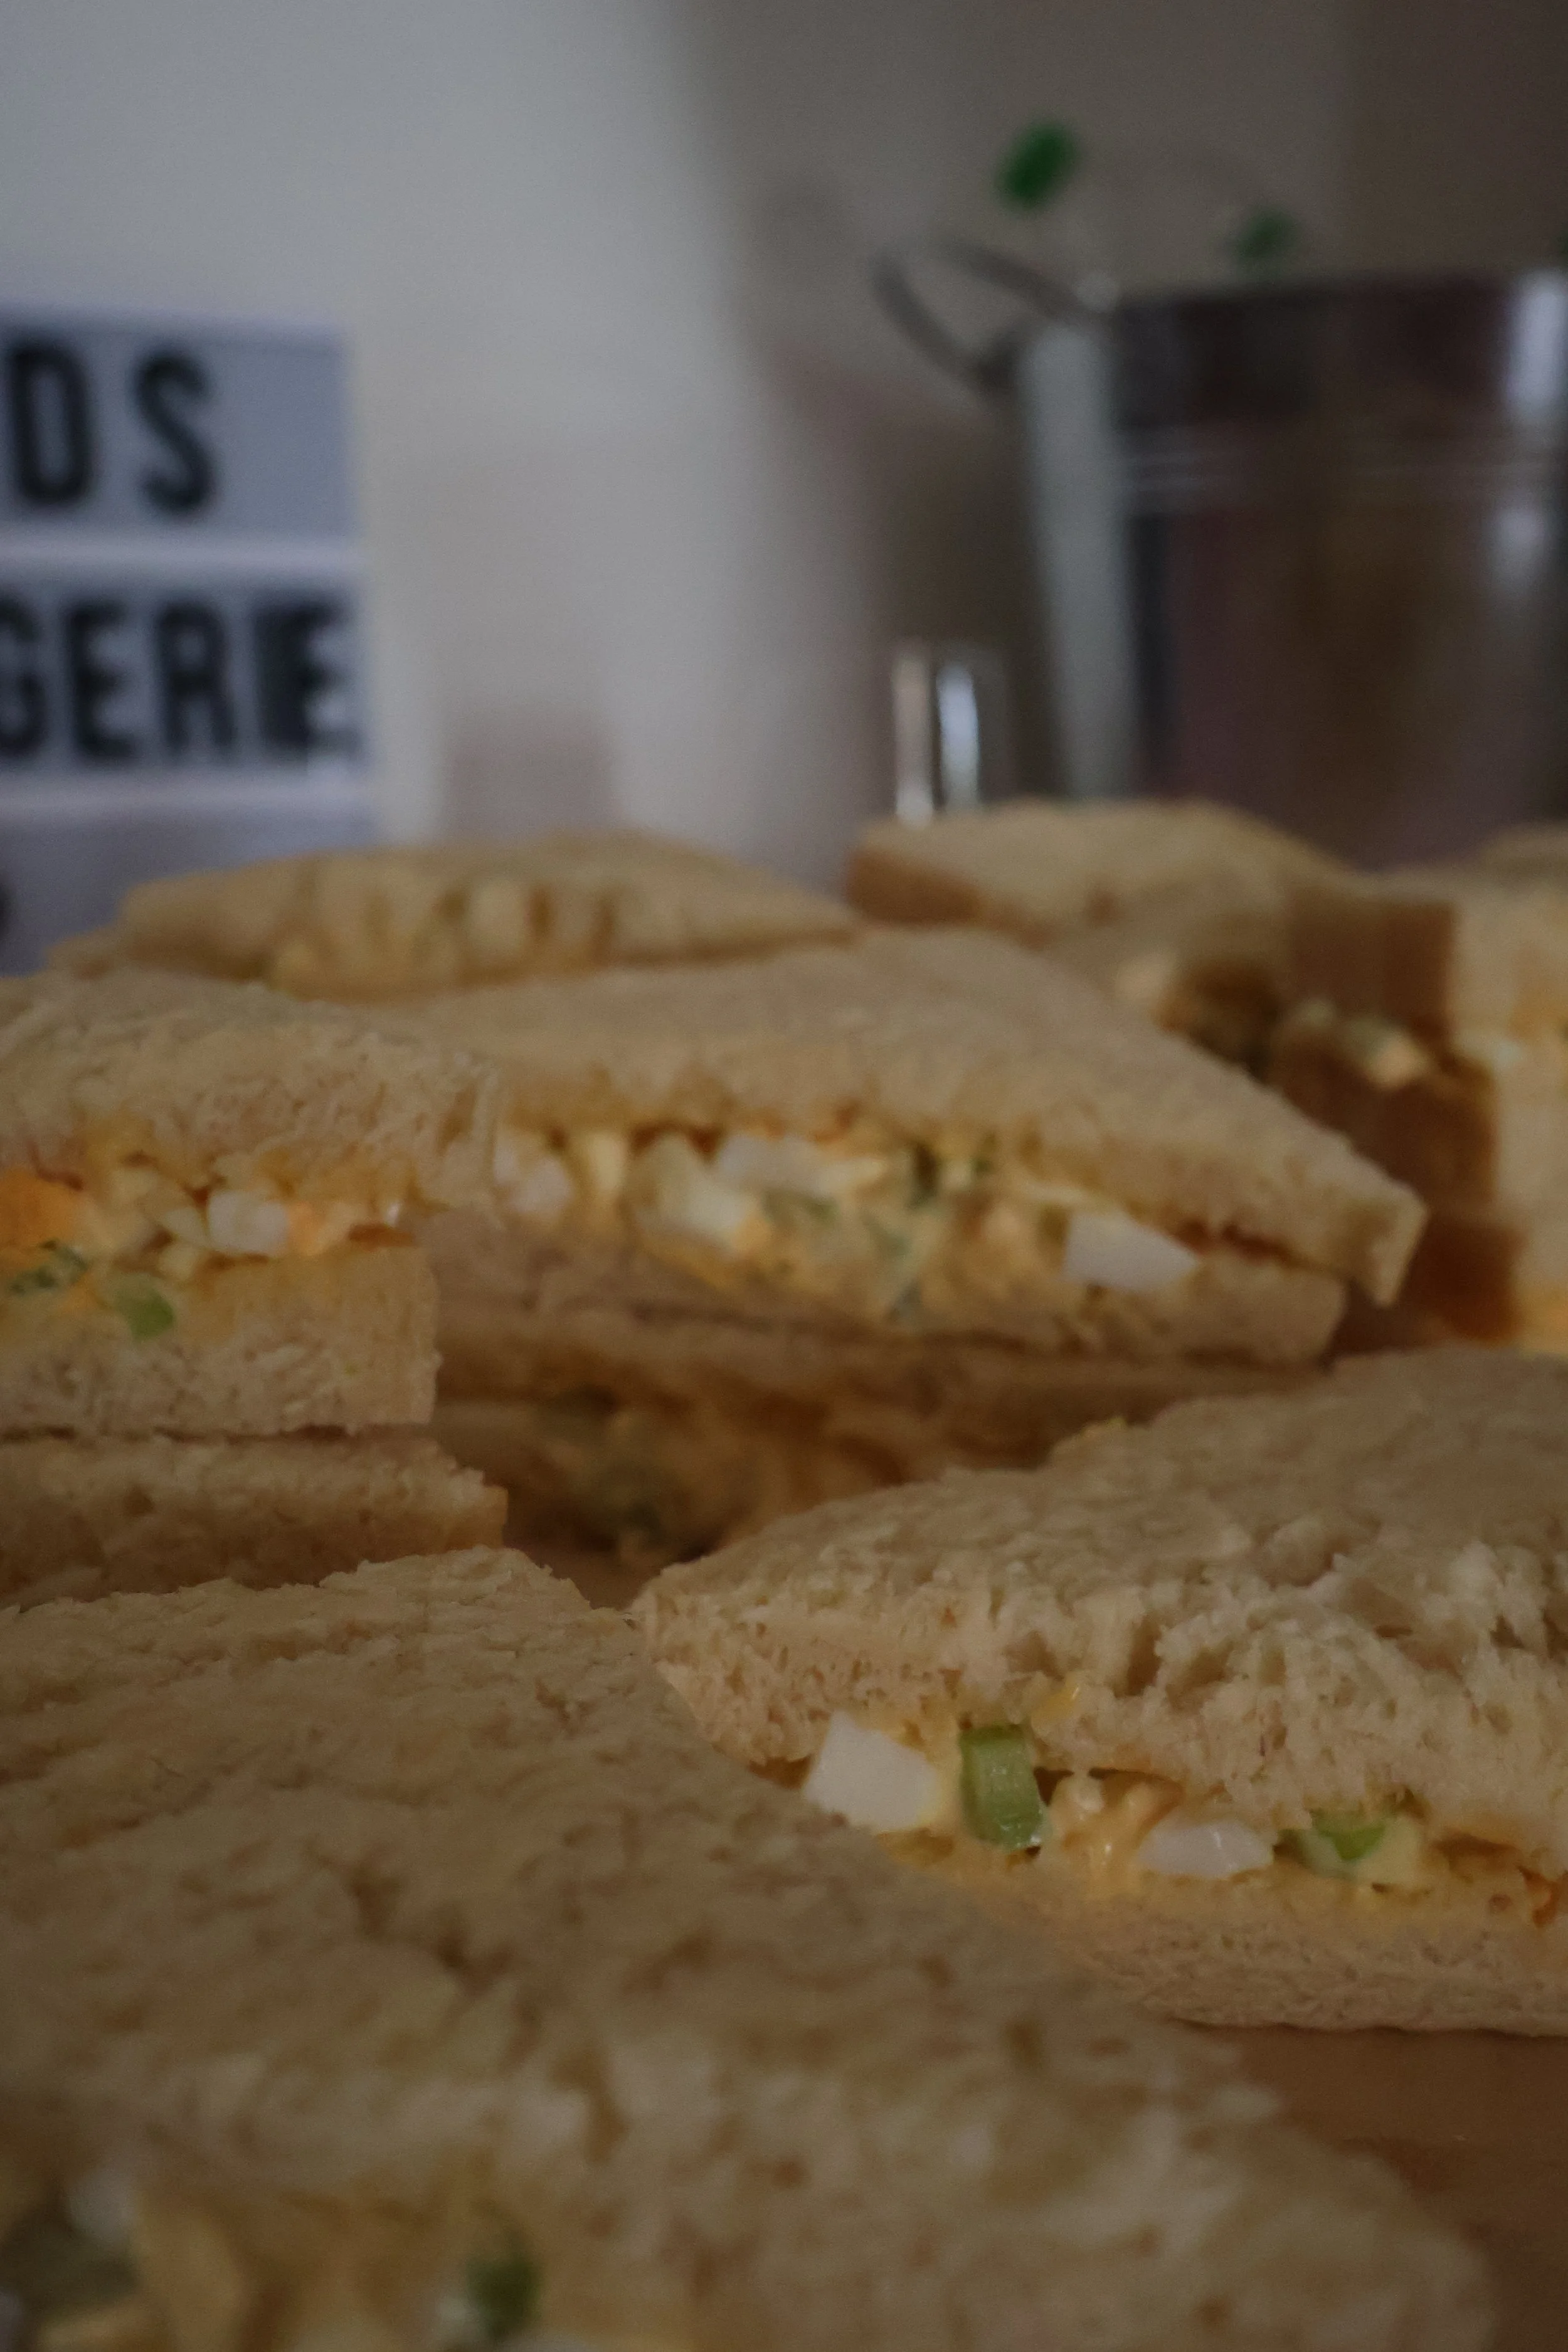
Sandwich dream: egg salad, smoked salmon, jam-butter, fried chicken sandwich… you get it
Hosting-friendly: bakes beautifully, slices cleanly, freezes well
Beginner-proofed with checkpoints for gluten development + fermentation + proofing
The Flavor Logic
This bread is basically balance in loaf form:
Fat (butter + egg) gives that brioche-adjacent richness and silky crumb.
Gentle sweetness (sugar) makes it feel “special” without turning dessert-y.
Milk + tangzhong are the softness drivers—tangzhong locks moisture into the crumb so it stays plush longer.
Salt keeps everything from tasting flat and makes the butter taste… butterier.
Mini final taste test guide (once baked):
You want: light sweetness, milky aroma, buttery finish, no sour bite.
If it tastes too sour → your starter may be over-ripe/acidic or fermentation ran long (fixes below).
If it tastes bland → salt was low or under-distributed (easy fix: butter + flaky salt on the slice… trust).
Timeline - at a glance
Sourdough Tangzhong Milk Bread — Plan Your Day Like a Calm Person
Yield: 1 loaf (about 12–14 slices)
Active time: 30–45 min hands-on
Rest / ferment time: 5–12 hours (varies with room temp + starter strength)
Bake time: 30–40 min
Total time: 6–13 hours (realistic; mostly waiting)
Make-ahead friendly? Yes — dough can bulk + proof overnight in the fridge
Best served: Same day for “cloud crumb,” next day for clean slicing
Schedule options:
Plan A (Same-day):
Mix 10:00 → Bulk 10:30–15:30 → Shape 15:45 → Proof 16:00–19:00 → Bake 19:00
Plan B (Overnight):
Mix 20:00 → Bulk 20:30–23:30 → Shape 23:45 → Fridge proof overnight → Bake 08:00–10:00
Key checkpoints:
Bulk ends at ~60-80% rise (not fully doubled)
Dough passes a gentle windowpane test (elastic, smooth)
Proof passes the poke test (slow spring-back)
Bake to deep golden or 93–96°C internal
Decision guidance:
Warm kitchen + strong starter → Plan A is totally doable.
Cool kitchen / hosting schedule / you want less stress → Plan B is the cheat code.
Optional AKS Upgrades
Shiny bakery top: brush with milk before baking + melted butter as soon as it comes out.
Sandwich mode: slice, lightly toast one side, and make an egg salad platter for brunch.
Two-tone garnish moment: chives on one side of your sandwiches, black sesame on the other.
“Platter energy” upgrade: serve slices with whipped butter + honey + jam + a bowl of flaky salt.
Fried chicken sandwich loaf: this bread + crunchy chicken + spicy mayo = unfairly good.
Ingredients (12 Rolls)
Tangzhong (the “stay-soft” base)
Bread flour: 25 g
Milk (whole preferred): 125 g
Dough
Bread flour: 425 g
Sugar: 45 g
Fine sea salt: 10 g
Milk: 170 g (cool/room temp)
Egg: 50 g (1 large, beaten)
Active sourdough starter (100% hydration): 100 g
Note: “Active” = at/near peak, bubbly, domed, not sunken
Unsalted butter: 60 g (soft but cool — not melted)
Optional (but excellent):
Milk powder: 15 g (extra tenderness + color)
Ingredient notes that prevent failure:
Butter must be soft (pressable) not melted.
Starter must be strong. If it takes 10+ hours to double, your timeline will stretch.
Equipment You’ll Need
Kitchen scale (highly recommended): this dough is enriched—grams keep it consistent.
Stand mixer: not mandatory, but makes gluten development way easier with butter-rich dough.
Small pot + whisk: for tangzhong (your softness insurance).
Loaf pan options:
Pullman pan with lid = perfect square slices, ultra-soft sides (sandwich king).
Classic loaf pan (9x5 in / ~23x13 cm) = beautiful domed loaf, slightly more golden crust.
Instant-read thermometer (helpful): removes the “is it baked?” anxiety (goal 93–96°C internal).
Cooling rack: prevents soggy sides (hot bread needs airflow).
No banneton needed. If you want a neat proof, a buttered bowl + plastic wrap works perfectly.
How to Make It
1) Make the tangzhong (5–7 minutes)
What you’re doing: Cooking a small portion of flour + milk into a thick paste.
Why it matters: Tangzhong gelatinizes starch, helping the loaf stay pillowy-soft longer.
Timing range: 3–6 min on heat depending on stove.
Combine 25 g flour + 125 g milk in a small pot. Whisk until totally smooth.
Cook over medium-low, stirring constantly, until thick like pudding and your whisk/spatula leaves trails.
Look for:
Glossy paste, thick enough that it “mounds” slightly; lines stay visible for a second.
Common mistake:
Cooking too hot → lumps or scorching.
If it happens:
Whisk aggressively off heat; if lumpy, press through a sieve (still usable).
If it smells burnt, restart (burnt tangzhong = bitter loaf).
2) Cool the tangzhong (10–20 minutes)
What you’re doing: Letting tangzhong cool so it won’t overheat the dough.
Why it matters: Hot tangzhong can weaken gluten and mess with fermentation.
Timing range: 10–30 min depending on room temp.
Look for:
Warm-to-room temp, not steaming.
Common mistake:
Mixing it in piping hot.
If it happens:
Dough feels greasy/weak early. Chill the dough 15 min and continue mixing gently.
3) Mix the dough (5 minutes + 10 minute rest)
What you’re doing: Hydrating flour + starting gluten development.
Why it matters: A short rest makes mixing easier and improves strength.
Timing range: Always worth the 10 minutes.
In mixer bowl: add 425 g flour, 45 g sugar, 10 g salt (and milk powder if using).
Add 170 g milk, 50 g egg, 100 g starter, and cooled tangzhong.
Mix on low 1–2 minutes until no dry flour remains.
Rest 10 minutes.
Look for:
Shaggy dough that’s cohesive, no flour pockets.
Common mistake:
Adding extra flour too early because it feels sticky.
If it happens:
Wait. Enriched dough often firms up as gluten develops.
4) Develop gluten (8–14 minutes total)
What you’re doing: Building the dough’s strength so it can trap fermentation gases.
Why it matters: Weak gluten = dense loaf, even if it rises.
Timing range: 8–14 min depending on mixer + flour.
Mix on medium until dough becomes smoother and starts pulling from the bowl.
Gluten development checkpoint:
Stretch a small piece: it should form a thin membrane before tearing (windowpane-ish).
Look for:
Smooth, elastic dough; tacky but not soupy.
Common mistake:
Under-mixing → dough stays rough, tears easily.
If it happens:
Keep mixing in 2-minute bursts. Don’t “fix” with flour.
5) Add the butter (6–10 minutes)
What you’re doing: Incorporating butter gradually without breaking the dough.
Why it matters: Dumping butter in too early can make the dough greasy and slow gluten.
Timing range: 6–10 min depending on butter softness.
Add 60 g soft butter in 3 additions, mixing until fully absorbed each time.
Look for:
Dough becomes glossy and very elastic; butter disappears into it.
Common mistake:
Butter too cold → won’t incorporate; too melted → greasy dough.
If it happens:
Too cold: warm butter slightly and keep mixing.
Too melted/greasy: chill dough 15–20 min, then resume mixing until it tightens.
6) Bulk fermentation (3–8 hours)
What you’re doing: The first rise—building volume and flavor.
Why it matters: Bulk controls texture. Under = dense; over = weak structure.
Timing range:
Warm room (26–28°C): 3–5 hours
Moderate (22–24°C): 4–7 hours
Cool (19–21°C): 6–10+ hours
Fermentation checkpoint (mandatory):
Bulk ends when dough is ~60–80% bigger, smoother, and lightly domed. It may not “double” dramatically because it’s enriched.
Look for:
Dough looks puffed, jiggly, and aerated at edges.
Common mistake:
Waiting for a perfect “double” no matter what.
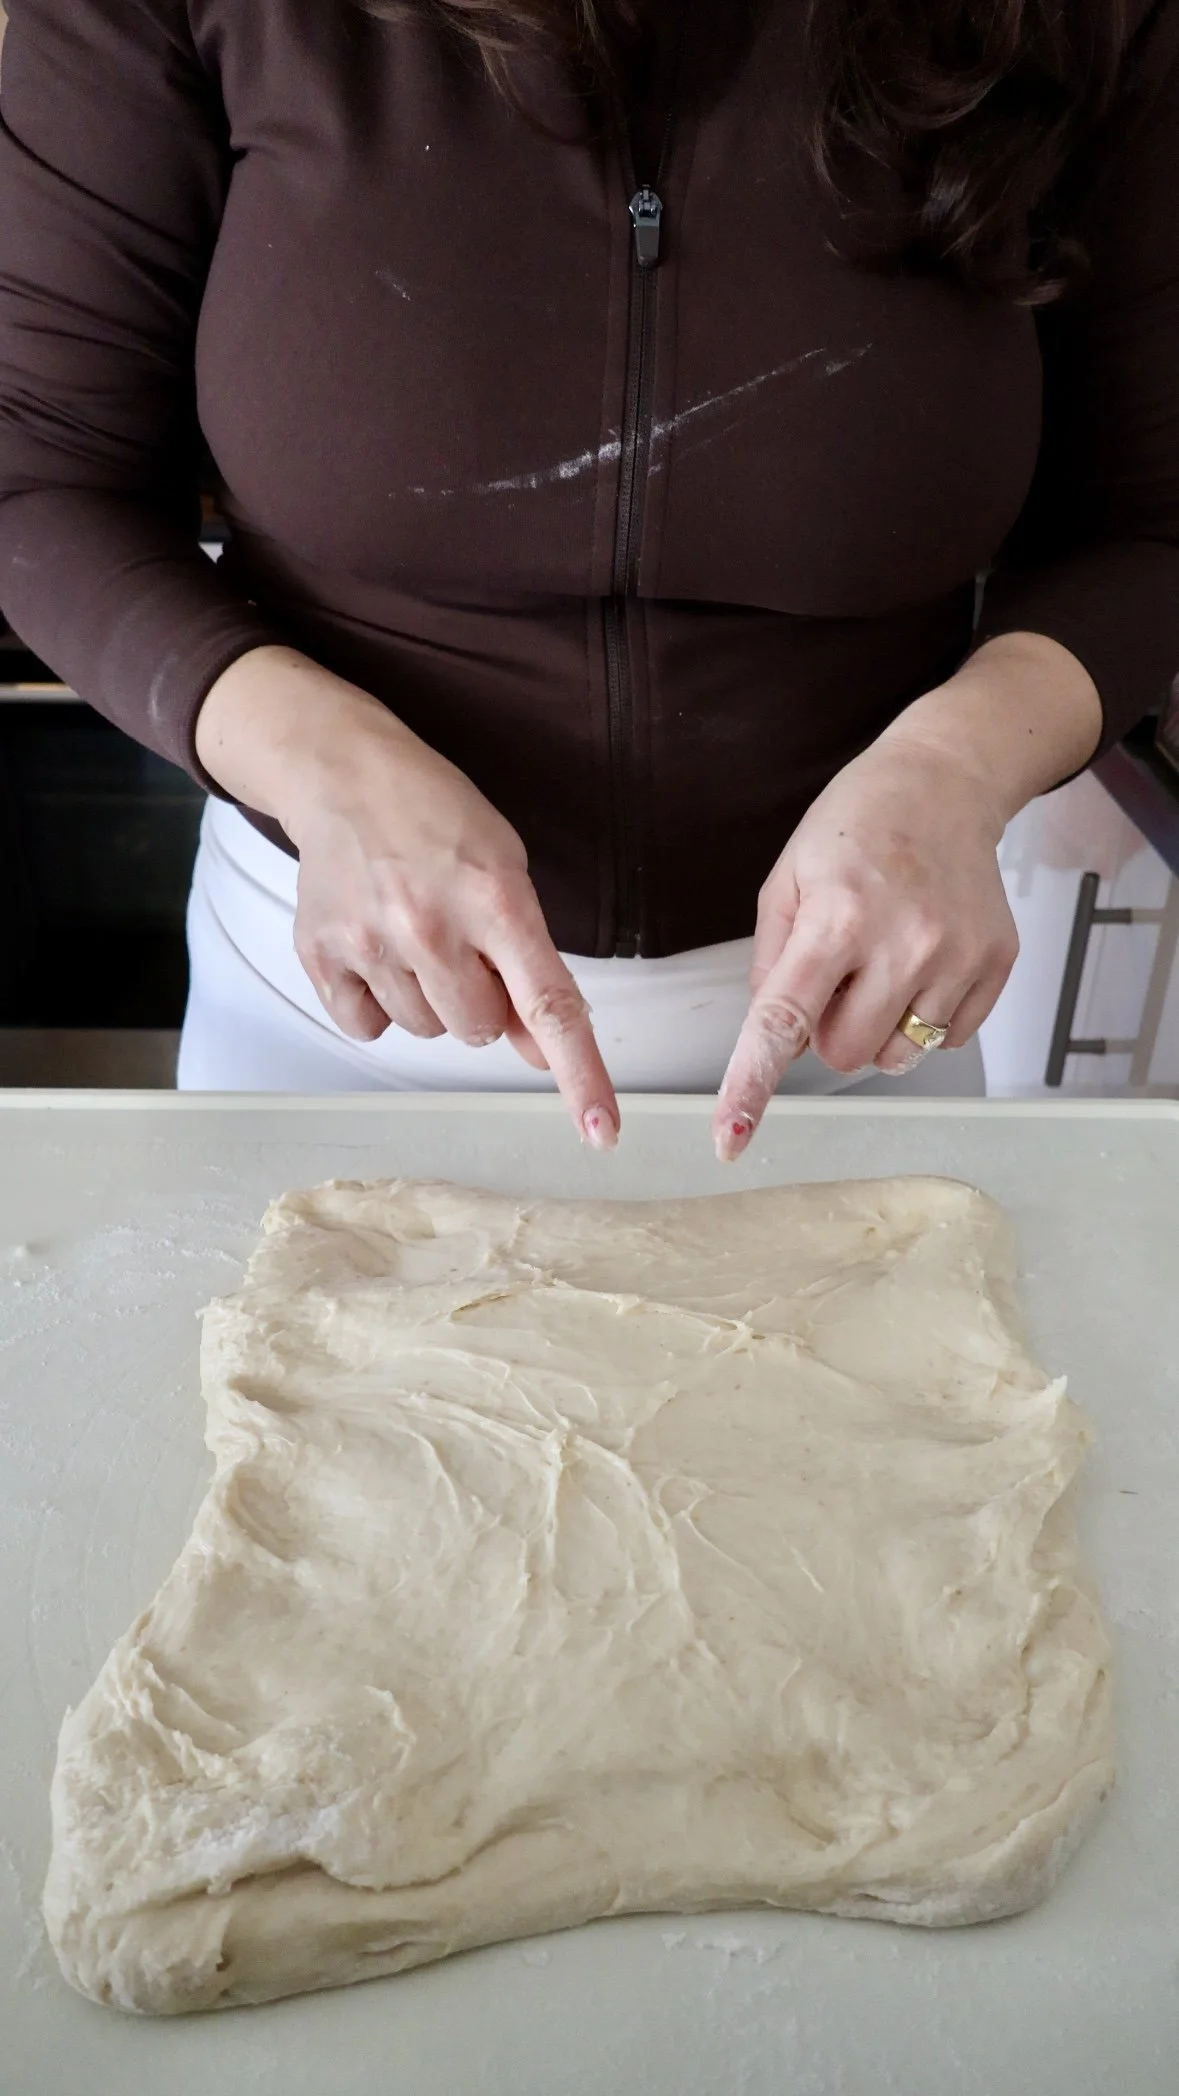
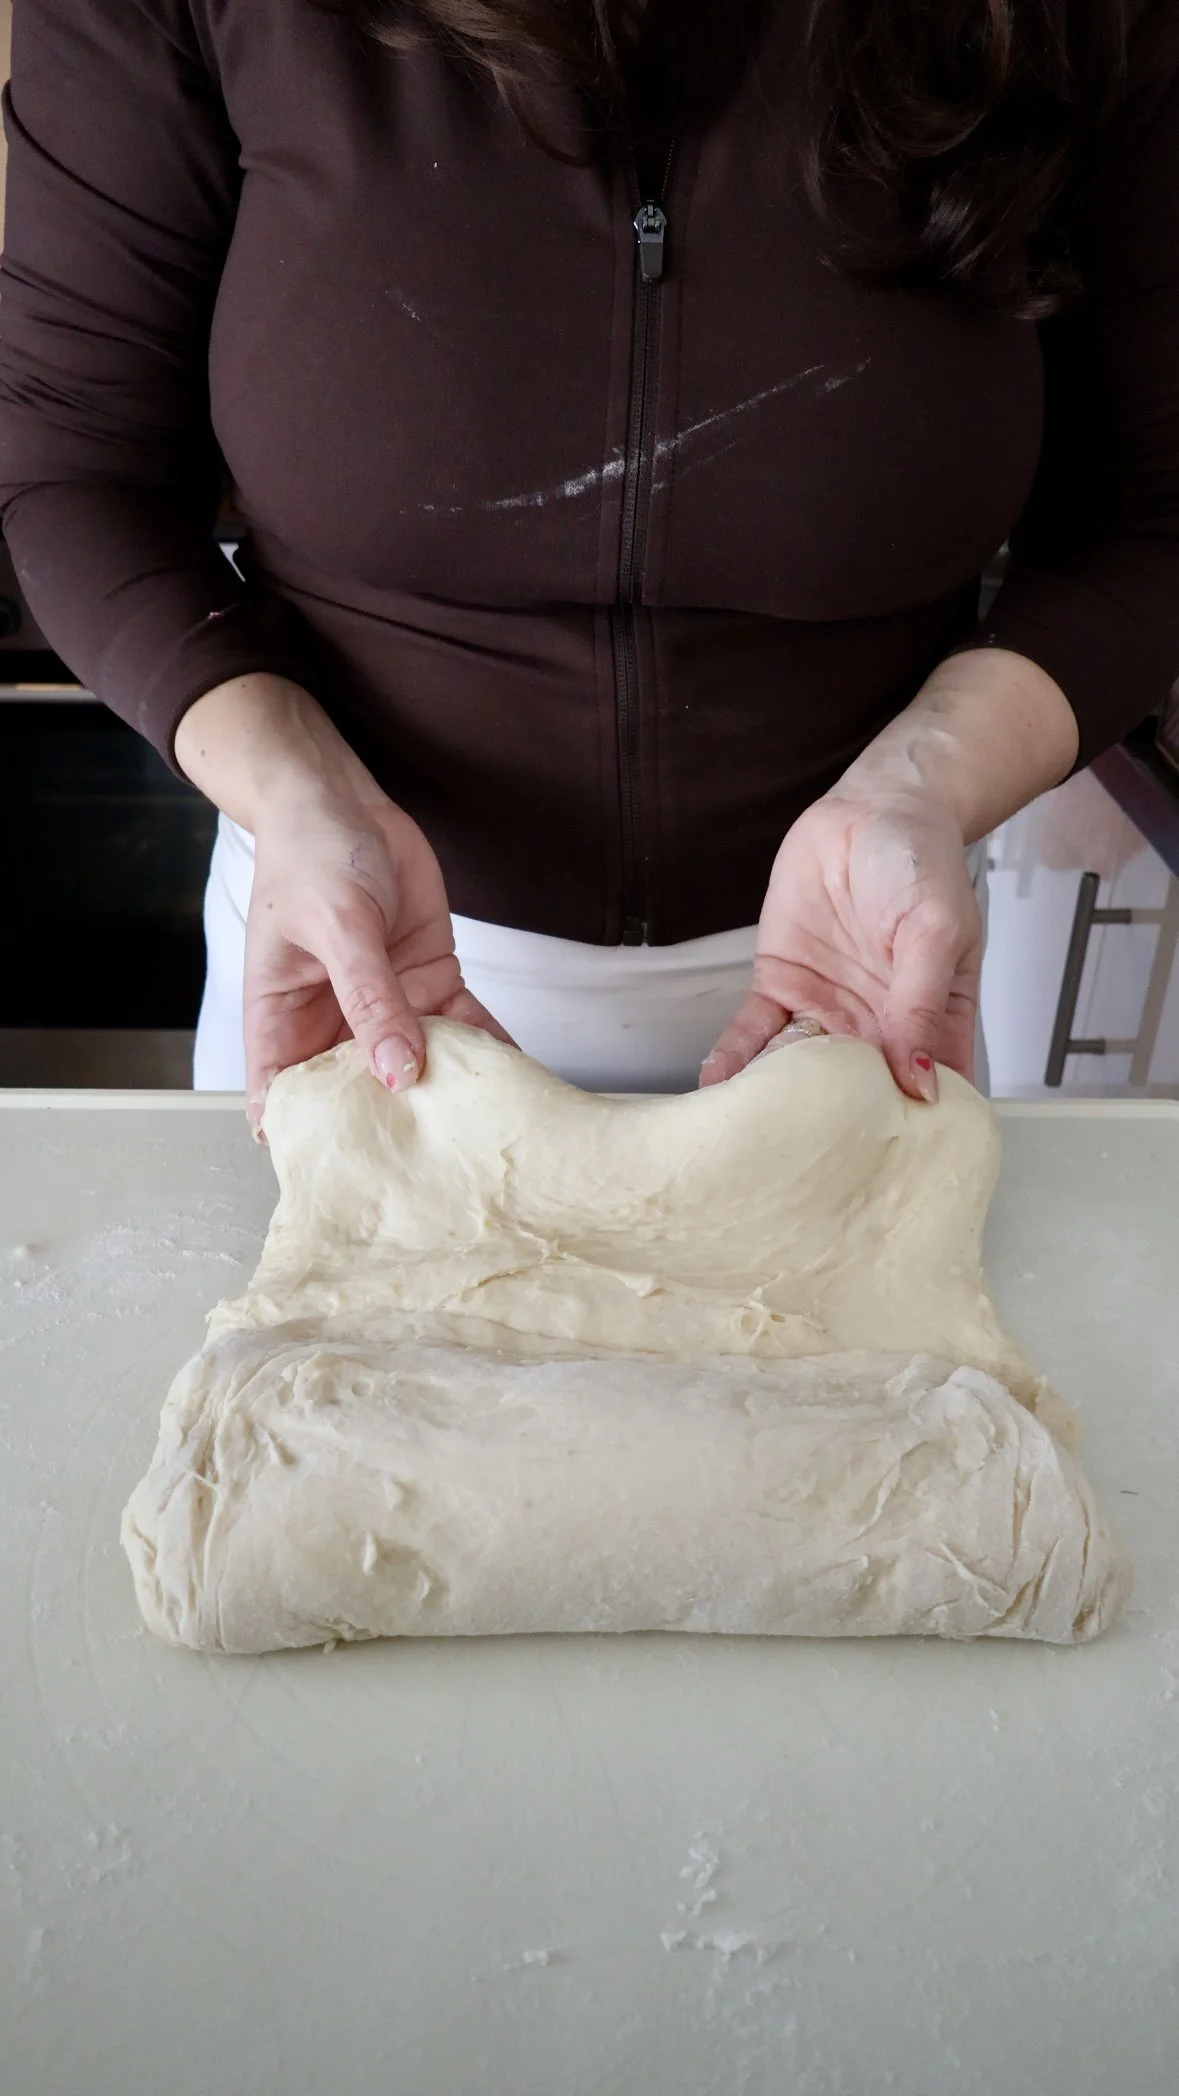
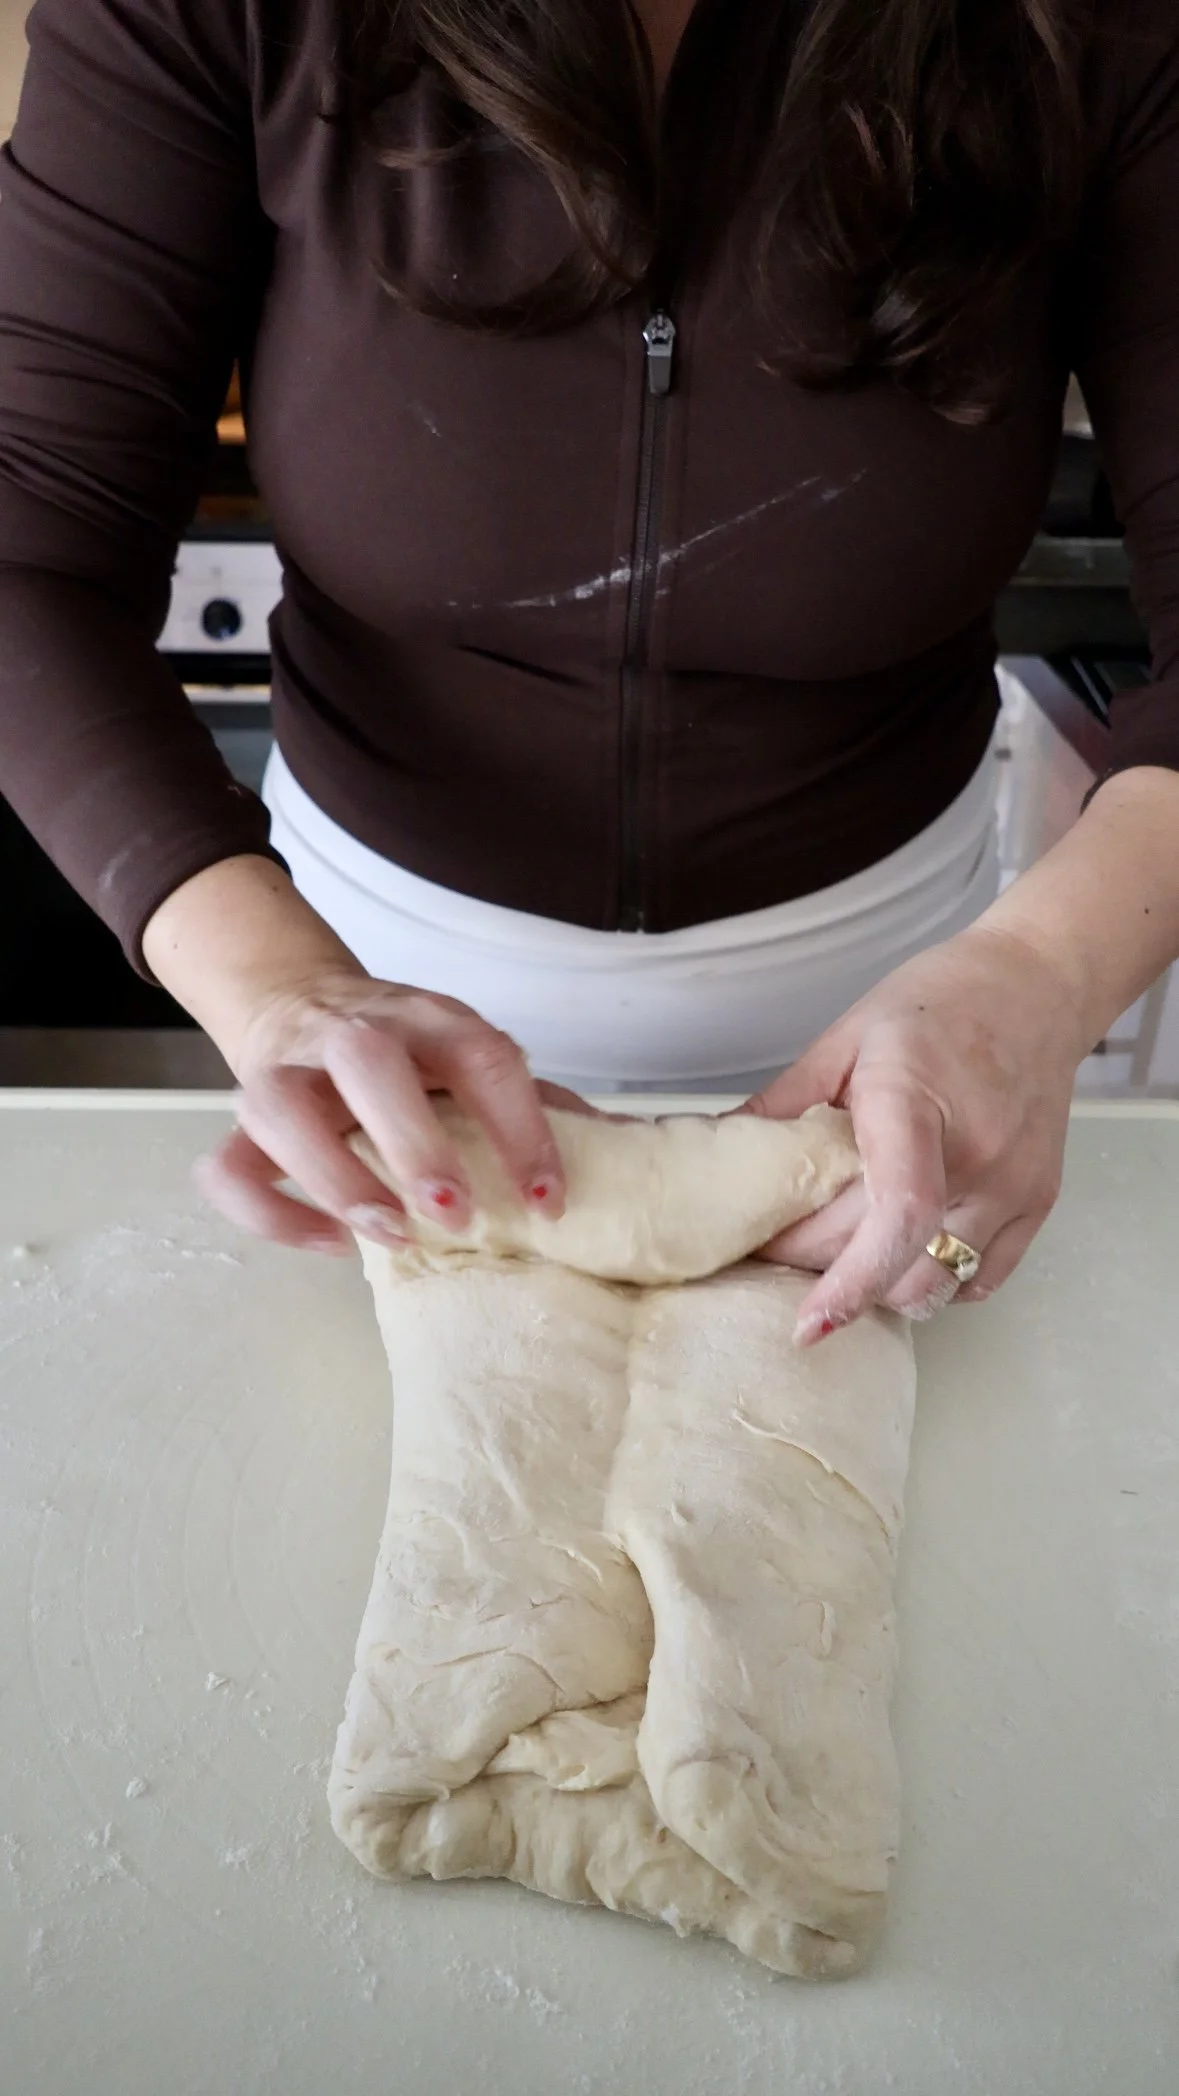
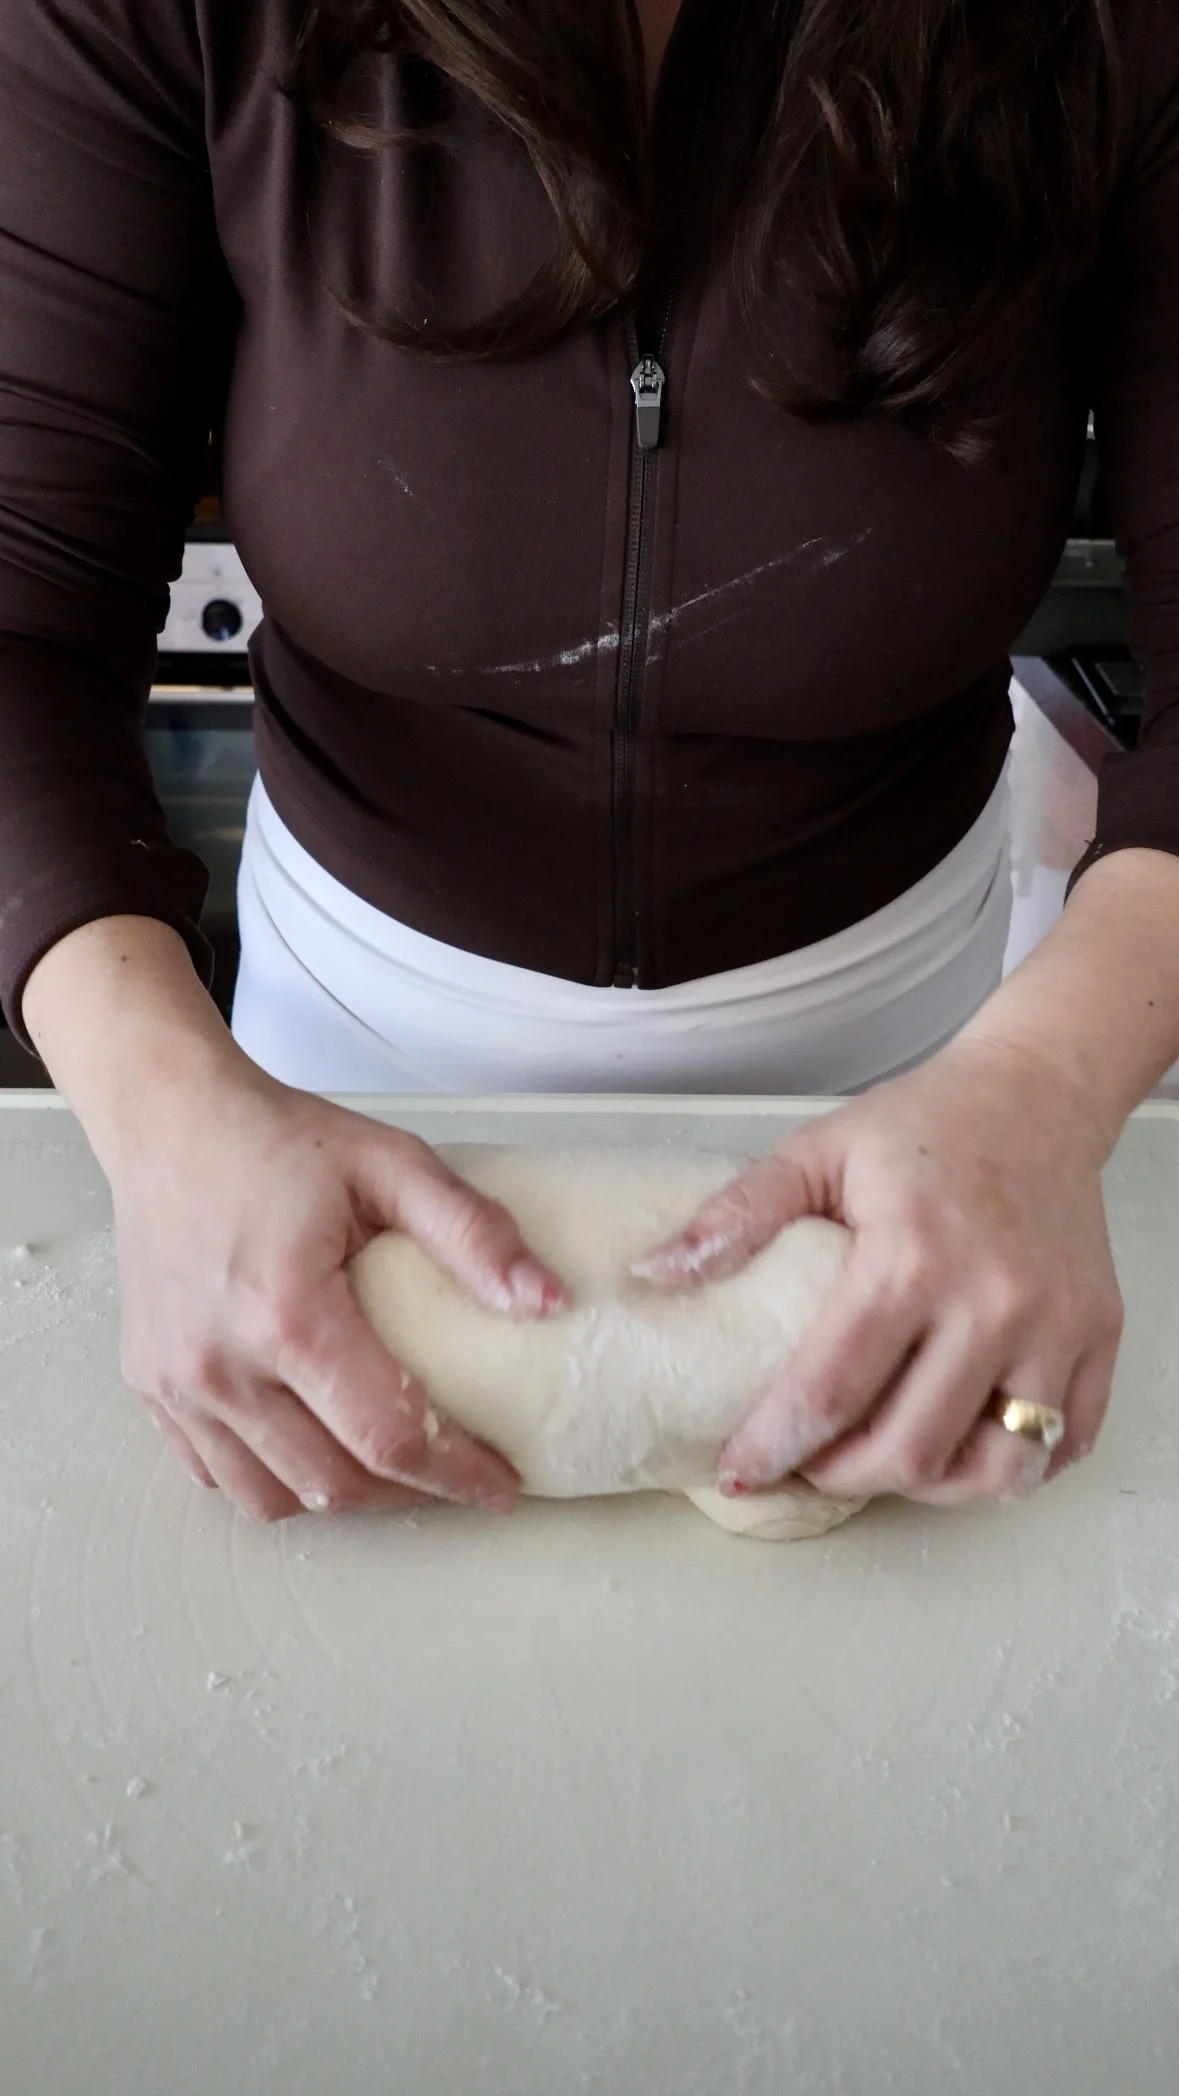
7) Shape the loaf (10–15 minutes)
What you’re doing: Creating surface tension so the loaf rises tall and evenly.
Why it matters: Shaping tension = structure (and that beautiful slice).
Timing range: 10–15 min.
Shaping checkpoint: You want a tight log with a clean seam.
Method (simple + reliable):
Lightly flour the counter. Turn dough out and gently press into a rough rectangle.
Envelope/lamination fold: fold the top third down, bottom third up (like a letter).
Rotate 90°. Press gently into a rectangle again (don’t deflate aggressively).
Roll tightly from the short side into a log, using your hands to create tension.
Pinch the seam closed. Place seam-side down in the buttered pan.
Look for:
A log that feels taut on the surface, not slack.
Common mistake:
Rolling loosely → big tunnels or flat loaf.
If it happens:
Unroll and re-roll tighter. It’s allowed.
8) Final proof
What you’re doing: The final rise in the pan.
Why it matters: This is where your crumb becomes cloud-like.
Timing range: depends heavily on temperature + starter strength.
Proofing checkpoint (poke test):
Press a floured fingertip gently into the dough.
Ready: dent springs back slowly and leaves a slight impression.
Not ready: springs back fast and completely.
Over-proofed: dent stays deep and dough looks fragile/wobbly.
Plan A (same-day): proof at room temp until ready (typically 2–5 hours).
Plan B (overnight): cover and refrigerate 8–14 hours, then bake cold or after 30–60 min at room temp if needed. This is only if you didn’t cold proof during bulk fermentation.
Look for:
Pullman: dough is 1–2 cm below rim before baking with lid.
Classic loaf pan: domed top, visibly puffy.
Common mistake:
Under-proofing because you’re scared it’s “too much.”
If it happens:
Your loaf will burst/split and be dense. Let it proof longer next time.
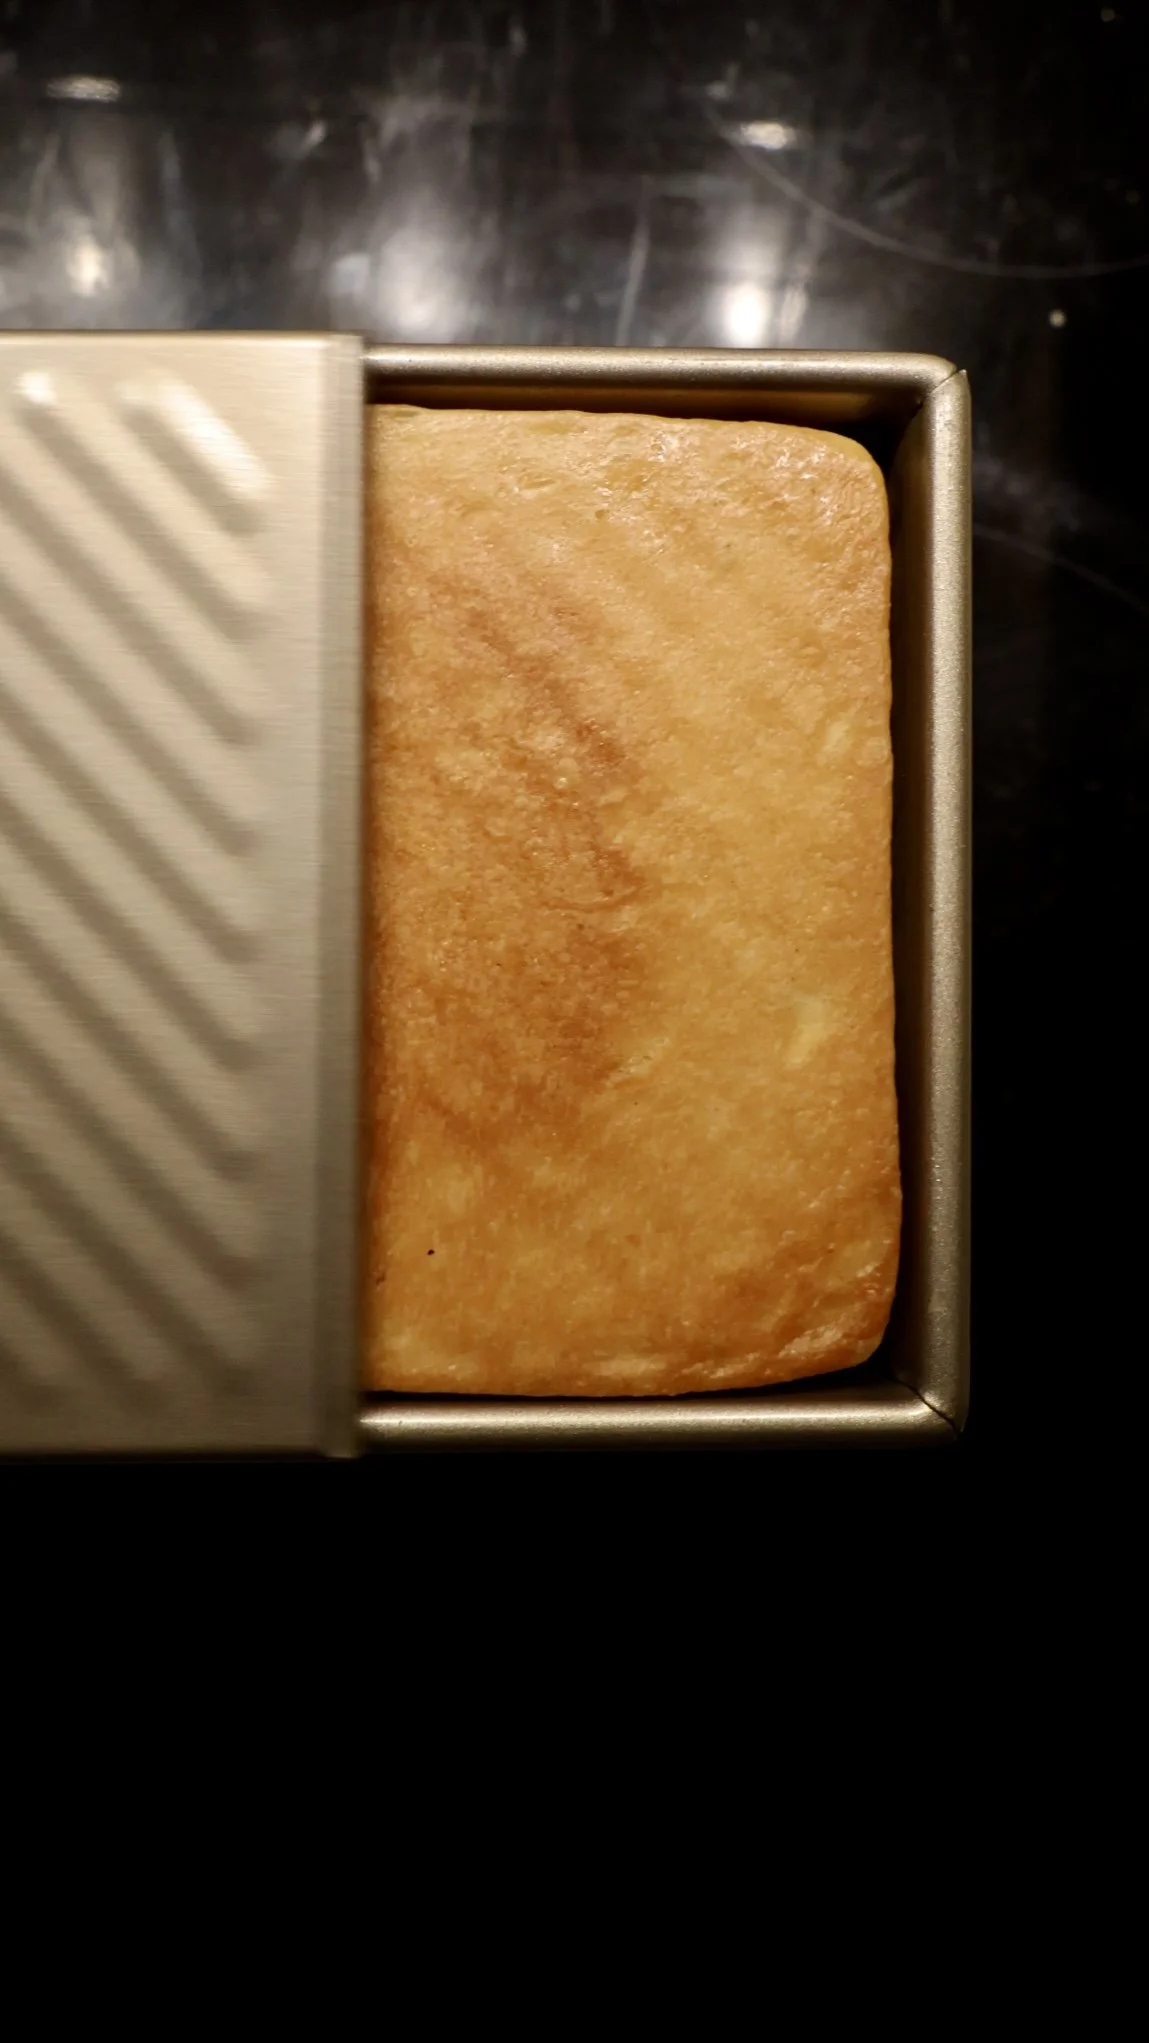
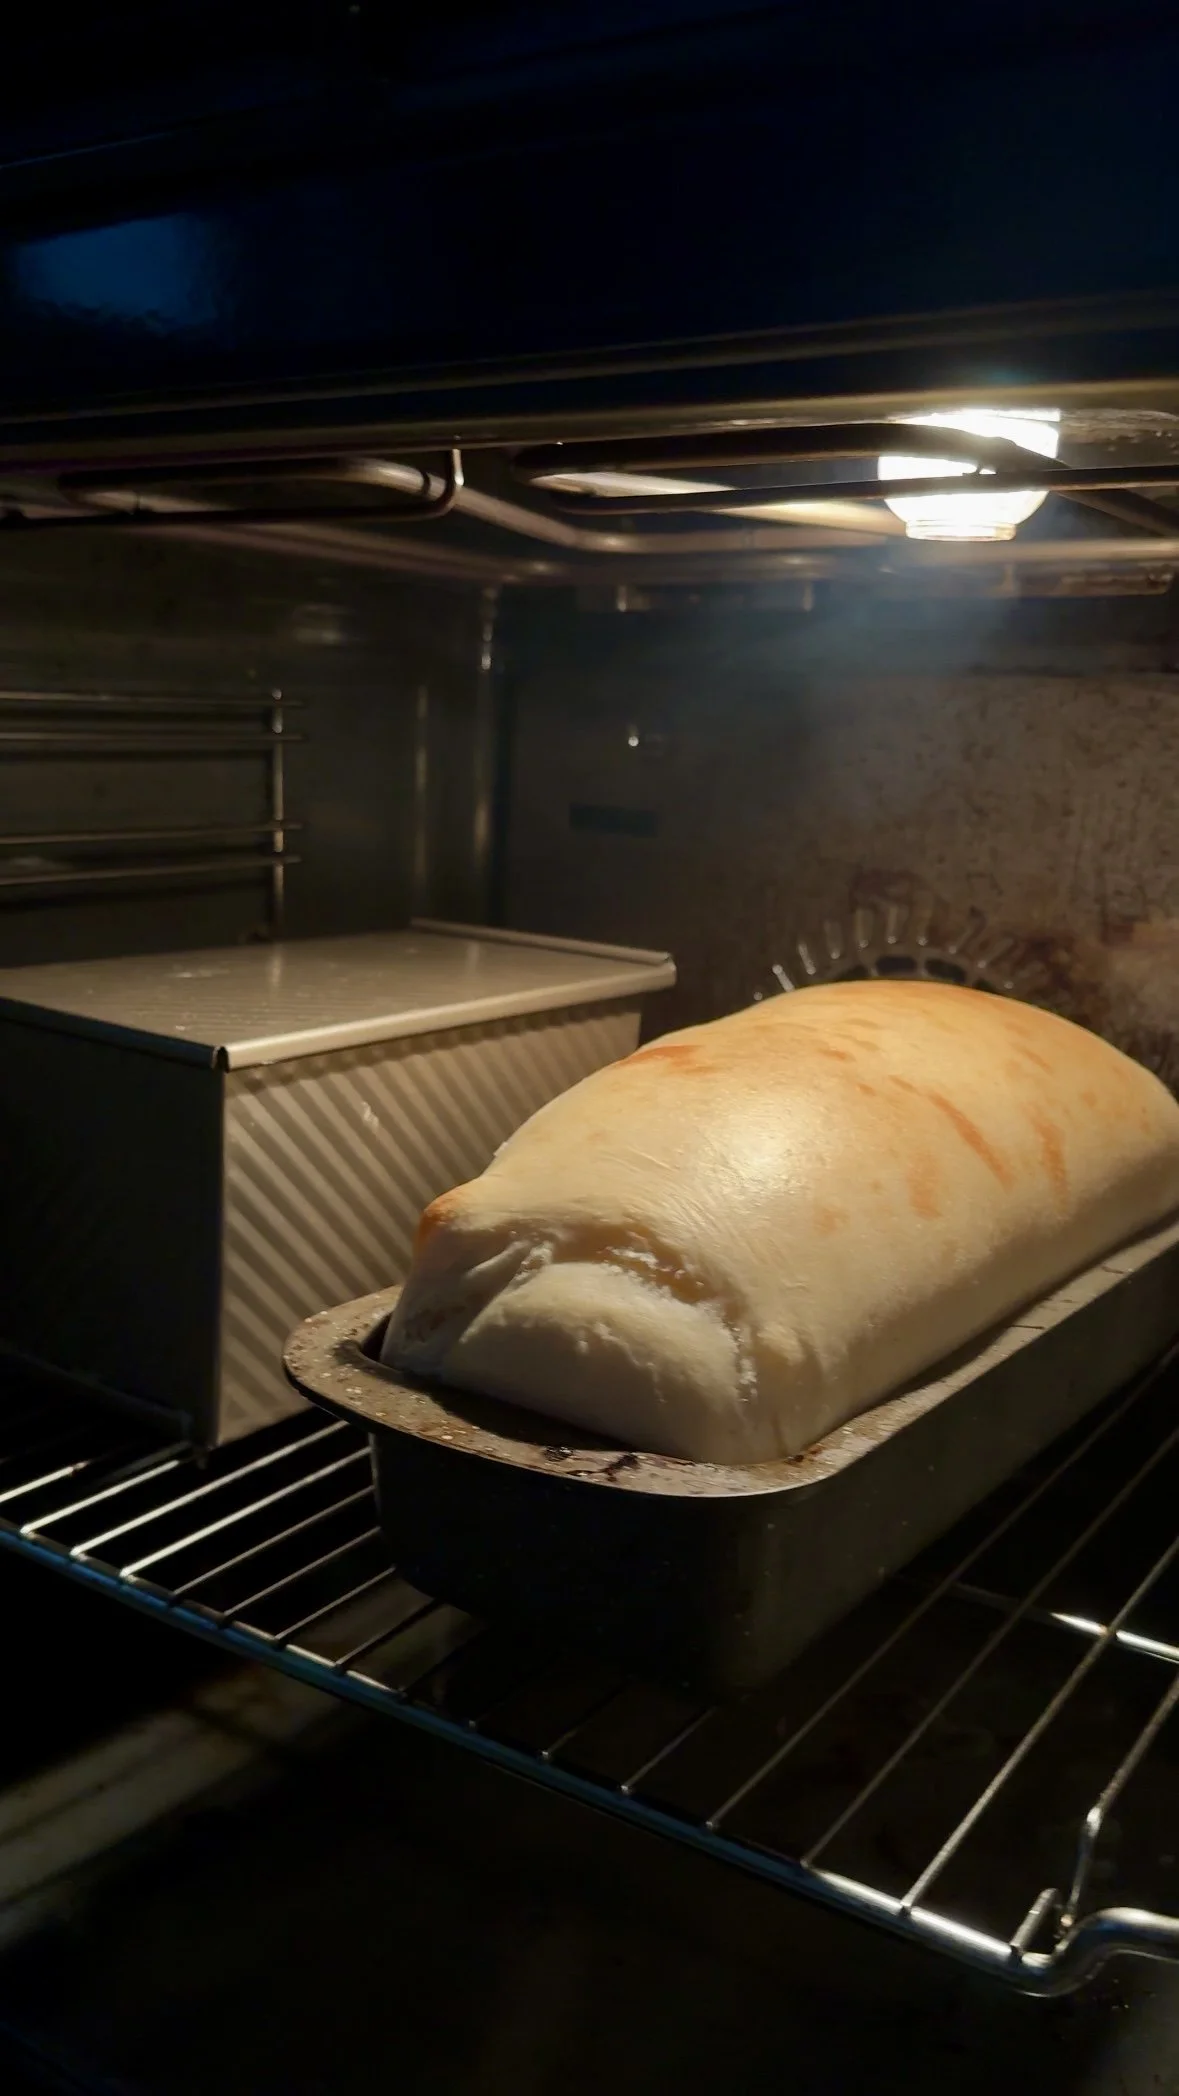
9) Bake (Pullman vs classic loaf pan)
What you’re doing: Setting structure and finishing the crumb.
Why it matters: Underbaked enriched bread feels gummy and collapses.
Oven placement: lower-middle rack for steady bottom heat.
Important: Do not add steam. This bread wants a soft crust, not a crackly one.
Option A: Pullman pan with lid
Bake at 180°C for 30–35 min (lower-middle rack)
Look for:
Even bake, firm loaf, lightly golden edges.
Common mistake:
Leaving it closed after baking → trapped steam = wrinkly/damp crust.
If it happens:
Next step fixes it: open lid soon after baking.
Option B: Classic loaf pan (no lid)
Bake at 175°C for 35–40 min (lower-middle rack)
If top browns early, tent with foil for last 10–15 min.
Look for:
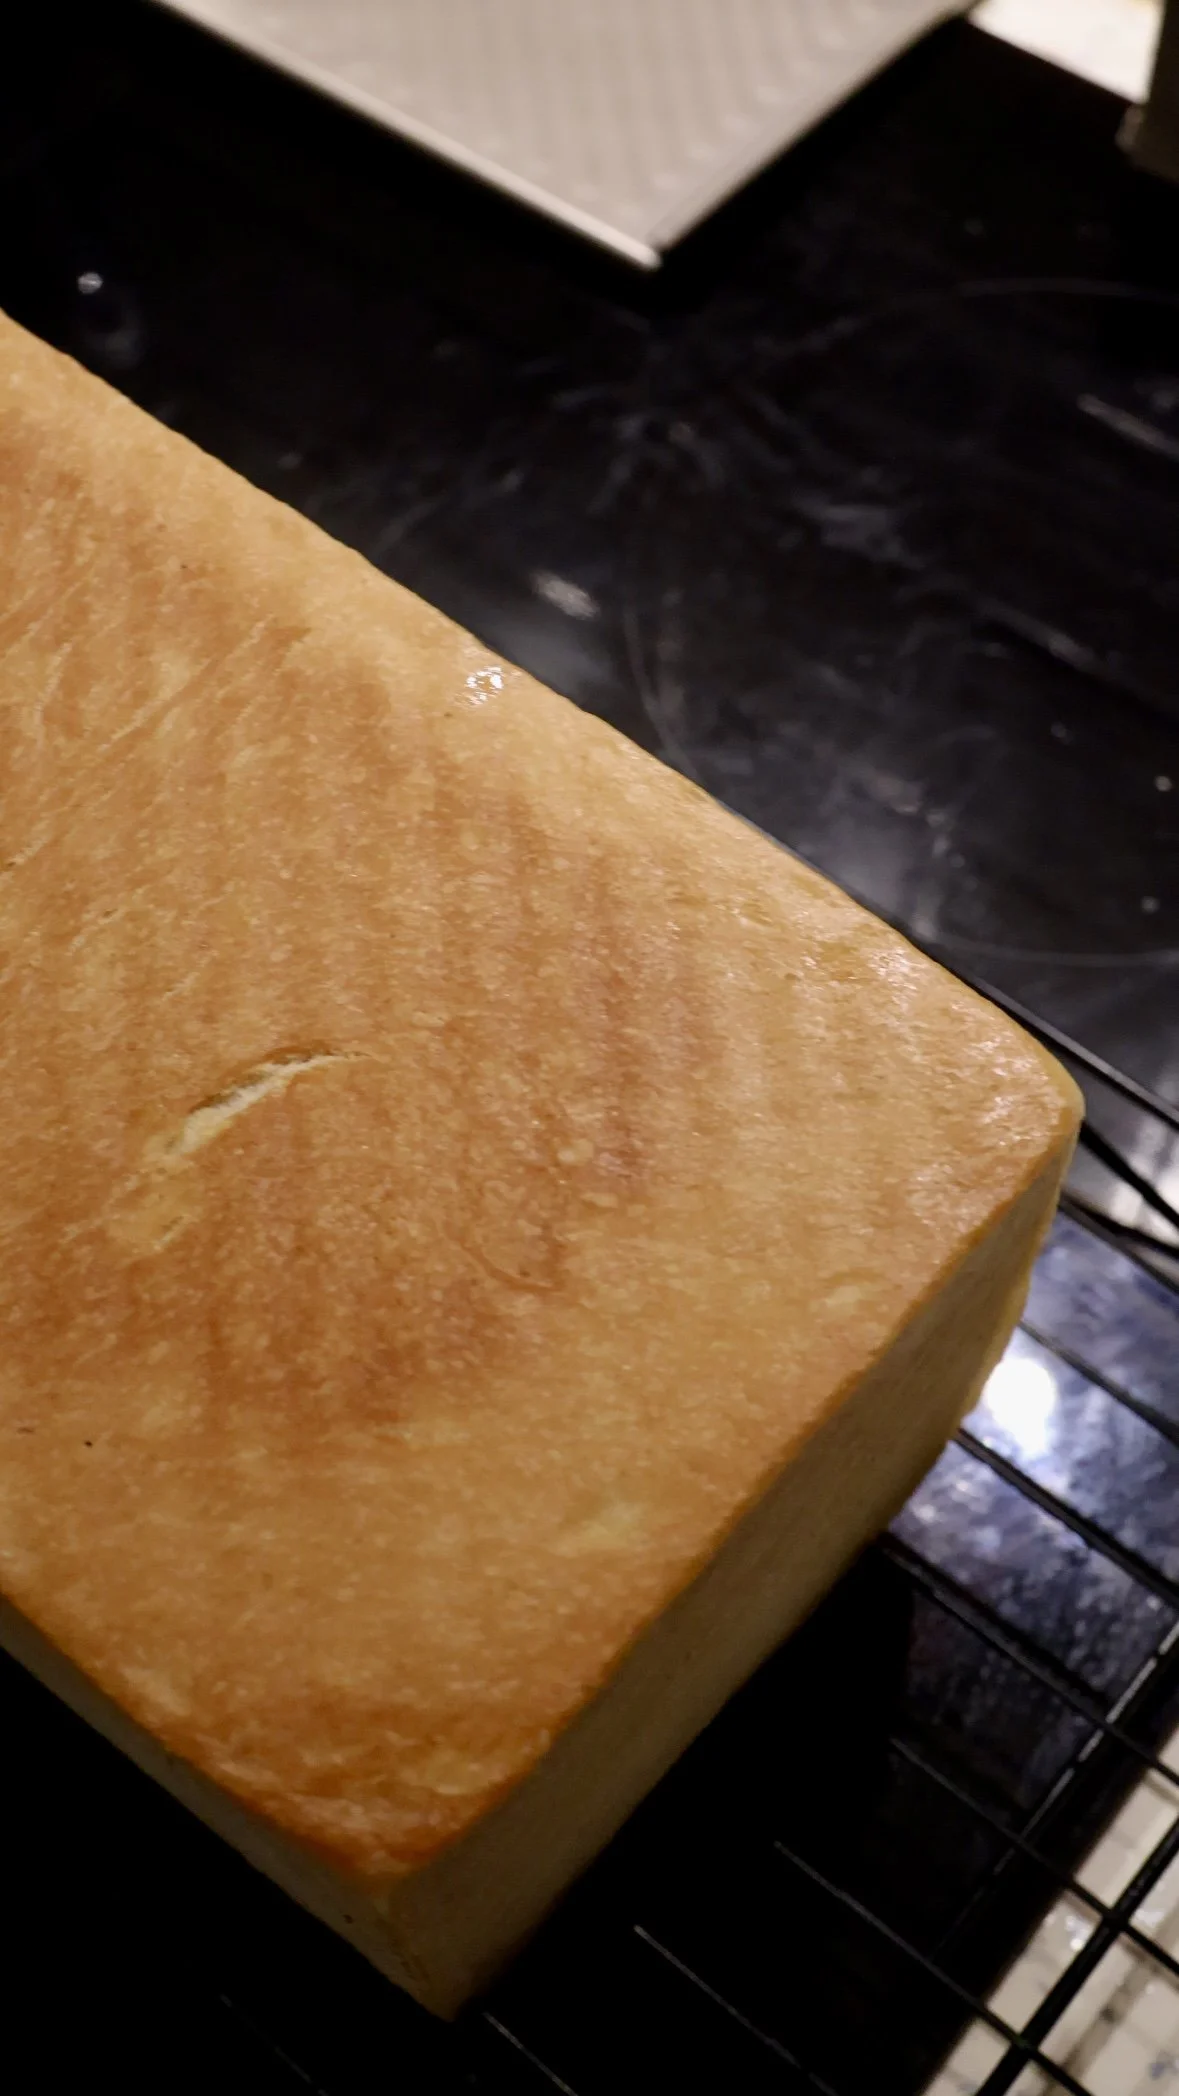
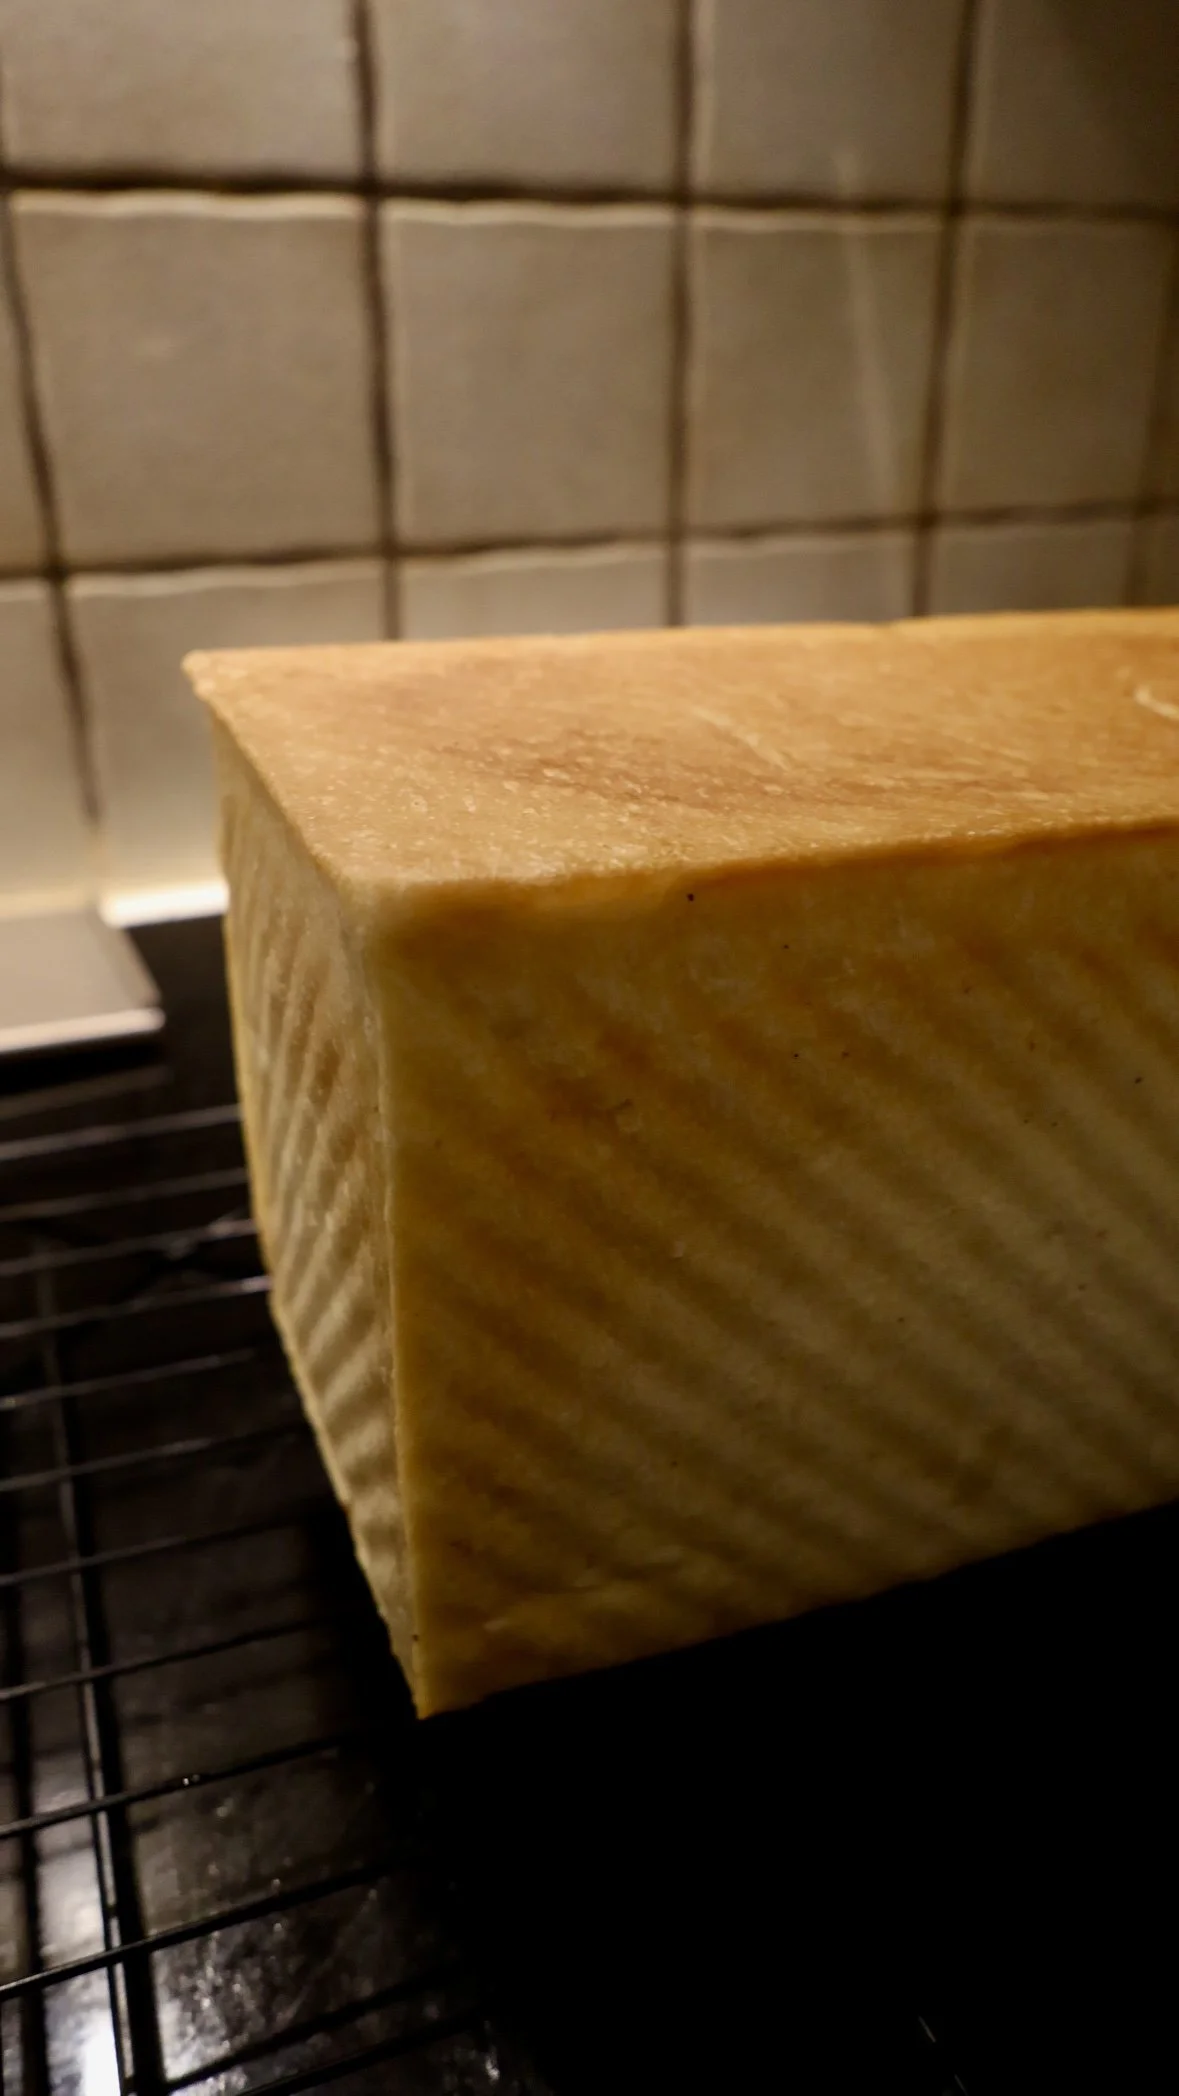
Deep golden top, stable loaf, no wet line at the base.
Bake cue (best confidence booster):
Internal temp 93–96°C in the center.
10) Cooling (2 hours — yes, really)
What you’re doing: Letting the crumb finish setting.
Why it matters: Cutting early compresses the crumb and makes it seem “gummy.”
Timing range: 90–120 min.
Pullman lid note:
When it comes out: wait 2–3 minutes, then slide lid off to release steam.
Rest in pan 5–10 minutes, then turn out onto rack.
Look for:
Loaf feels lighter as it cools; crust stays soft.
Common mistake:
Slicing warm because it smells too good.
If it happens:
Slice anyway, accept your fate, and call it “chef’s treat.” (But cool the rest before slicing.)
Tips & Troubleshooting
-
Under-fermented bulk or under-mixed gluten → Let bulk go longer next time / mix to elasticity → Watch rise + dough feel, not the clock.
-
Under-proofed final rise → Proof longer until poke test passes → Don’t rush final proof.
-
Underdeveloped gluten or too warm → Chill 20 min, then shape with light flour → Mix longer; keep butter cool-soft.
-
Loose shaping / trapped air pockets → Degas gently and roll tighter → Create tension; pinch seams.
-
Proof went too long/warm → Bake immediately; next time shorten proof or use fridge proof → Use poke test + cooler proof spot.Overproofed → Bake immediately; don’t wait → Shorten final proof next time
QUick Saves
Dough feels greasy/slack after butter: Chill 15–20 min, then mix 2–3 min more to tighten. Prevent: butter soft, not melted.
Proof is crawling and you need it faster: Move pan to a warmer spot (oven OFF with light on). Prevent: starter at peak, warmer dough temp.
Top browning too fast (classic pan): Tent with foil. Prevent: lower rack + correct temp.
Loaf seems done but center gummy: Bake 5–10 min longer and confirm internal temp. Prevent: thermometer.
Loaf collapses slightly after baking: Usually underbaked or overproofed—return to oven if still warm and bake 8–10 min more. Prevent: proof to poke test + bake to temp.
Don’t panic, this is normal
Enriched sourdough can rise slower than yeast doughs. That’s expected.
Bulk will not fully double—60–80% rise is often the sweet spot.
Dough will feel slightly tacky even when perfect. Don’t fight it.
Substitutions & Variations
Flour: Bread flour is best. If using all-purpose, expect slightly less height; mix a bit longer for strength.
Milk: Whole milk gives best softness. 2% works.
Sugar: Can reduce to 35 g for less sweetness (crumb slightly less tender).
Milk powder: Optional, but adds tenderness and color—great if you want “bakery slice.”
Flavor add-ins: lemon zest (½ tsp) for brightness, or vanilla (½ tsp) if serving sweet.
Sesame crust: brush top with milk and sprinkle sesame before baking (classic pan only).
Commercial yeast option (if you ever need speed): Replace starter with 50 g flour + 50 g milk and add 6 g instant yeast. Bulk becomes ~60–90 min; proof ~45–75 min. (Different flavor, very reliable timeline.)
Mini loaves: Divide dough into 2 smaller pans; reduce bake time to ~25–30 min, still bake to temp.
Bun variation: Divide into 8–10 buns; bake 18–22 min at 180°C.
Storage
Fridge
Not ideal for bread (it stales faster). If you must, wrap airtight and bring to room temp before serving.
Freezer (best option)
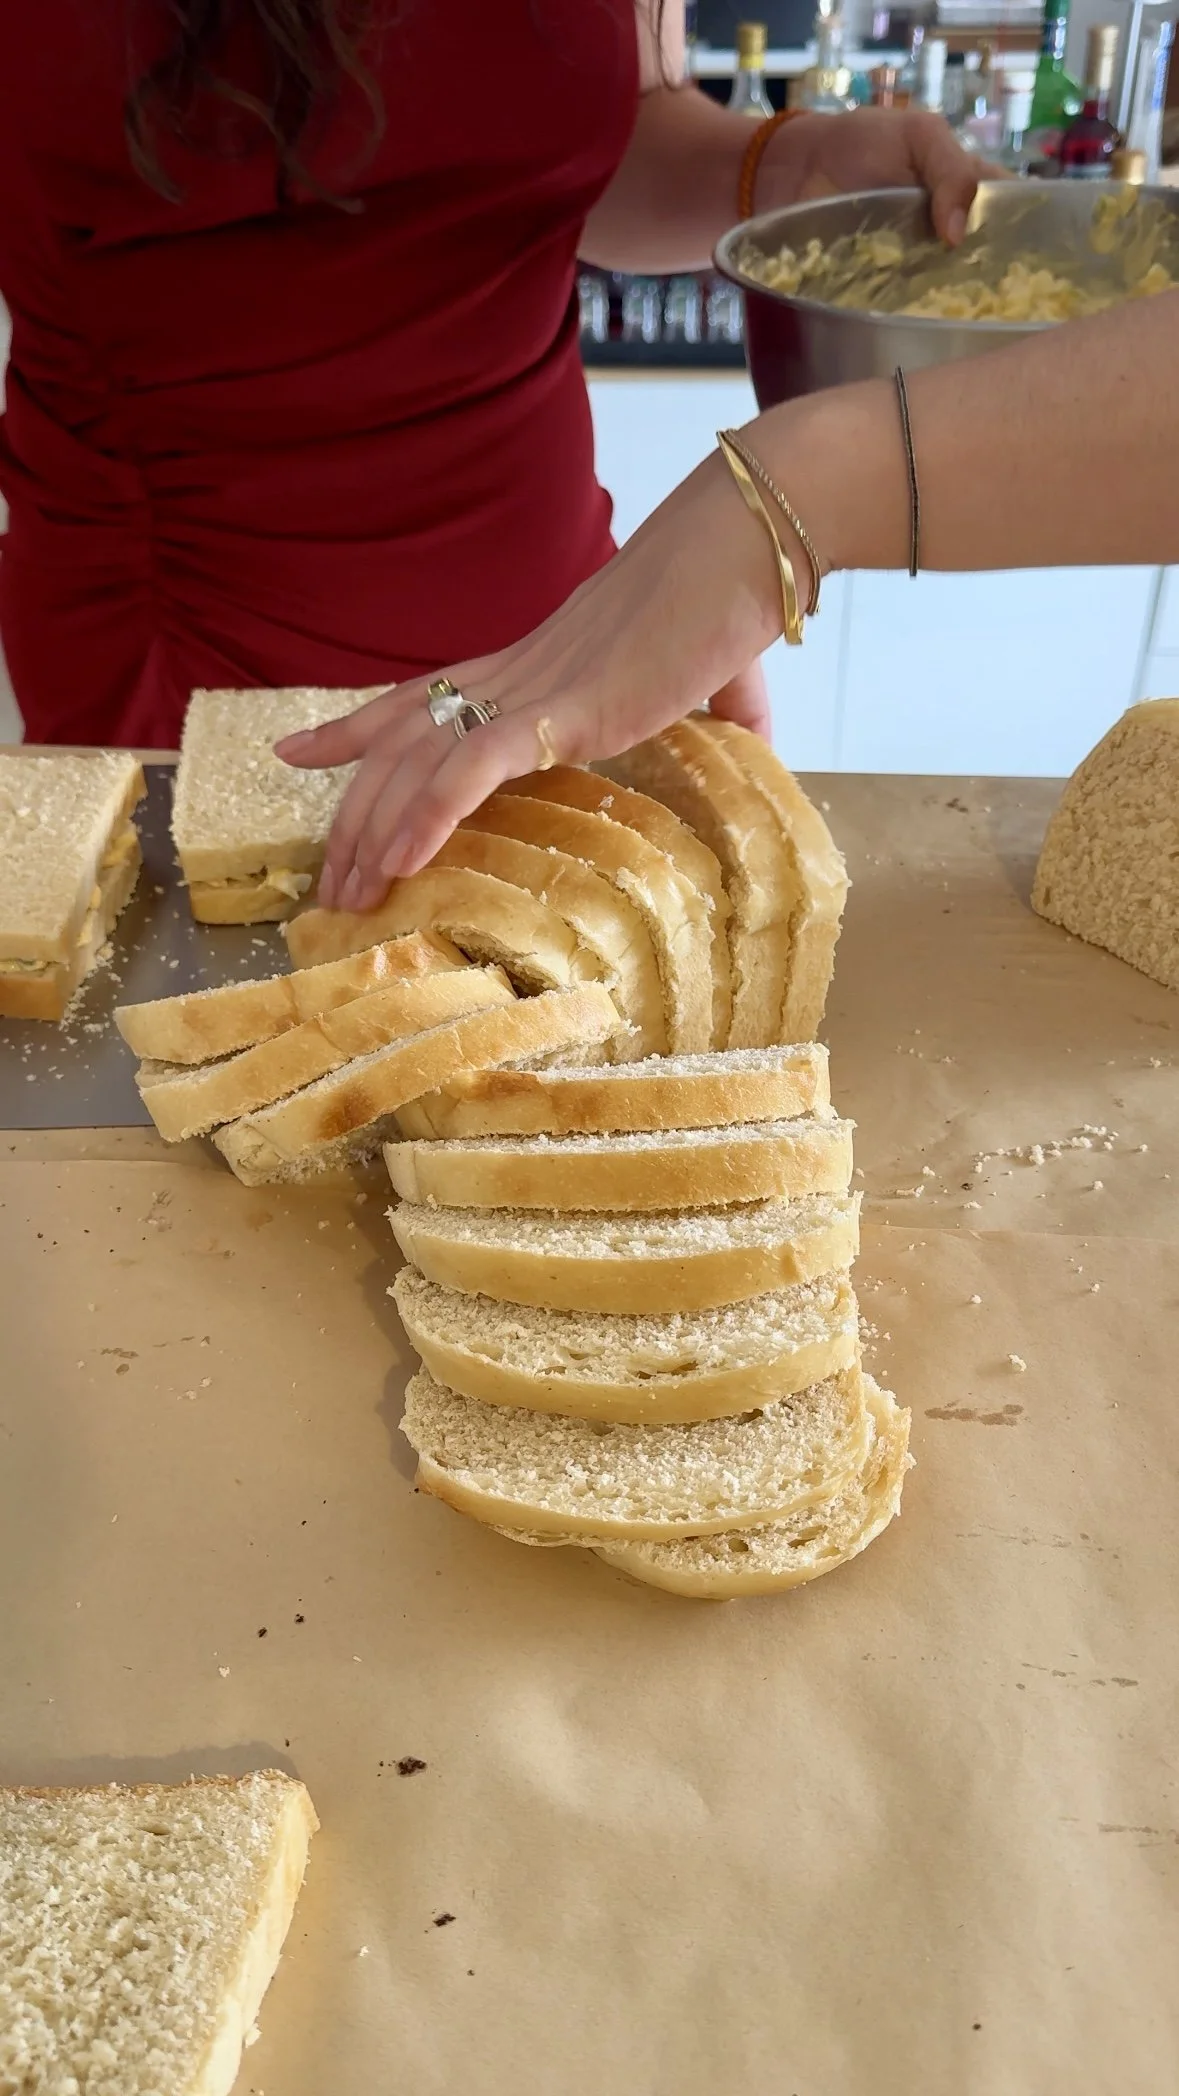
Slice the loaf once fully cooled.
Freeze slices with parchment between in a freezer bag.
Best within: 2 months.
Reheat (keep it pillowy)
Toaster: low setting, just until warm.
Oven: 160°C for 6–10 minutes (wrap in foil for extra softness).
Microwave (emergency): 10–15 seconds per slice, then rest 1 minute (can soften too much—use sparingly).
Hosting Notes
T-24h (the calm, chic plan):
Mix and bulk ferment in the evening.
Shape and place in pan.
Cover well and fridge proof overnight.
Day-of (morning):
Bake straight from fridge (or let sit 30–60 min if your kitchen is very cold).
Cool fully. Slice cleanly.
T-2h:
Slice and set up your sandwich station (or prep butter/jam board).
T-1h:
Assemble sandwiches if serving savory (egg salad, fried chicken, etc.).
T-30m:
Platter strategy: stack halves slightly tilted, “show the crumb,” add a garnish bowl (chives, sesame, flaky salt).
Keep covered lightly so slices don’t dry out.
Batching notes:
If making multiple loaves, bake one Pullman + one classic pan at a time if your oven heats unevenly.
Slice only what you’ll serve first—keep the rest wrapped.
Estimated Nutrition (per serving)
Per slice (1/12 of loaf): approximately
Calories: ~190–220
Protein: ~6–7 g
Carbs: ~28–32 g
Fat: ~6–8 g
Assumptions: 1 loaf yields 12 slices; whole milk; 60 g butter; 1 egg; starter contributes flour/water but not extra fat/sugar. Values are estimates.
AKS RECIPE CARD
Sourdough Tangzhong Milk Bread
100% sourdough, brioche’s Japanese cousin: ultra-pillowy, lightly sweet, and made for elevated sandwiches.
Ingredients
Tangzhong (stay-soft base)
- Bread flour: 25 g
- Milk (whole preferred): 125 g
Dough
- Bread flour: 425 g
- Sugar: 45 g
- Fine sea salt: 10 g
- Milk: 170 g (cool/room temp)
- Egg: 50 g (1 large, beaten)
- Active sourdough starter (100% hydration): 100 g (at/near peak, bubbly & domed)
- Unsalted butter: 60 g (soft but cool, not melted)
Optional
- Milk powder: 15 g (extra tenderness + color)
Method
- Tangzhong: Whisk 25 g flour + 125 g milk; cook on medium-low 3–6 min until pudding-thick and glossy with trails. Cool to room temp.
- Mix: In bowl, combine flour, sugar, salt (and milk powder if using). Add milk, egg, starter, and cooled tangzhong; mix 1–2 min until no dry flour. Rest 10 min.
- Develop gluten: Mix on medium 8–14 min until smoother and elastic; dough should stretch thin before tearing (windowpane-ish).
- Add butter: Mix in soft butter in 3 additions (6–10 min total) until fully absorbed; dough turns glossy and very elastic.
- Bulk ferment: Cover and rise until ~60–80% bigger, domed, and jiggly (about 3–10+ hrs depending on temp/starter).
- Shape: Press into a rectangle; envelope fold (top third down, bottom third up). Rotate 90°, press gently, then roll tight into a log. Pinch seam; place seam-side down in buttered pan.
- Final proof: Proof until puffy and poke test passes (dent springs back slowly). Pullman: dough 1–2 cm below rim; classic pan: nicely domed (2–6 hrs).
- Bake (no steam): Lower-middle rack. Pullman w/ lid: 180°C 30–35 min. Classic pan: 175°C 35–40 min (foil tent if browning). Bake to 93–96°C internal.
- Cool: Pullman: wait 2–3 min, slide lid off; rest 5–10 min in pan, then rack. Cool 90–120 min before slicing.
Quick Troubleshooting
- Dense loaf: Extend bulk (aim 60–80% rise) and/or mix longer for elasticity; don’t add extra flour early.
- Loaf splits/bursts: Under-proofed—proof longer until poke test springs back slowly with a slight dent.
- Wrinkly/damp crust (Pullman): Lid stayed on—remove lid 2–3 min after baking to vent steam.
- Gummy center: Underbaked—bake longer and confirm 93–96°C internal; cool fully before slicing.
- Greasy/slack dough: Butter too warm—chill dough 15–20 min, then mix briefly to tighten.
Storage
- Fridge: Not ideal (stales faster). If needed, wrap airtight 1–2 days.
- Freezer: Slice, parchment between; freeze up to 2 months. Thaw at room temp.
- Reheat: Low toaster or 160°C oven 6–10 min; wrap in foil for extra softness.
Estimated nutrition (per serving): ~190–220 kcal • P 6–7 g • C 28–32 g • F 6–8 g (assumes 12 slices/loaf; whole milk, 1 egg, 60 g butter)