Peanut Butter & Jam Sourdough Rolls (with Tangzhong) - Soft, Fluffy, Bakery-Style Swirls
“Here’s the School-Lunchbox PB&J Upgrade we all needed”
this is the adult pb& treat you didnt know you needed.
Everyone knows what a cinnamon roll is, and I’m pretty sure everyone knows what a PB&J sandwich is. The question is - do you know what a PB&J Roll is? It’s the perfect adult sweet & savory treat
Why You’ll Love This Recipe
Soft for longer: tangzhong keeps these rolls pillowy even the next day
Sourdough depth: not “sour,” just more complex, more bakery, more real
Make-ahead friendly: perfect for brunch hosting (fresh-baked, minimal morning chaos)
Beginner-coachable: visual cues + checkpoints so you’re not baking on vibes alone
Freezer-friendly: bake now, rewarm later, still dreamy
That sweet-salty balance: peanut butter + a touch of salt + bright jam = addictive
The Flavor Logic
This recipe is basically a tiny masterclass in balance:
Fat (peanut butter + butter + milk) gives richness and that “bakery” mouthfeel.
Sweet (sugar in the dough + jam) makes it dessert-worthy.
Salt is the secret—tiny amount, huge effect. It sharpens the peanut butter and stops everything tasting “flat.”
Acid (from the jam, and optional lemon zest in the dough) keeps the fruit tasting bright and stops the filling from feeling heavy.

Timeline - at a glance
PB&J Sourdough Rolls — Timeline Cheat Sheet
Yield: ~12 rolls
Active time: 35–55 minutes (hands-on)
Rest / ferment time: 6–12 hours total (varies by room temp + starter strength)
Bake time: 22–28 minutes
Total time: Same-day: ~8–12 hours | Overnight: ~12–18 hours (mostly hands-off)
Make-ahead friendly? Yes — shape + chill, bake in the morning
Best served: warm (but still soft next day thanks to tangzhong)
Schedule options:
Plan A (Same-day):
Mix 9:00 → Bulk 9:30–15:00 → Shape 15:15 → Proof 15:30–17:30 → Bake 17:30Plan B (Overnight):
Mix 19:00 → Bulk 19:30–23:30 → Shape 23:30 → Fridge overnight → Proof + Bake next morning
Key checkpoints:
Bulk ends at ~60–80% rise (puffy + relaxed, not necessarily doubled)
Final proof passes the poke test (slow spring-back)
Bake to deep golden + center set (internal temp ~93°C if using a thermometer)
Optional AKS Upgrades
Raspberry “dust” moment: crush freeze-dried raspberries and sprinkle on top for color + tang (no sogginess).
Peanut butter satin drizzle: thin peanut butter with a little warm milk + powdered sugar for a bakery finish.
Crunchy topper: toasted peanuts or pistachios for texture.
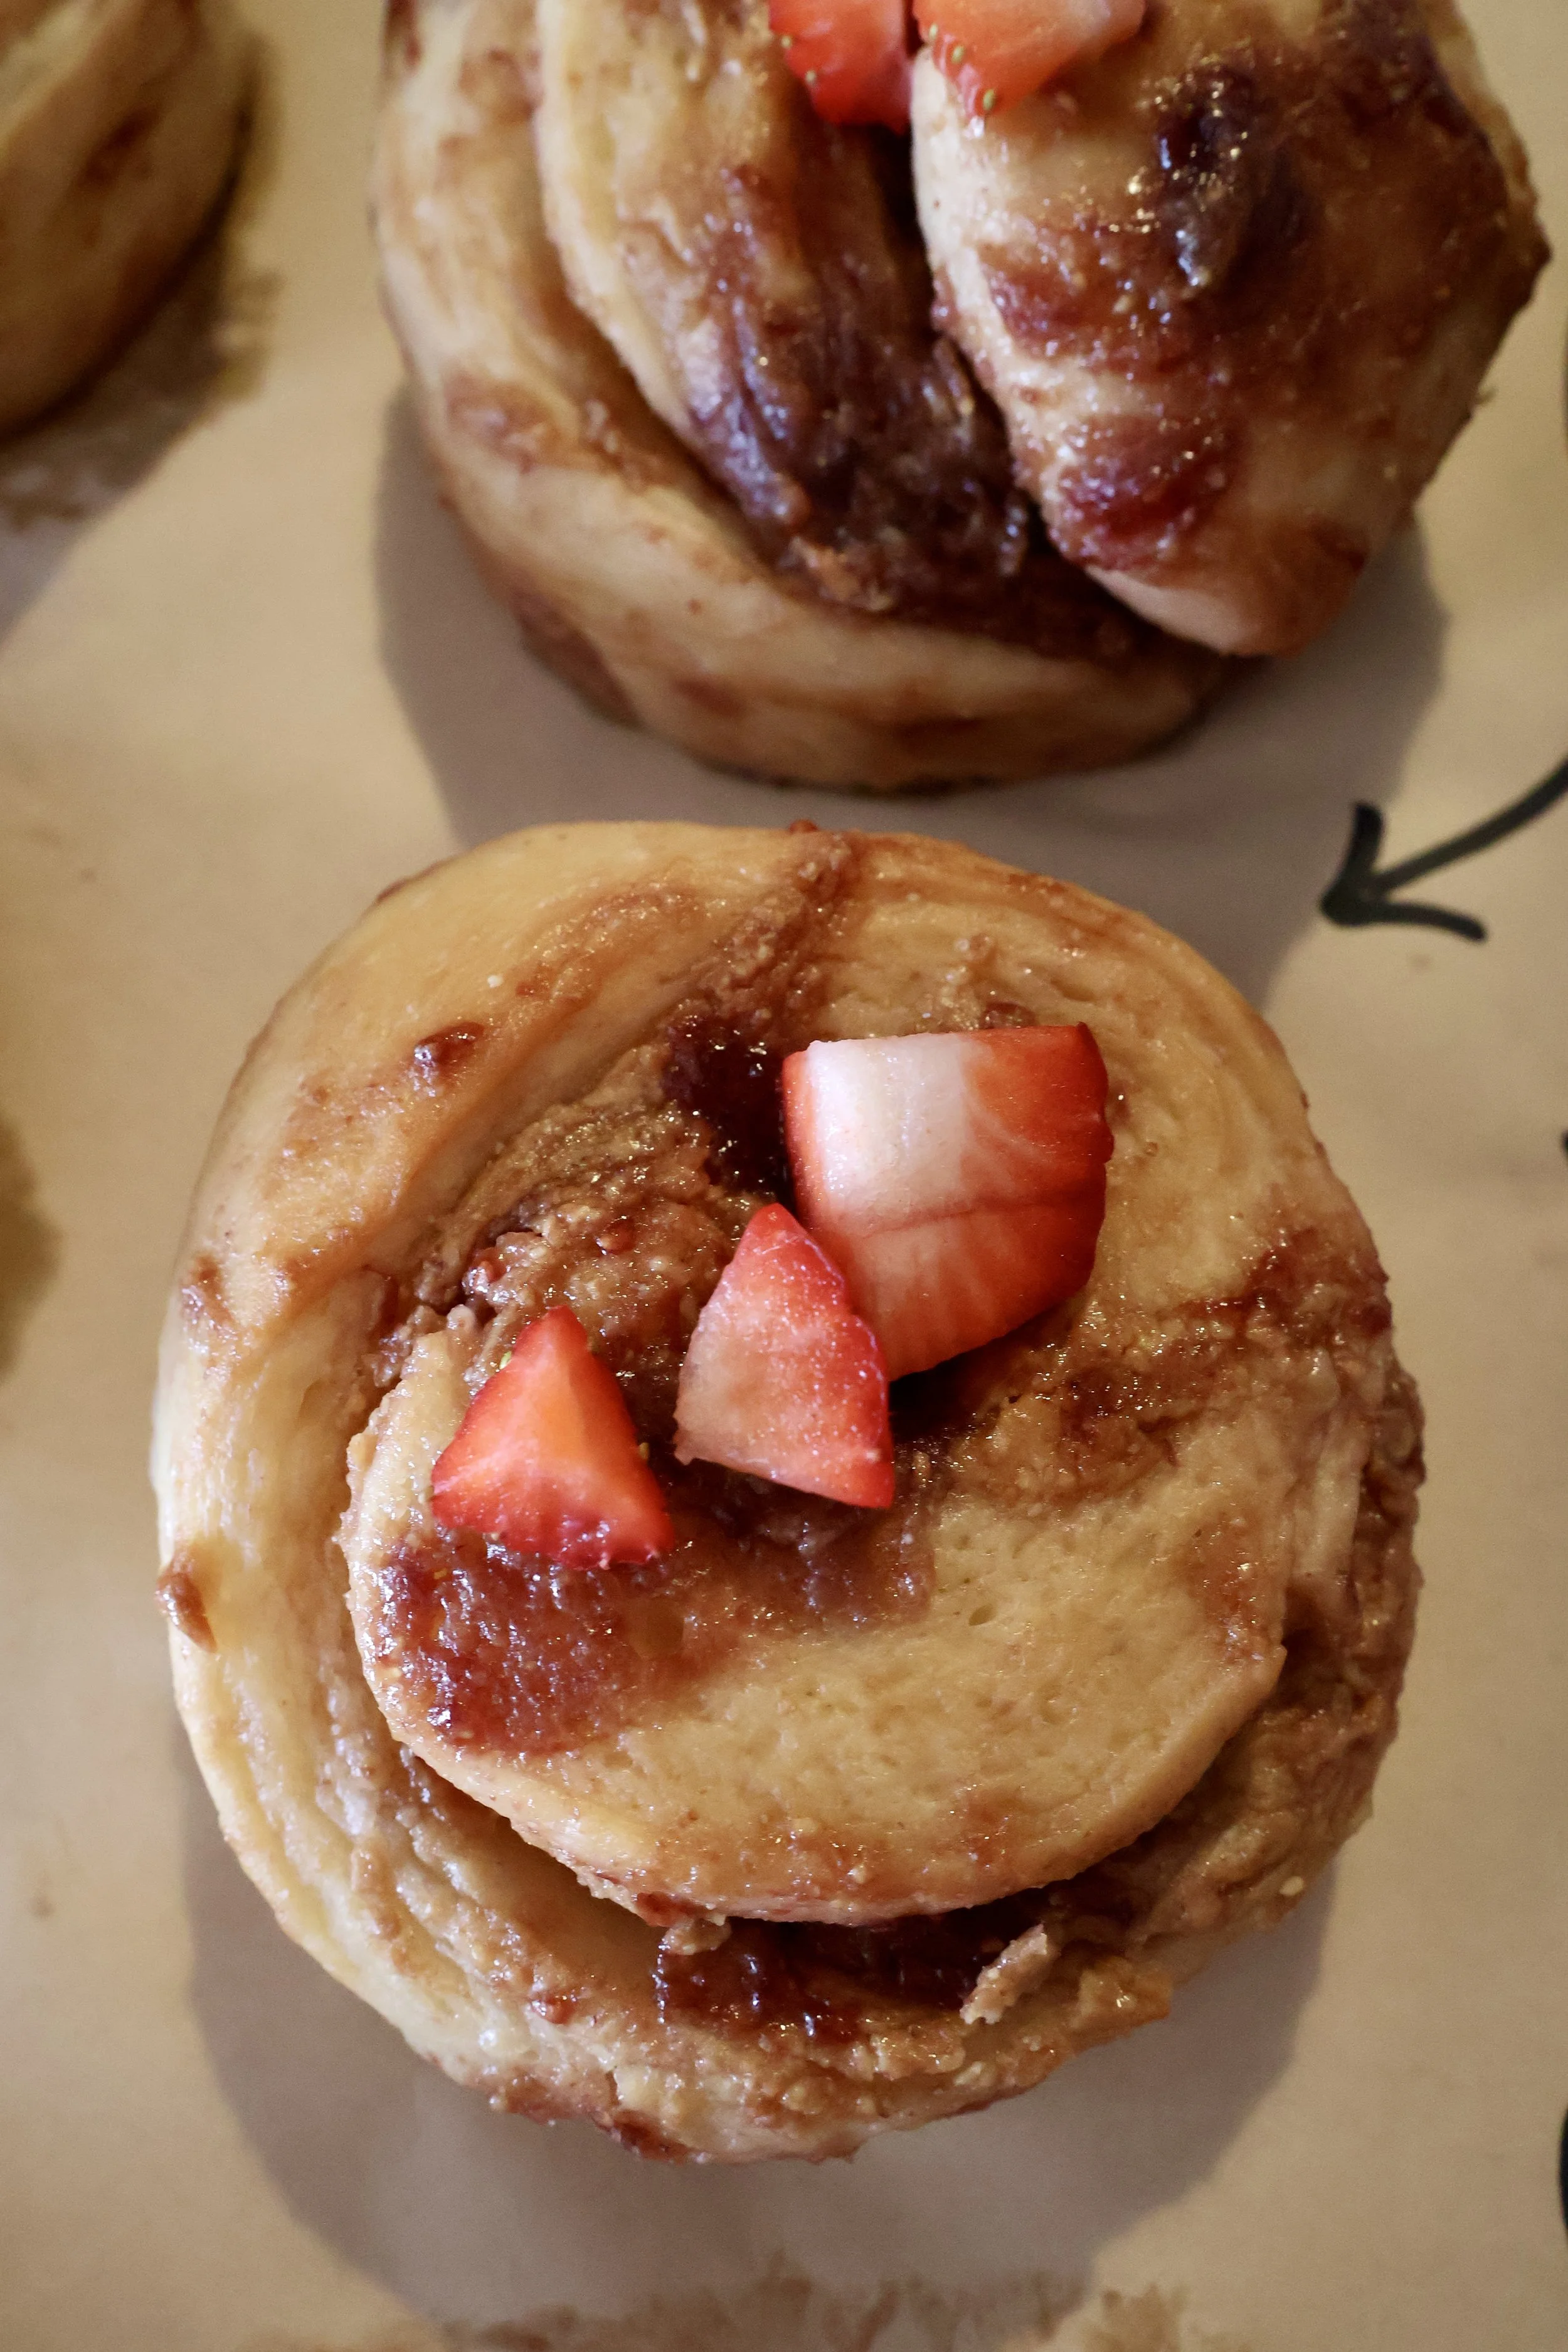
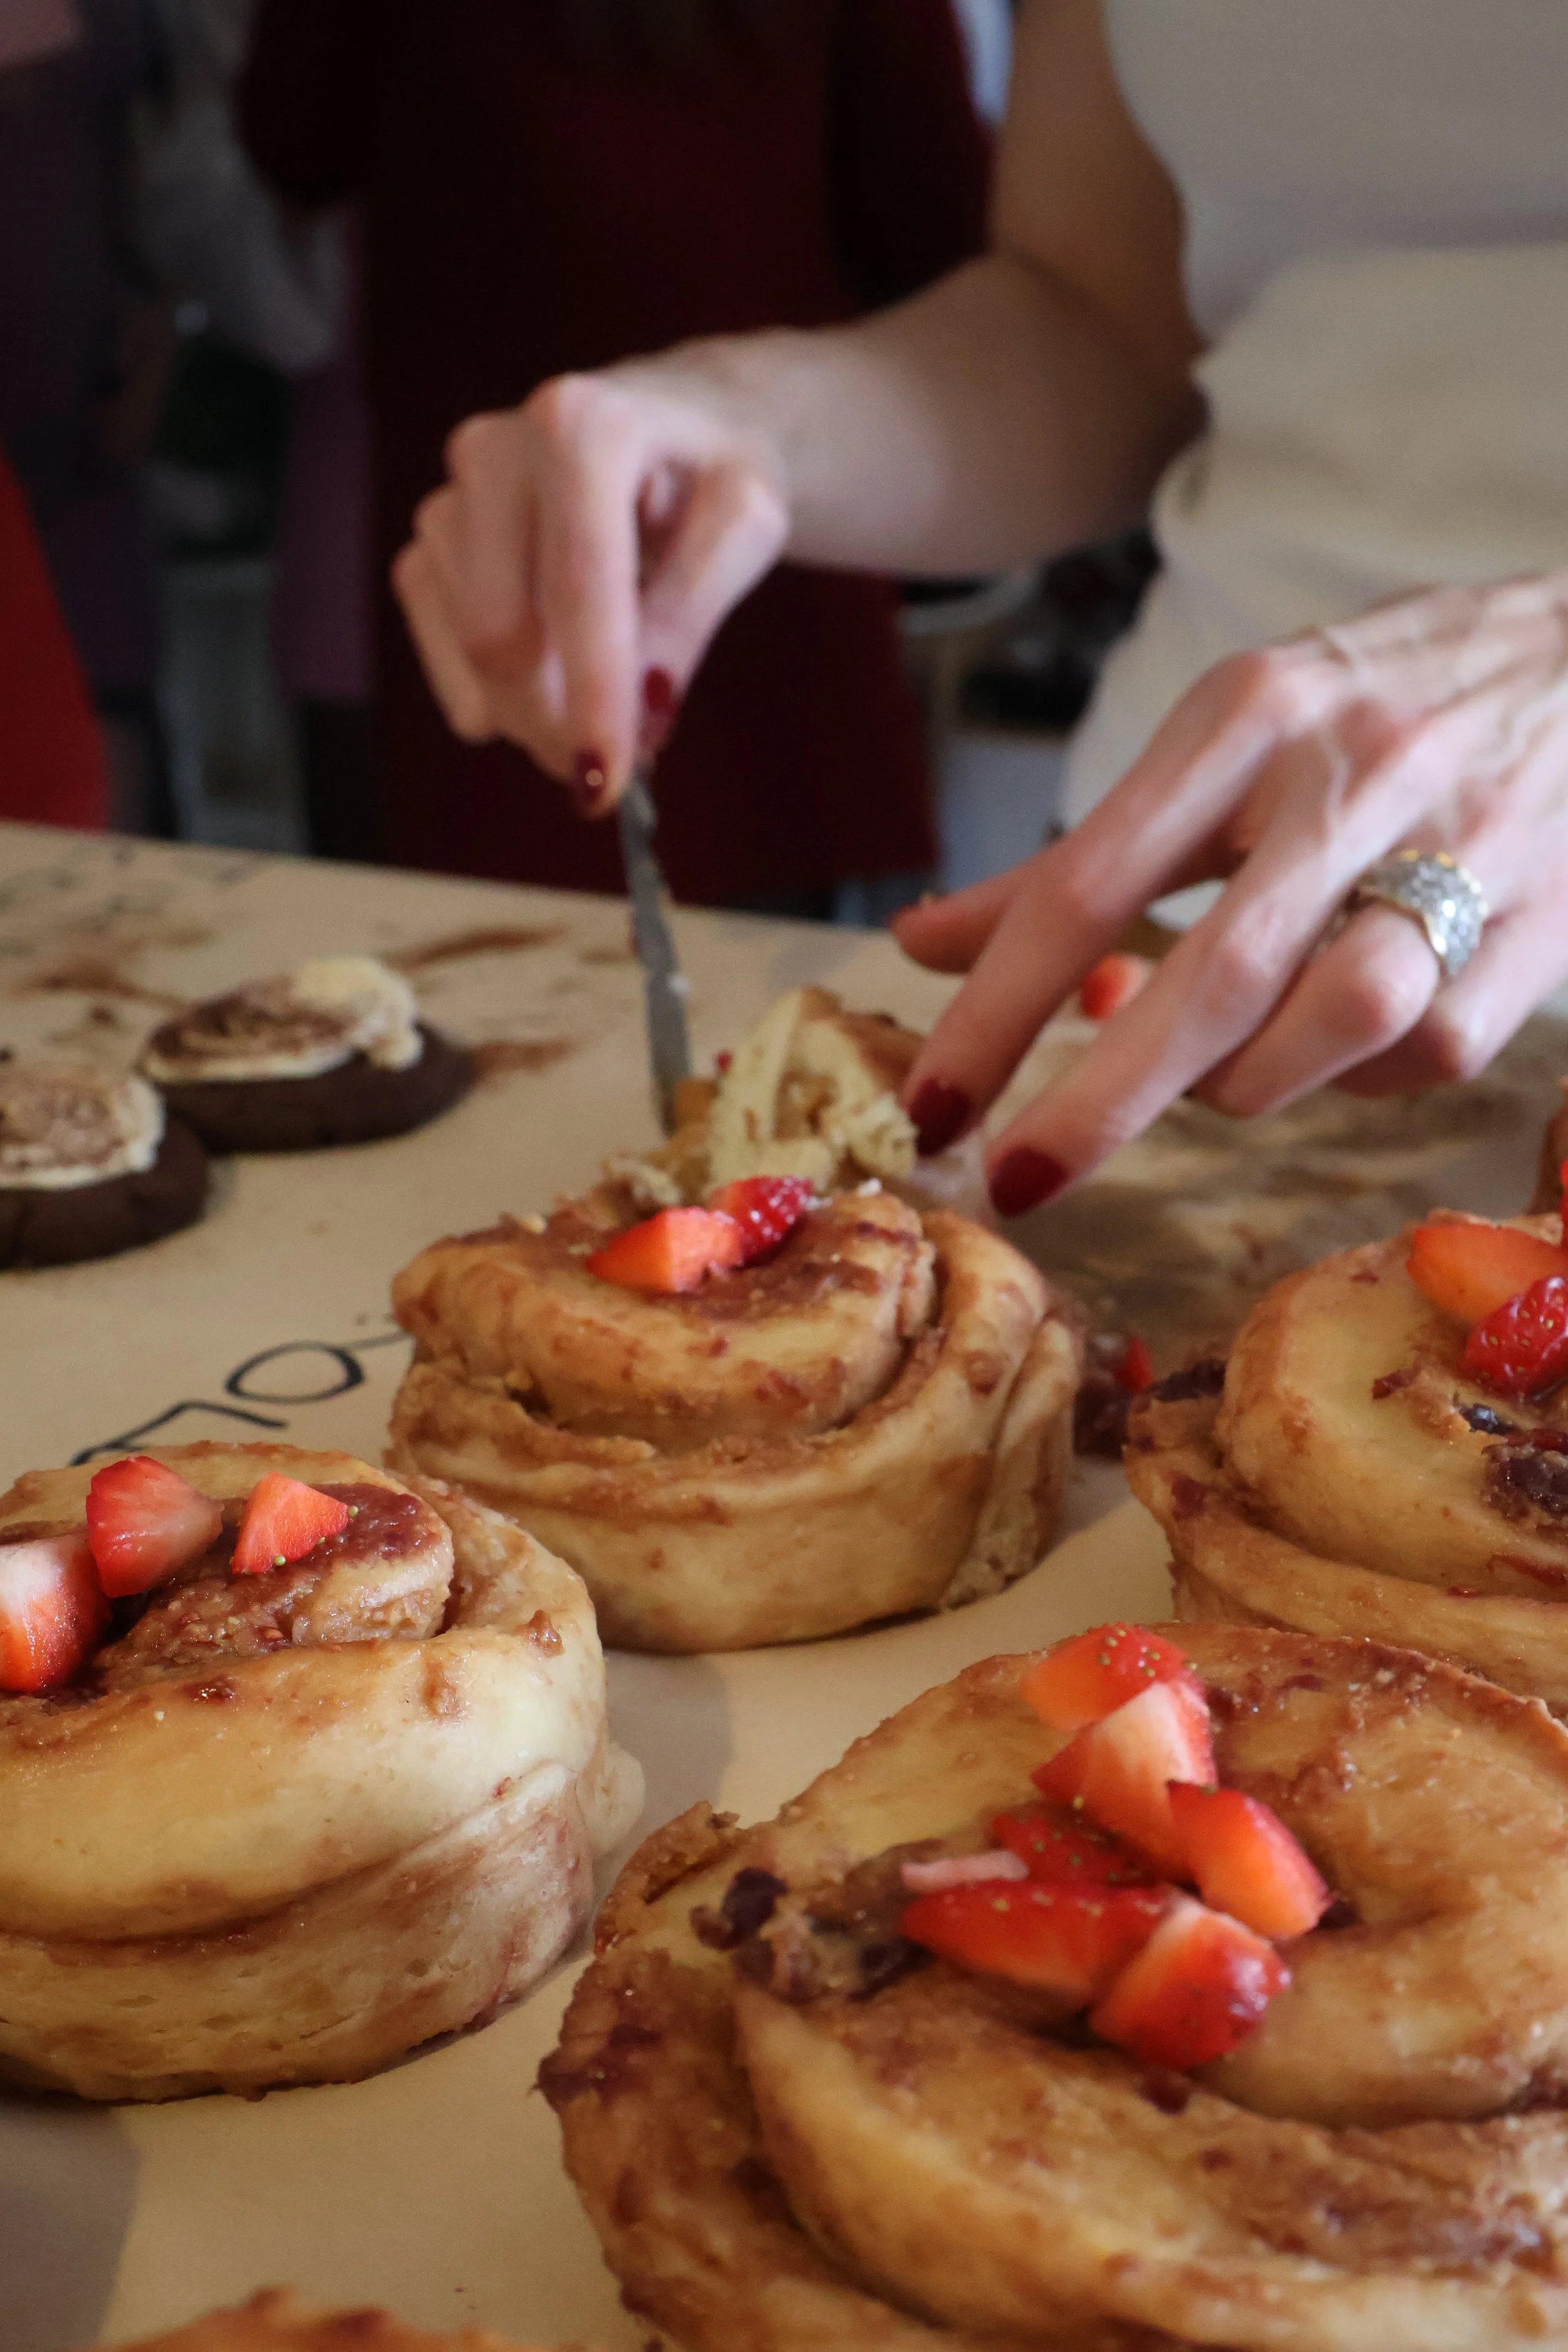
Platter styling: fresh berries scattered right before serving + a small bowl of extra jam for dipping.
Citrus lift: orange zest in the dough (or a little in the filling) makes it feel extra “brunch.”
Ingredients (12 Rolls)
Tangzhong (Japanese milk-bread technique)
25 g bread flour (strong flour)
125 g milk (whole or 2%)
Note: Tangzhong is cooked flour + milk. It makes the dough hold more moisture, so the rolls stay softer longer.
Dough
325 g bread flour (strong flour)
60 g granulated sugar
6 g fine salt
110 g active sourdough starter (100% hydration, used near peak)
1 large egg (~50 g without shell)
75 g milk
45 g unsalted butter, very soft (not melted)
5 g vanilla extract (optional)
Zest of 1/2 lemon (optional but excellent)
Filling
150 g creamy peanut butter
30 g Brown sugar
1 Pinch fine salt
180-200g Thick, cold, Jam
Ingredient note (AKS):
I use peanut butter from Angeliki Tsoukala—100% peanuts, no seed oils, no added sugar, no preservatives. Clean flavor, spreads beautifully, and gives that slightly savory finish that makes PB&J feel grown-up.
Failure-prevention note:
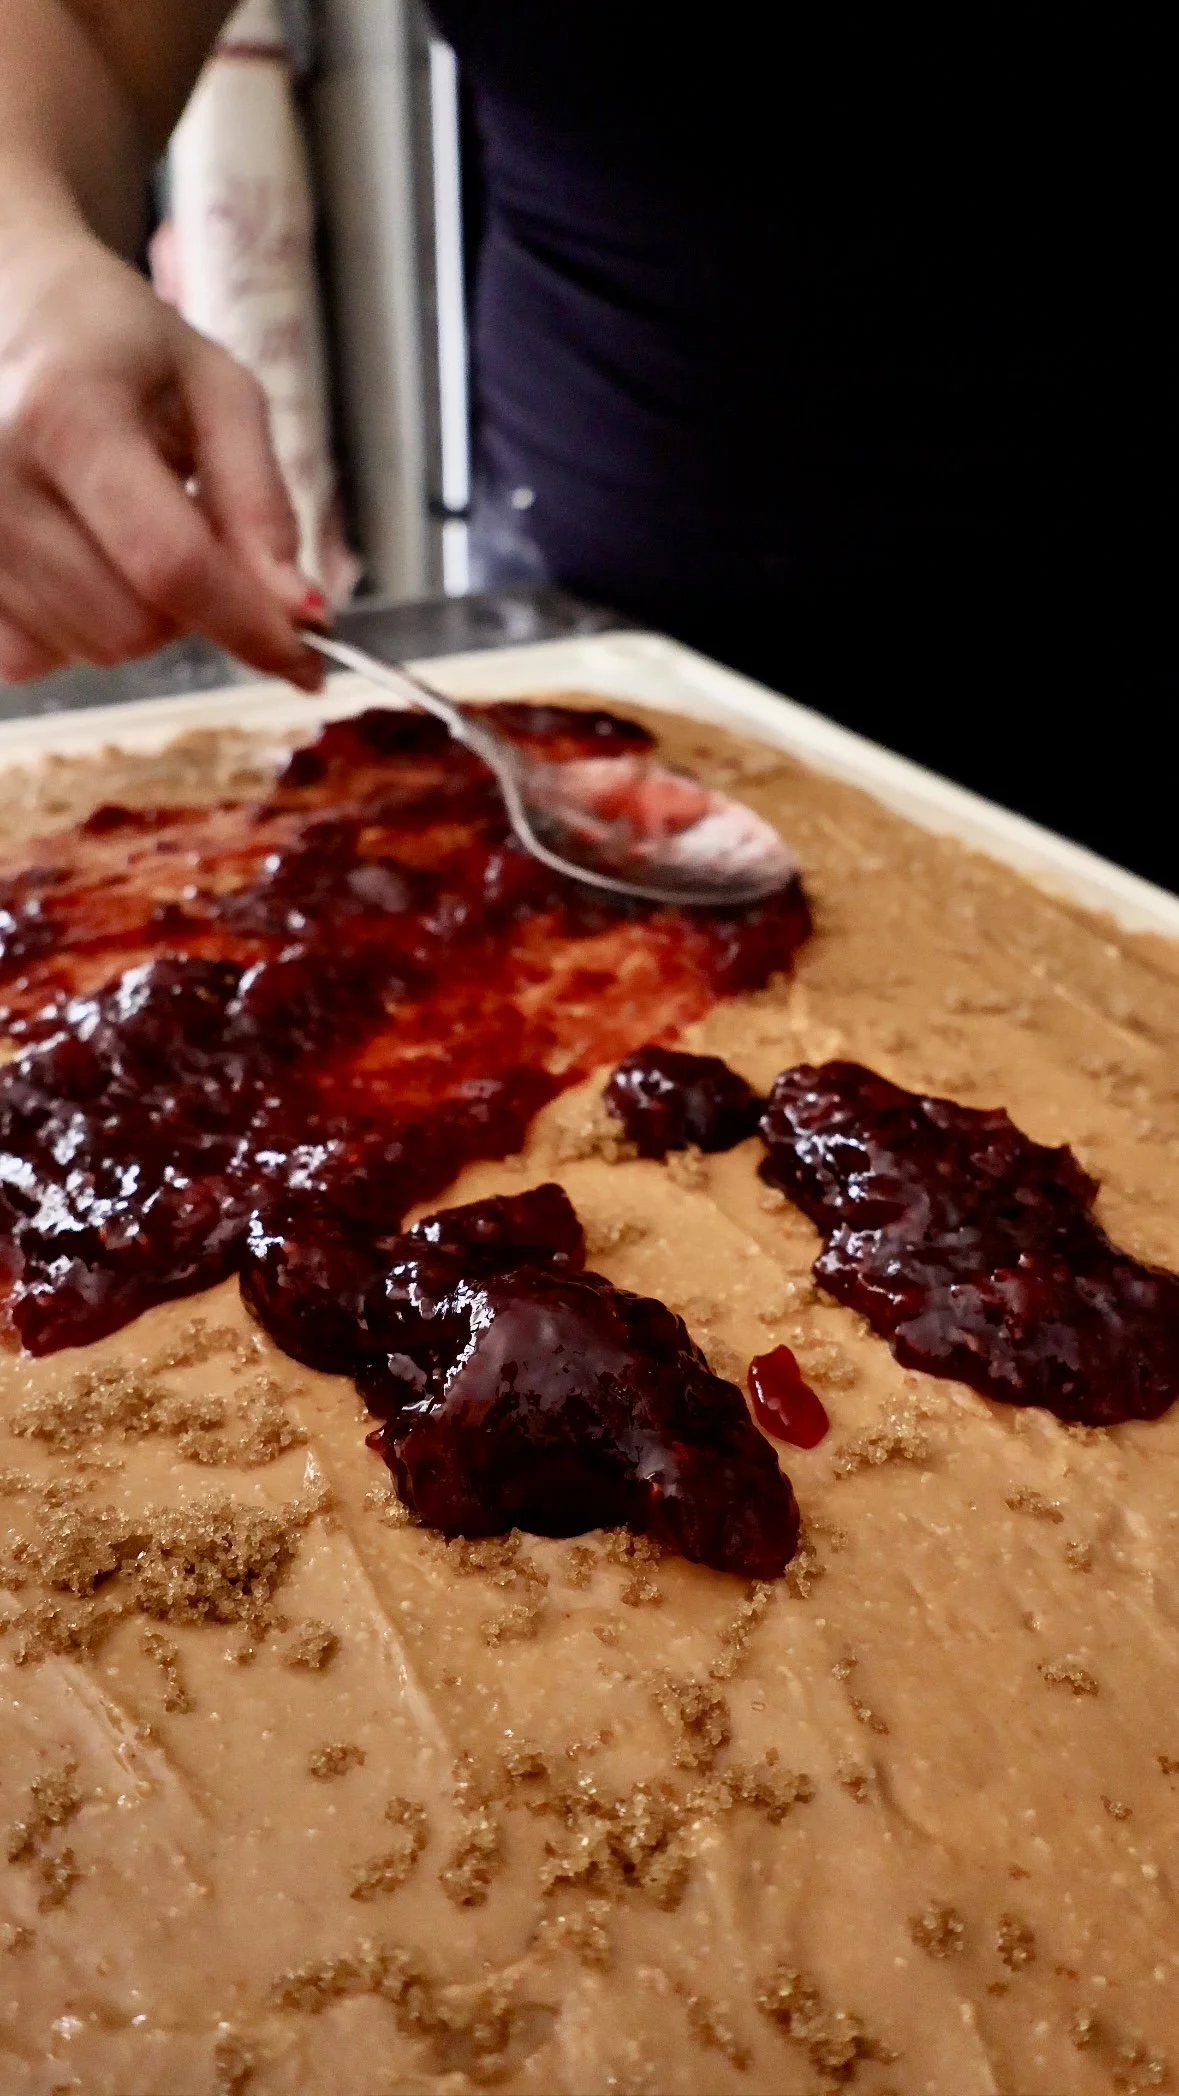
Runny jam leaks, burns, and ruins spirals. Choose thick jam or reduce it briefly on the stovetop and cool completely.
Optional toppings
Melted butter (for brushing after baking)
Freeze-dried raspberries (crushed)
Toasted chopped peanuts/pistachios
Fresh berries (for serving, added at the last minute)
Equipment You’ll Need
Kitchen scale (strongly recommended): enriched dough is sensitive—grams make it reliable.
Stand mixer (helpful, not mandatory): butter enrichment is easiest with a mixer, but you can do it by hand with patience.
Rolling pin: for a consistent rectangle and even spirals.
9×13 inch / 23×33 cm pan (or similar): helps rolls bake evenly and stay soft.
Parchment paper: prevents jam + sugar from welding to the pan.
Bench scraper: makes dough handling calmer and cleaner.
Thermometer (optional but confidence-boosting): bake to ~93°C in the center for doneness.
No banneton needed here—this is a pan-proofed enriched dough.
If you don’t have a proofing box, your oven light or a turned-off oven with a warm mug of water works beautifully.
How to Make It
1) Make the tangzhong (your softness insurance)
What you’re doing: Cooking a small portion of flour + milk into a paste.
Why it matters: It “pre-gelatinizes” starches so the dough holds more water—translation: softer rolls for longer.
In a small pot, whisk 25 g flour + 125 g milk until smooth.
Cook over medium heat, stirring constantly, 60–90 seconds, until thick like a loose paste.
Scrape into a bowl and cool 10 minutes (warm is fine; piping hot is not).
Look for: a glossy, spoonable paste that leaves trails when stirred.
Common mistake: letting it boil hard → lumps.
If it happens: whisk aggressively off heat; if still lumpy, press through a sieve (it’s worth it).
2) Mix the dough (build structure before butter)
What you’re doing: Bringing the dough together so gluten can begin forming.
Why it matters: If butter goes in too early, it can coat flour and slow gluten development.
In a bowl or mixer, combine: bread flour, sugar, salt.
Add: sourdough starter, egg, milk, tangzhong, vanilla (if using), lemon zest (if using).
Mix until you have a cohesive dough (it will look shaggy at first).
Rest 10 minutes after the first mix.
This short rest helps the flour hydrate and gluten start organizing—making the butter stage smoother.
Look for: dough that goes from ragged to more elastic after the rest.
Common mistake: skipping the rest → dough feels greasy/slippery when butter is added.
If it happens: knead longer before adding all the butter; add butter in smaller pieces.
3) Knead + add butter (glossy dough checkpoint)
What you’re doing: Developing gluten, then enriching with butter.
Why it matters: Strong structure = better rise + cleaner spirals.
Knead 6–8 minutes (mixer medium or by hand) until smoother and stretchy.
Add very soft butter in small pieces. Knead 5–8 minutes more until incorporated.
Gluten development checkpoint:
You don’t need a perfect “windowpane,” but the dough should stretch without tearing immediately.
Look for: glossy dough, elastic pull, slightly tacky but not soupy.
Common mistake: adding melted butter → greasy, slack dough.
If it happens: chill the dough 20–30 minutes, then knead again.
Temperature logic:
Warm kitchens speed fermentation; cold kitchens slow it. Aim for a comfortable room temp (around 22–26°C). If your dough feels hot and loose, chill briefly.
4) Bulk fermentation (first rise)
What you’re doing: Letting the dough rise and build flavor.
Why it matters: This is where structure and airiness begin.
Cover and let rise until puffy and ~60–80% bigger. Not double (100%).
Timing range:
Warm room + strong starter: 3–5 hours
Cooler room or weaker starter: 5–7+ hours
Fermentation checkpoint (most important):
Bulk ends when the dough looks relaxed and aerated—not tight.
Look for: puffy, domed dough; small bubbles at edges; softer feel.
Common mistake: pushing bulk to a hard double in warm conditions → harder shaping, more stickiness, risk of overproof.
If it happens: chill dough 20–30 minutes before rolling and shorten final proof.
Starter strength note:
Active starter = it rises predictably and smells pleasantly tangy/yeasty (not sharply acidic). If your starter is sluggish, expect a longer bulk.
Overnight Option:
If you prefer, you can let your dough rise for 2-3 hours till it just starts getting puffy (~30-40%), and then place covered in the fridge to slow ferment & rise in the fridge.
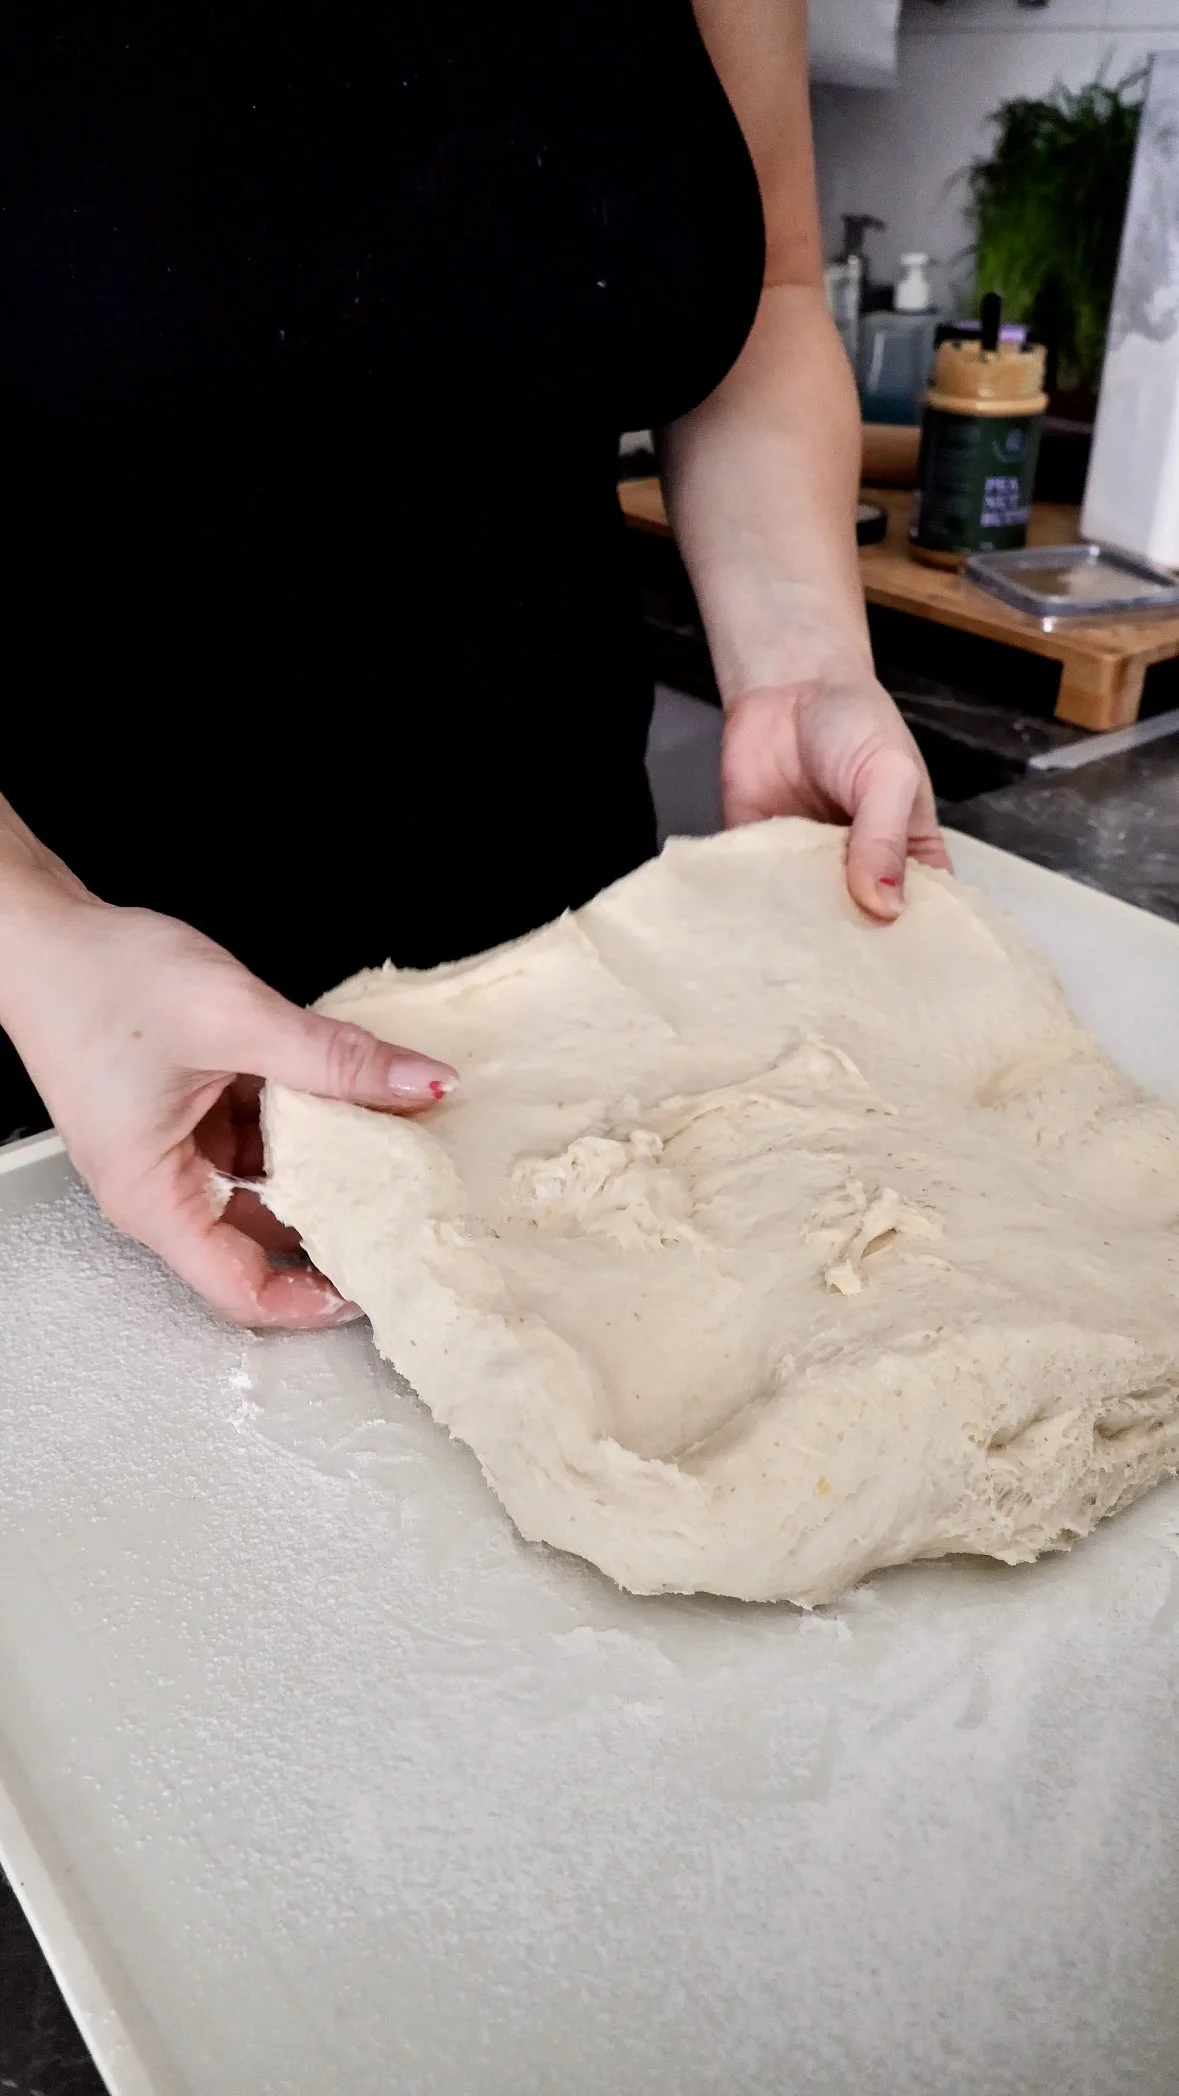
5) Roll out + build tension (clean spiral setup)
What you’re doing: Rolling dough into a rectangle and keeping the surface smooth.
Why it matters: A smooth, evenly rolled rectangle gives even spirals and a nicer crumb.
Lightly flour your surface. Roll dough into a rectangle about 30×45 cm.
Optional (helpful if dough feels slack): do one gentle envelope fold before rolling to build surface tension.
Shaping checkpoint:
Surface should feel smooth and “held,” not like it’s spreading into a puddle.
Look for: even thickness; edges not tearing.
Common mistake: overflouring → dry spirals.
If it happens: brush excess flour off before rolling up.
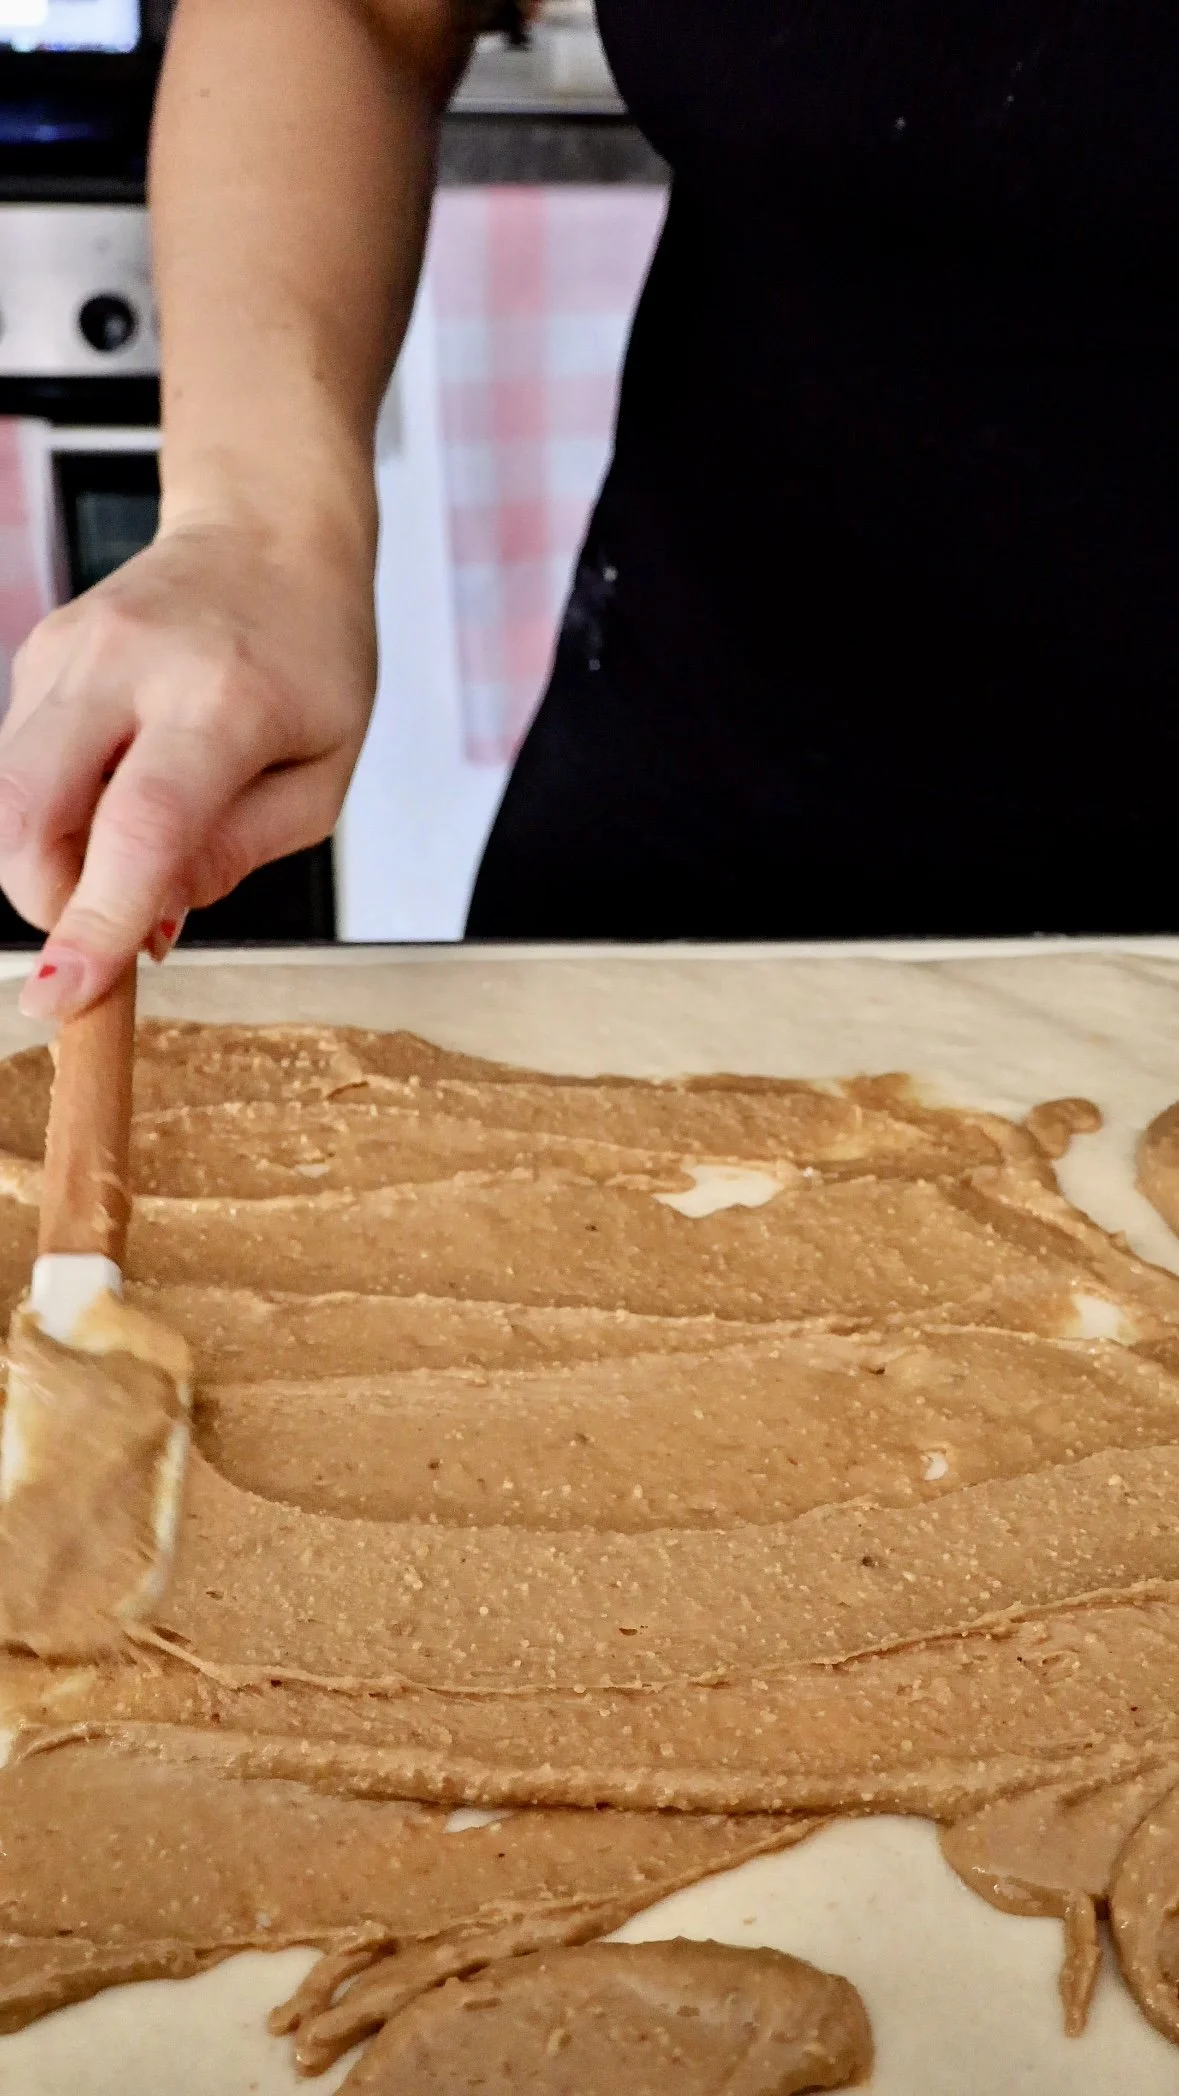
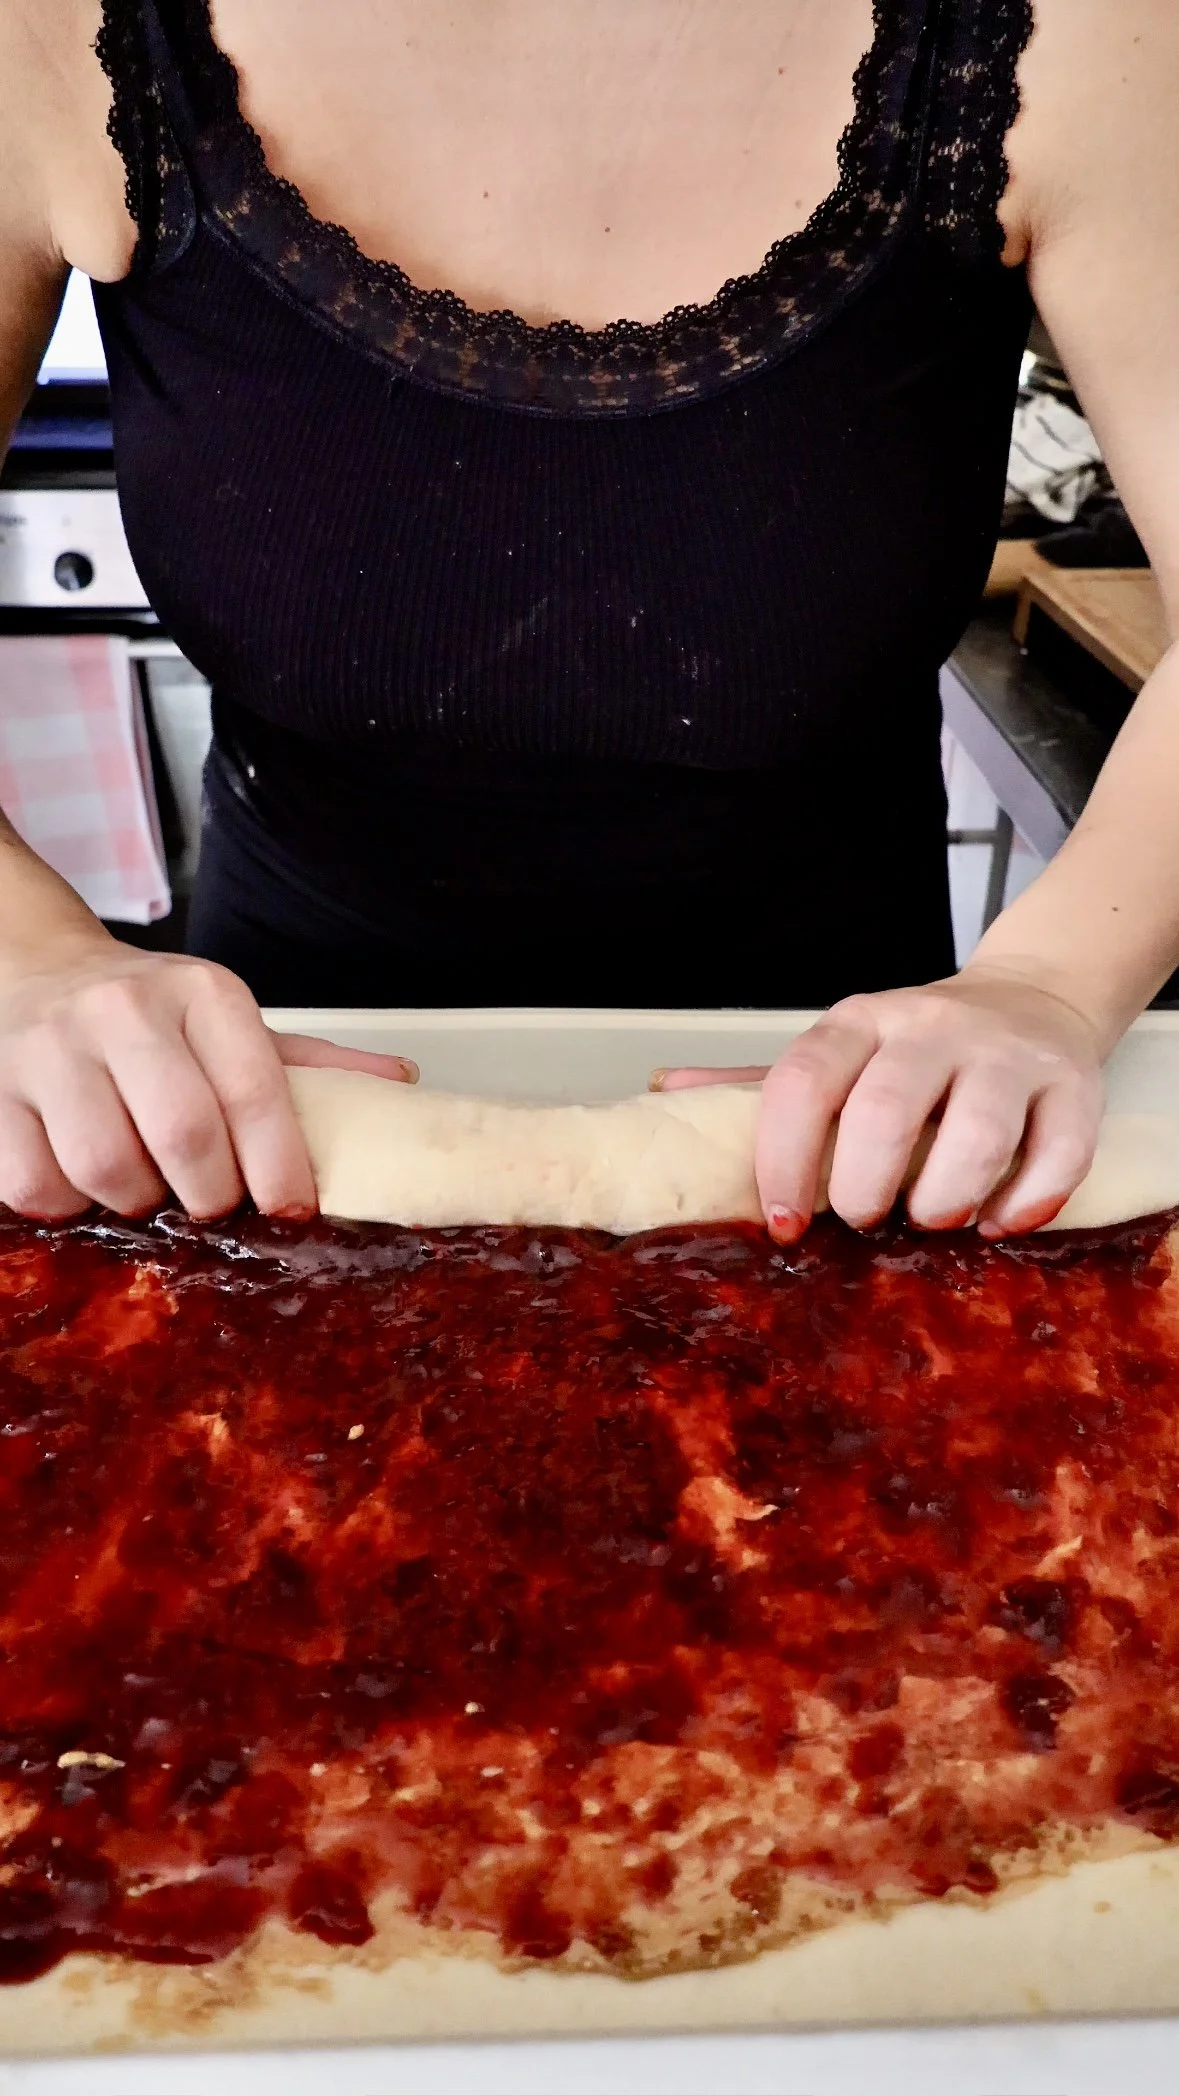
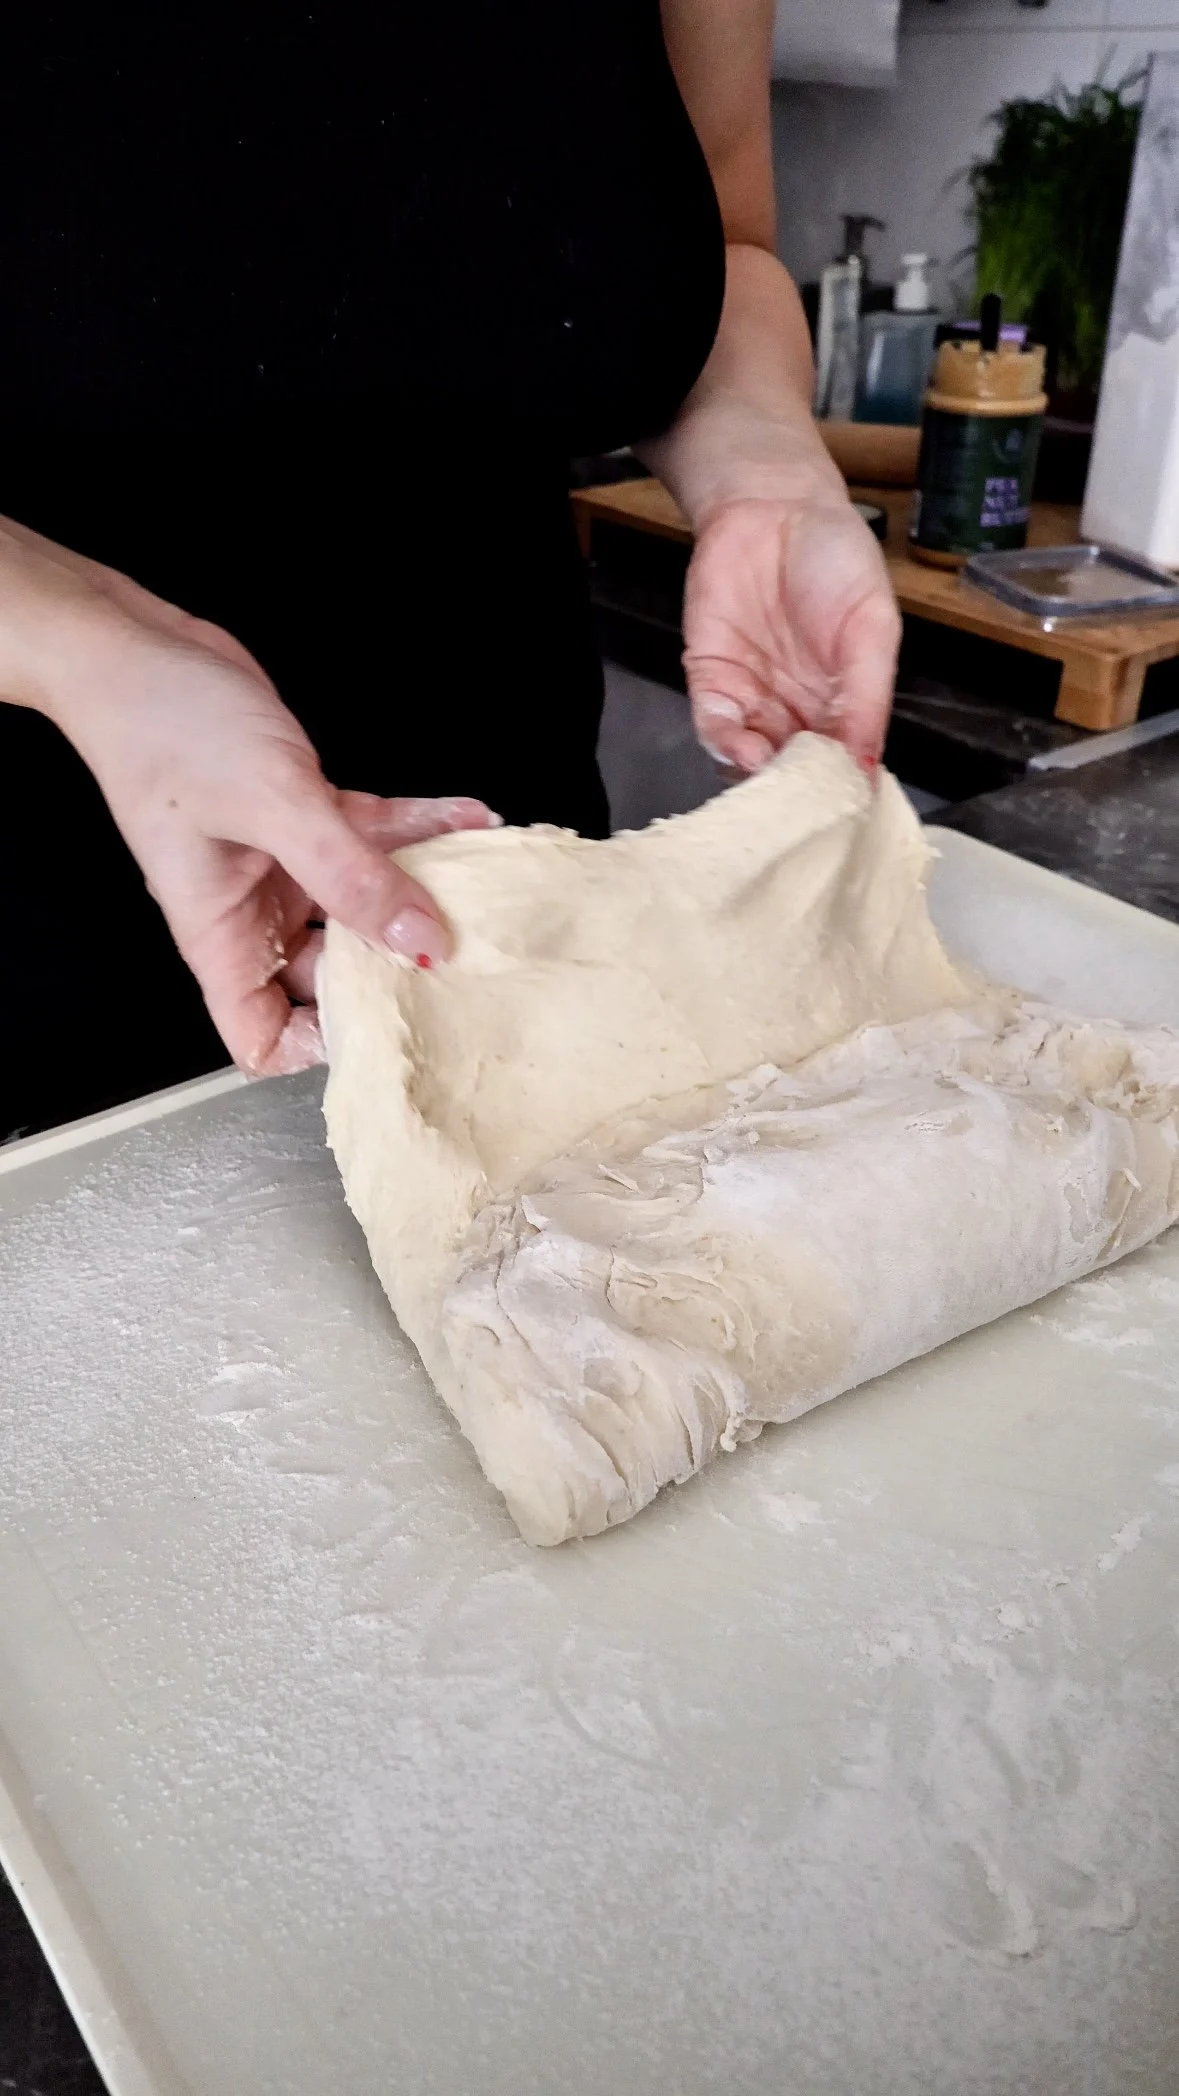
6) Fill + roll (leak-control technique)
What you’re doing: Layering fillings and rolling tightly.
Why it matters: Overfilling is the #1 reason spirals become chaos.
Spread peanut butter evenly, leaving a 2 cm border at the top edge.
Tip: If your peanut butter is very firm, gently warm up the jar in a warm bowl of water.Dot or thinly spread thick jam (don’t pool it).
Roll tightly into a log, seam-side down.
Look for: tight roll with a clear seam.
Common mistake: too much jam → slips and leaks.
If it happens: scrape off excess before rolling; chill the log before slicing.
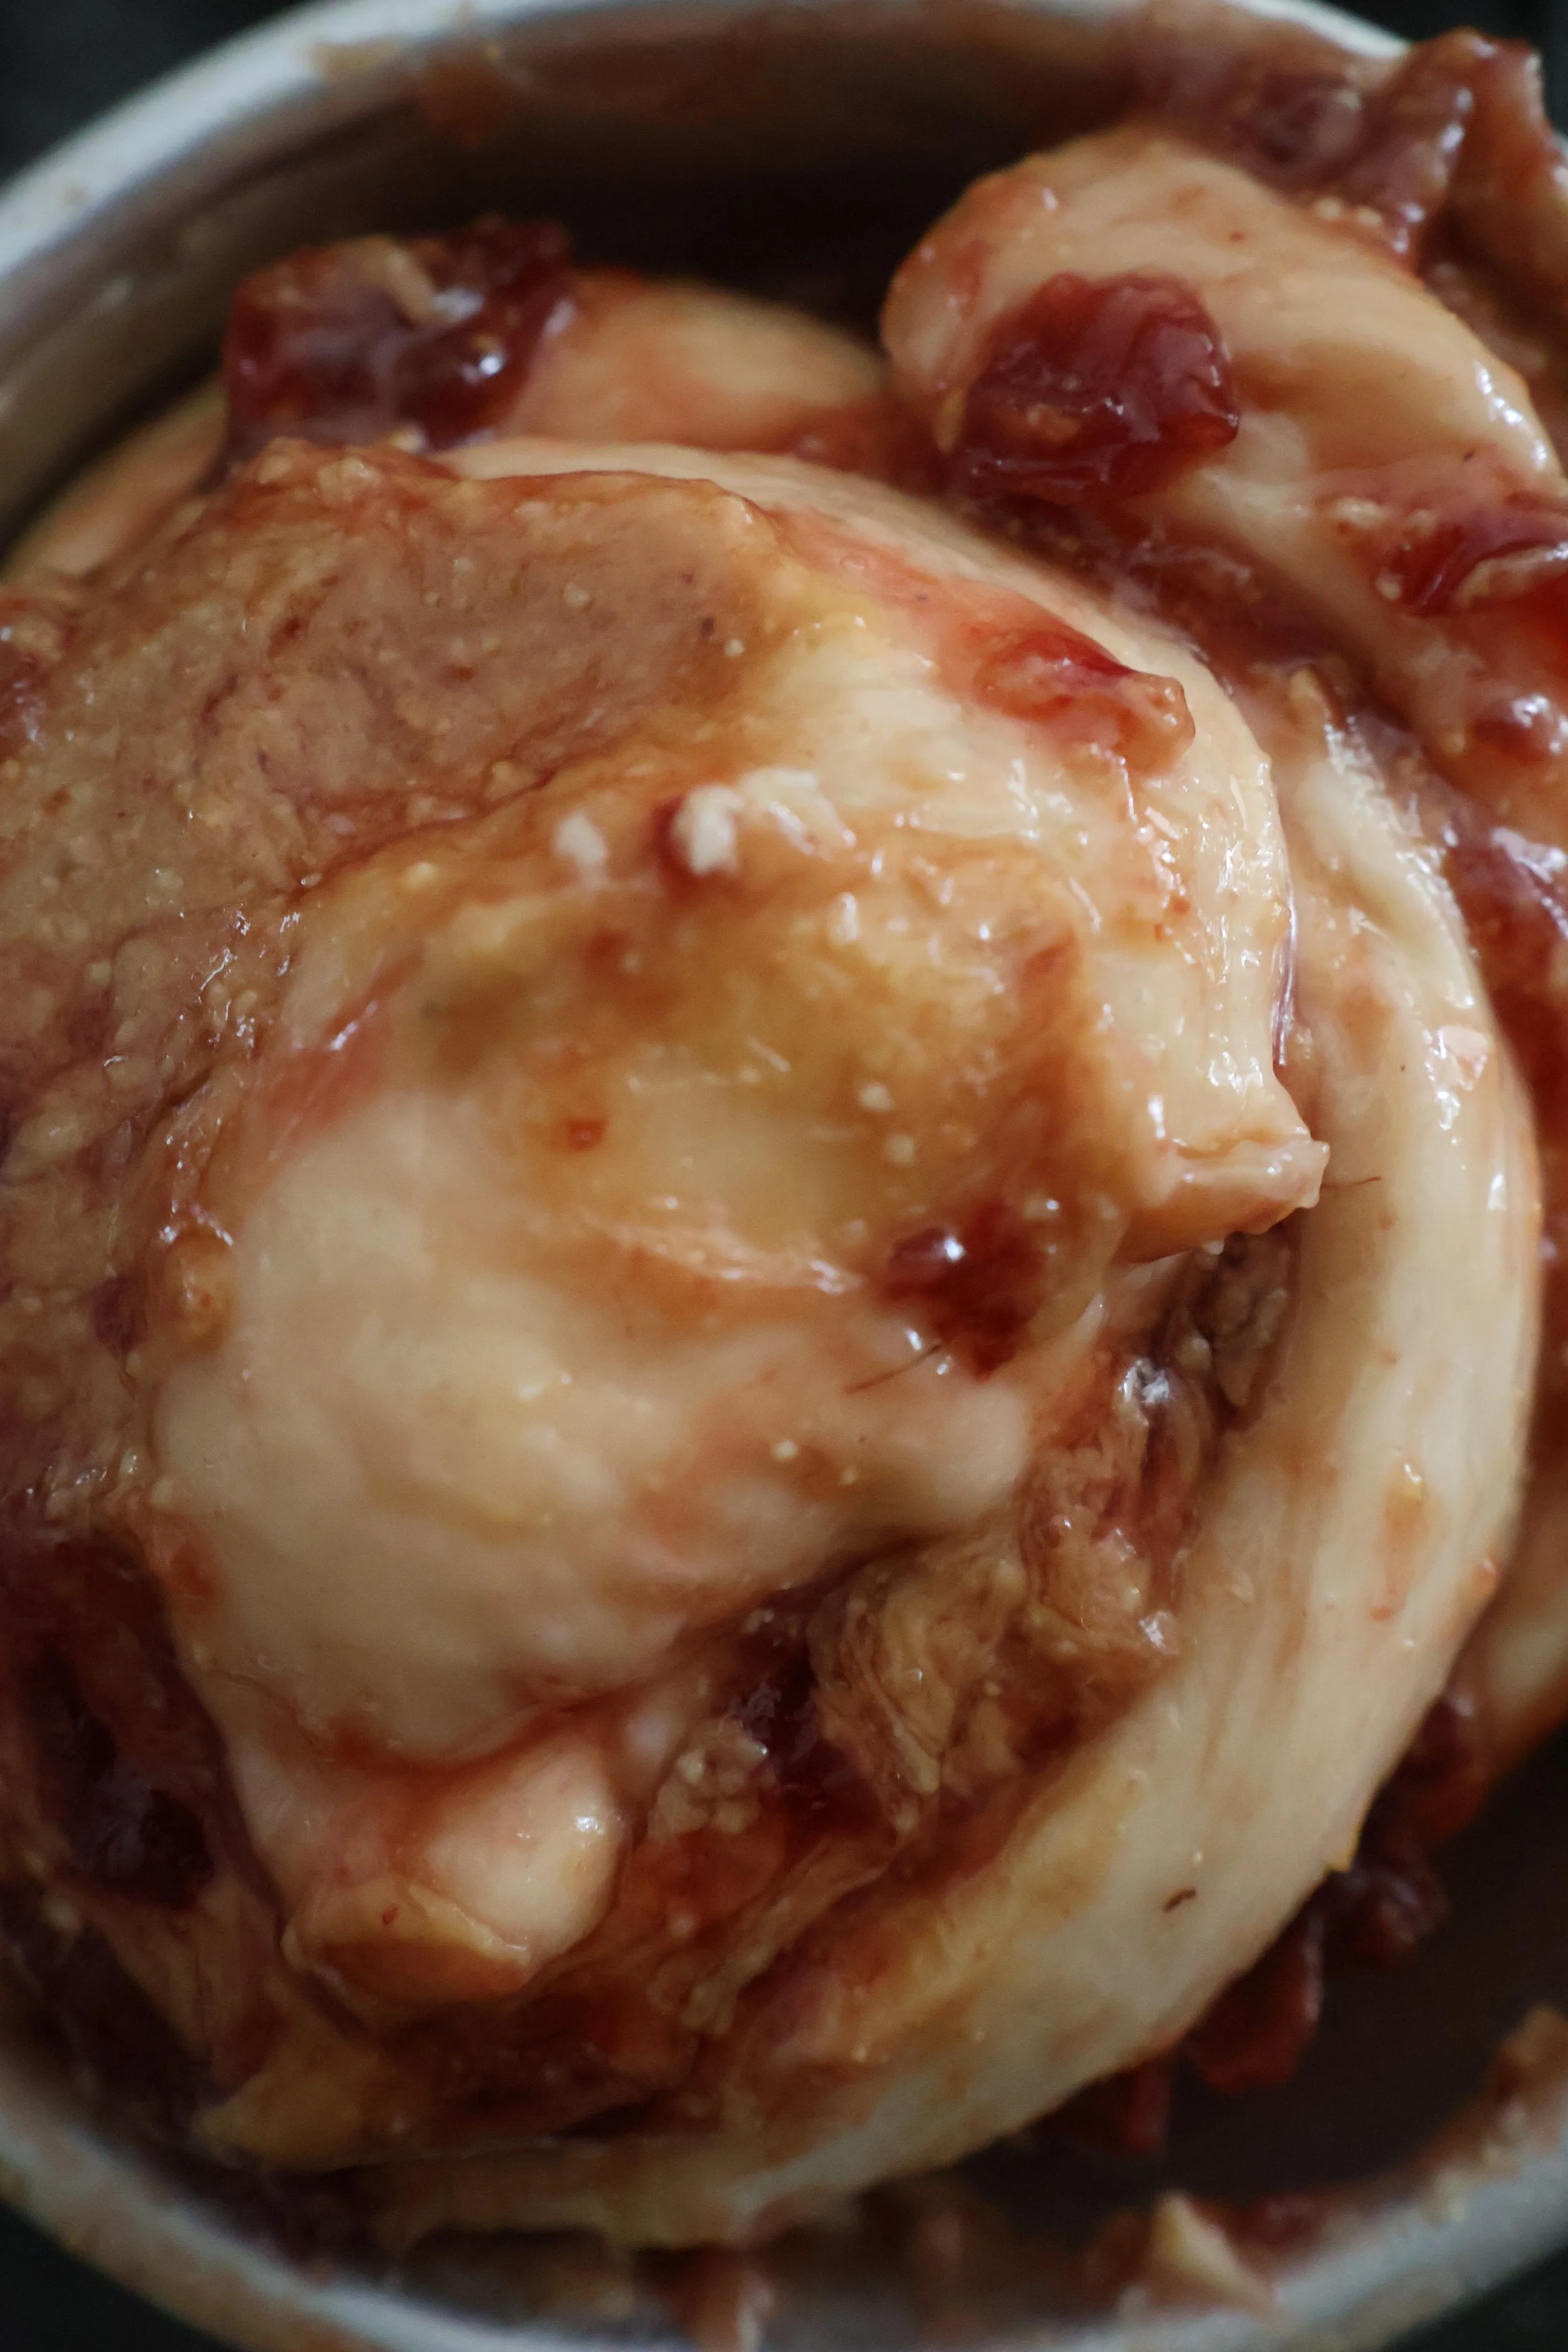
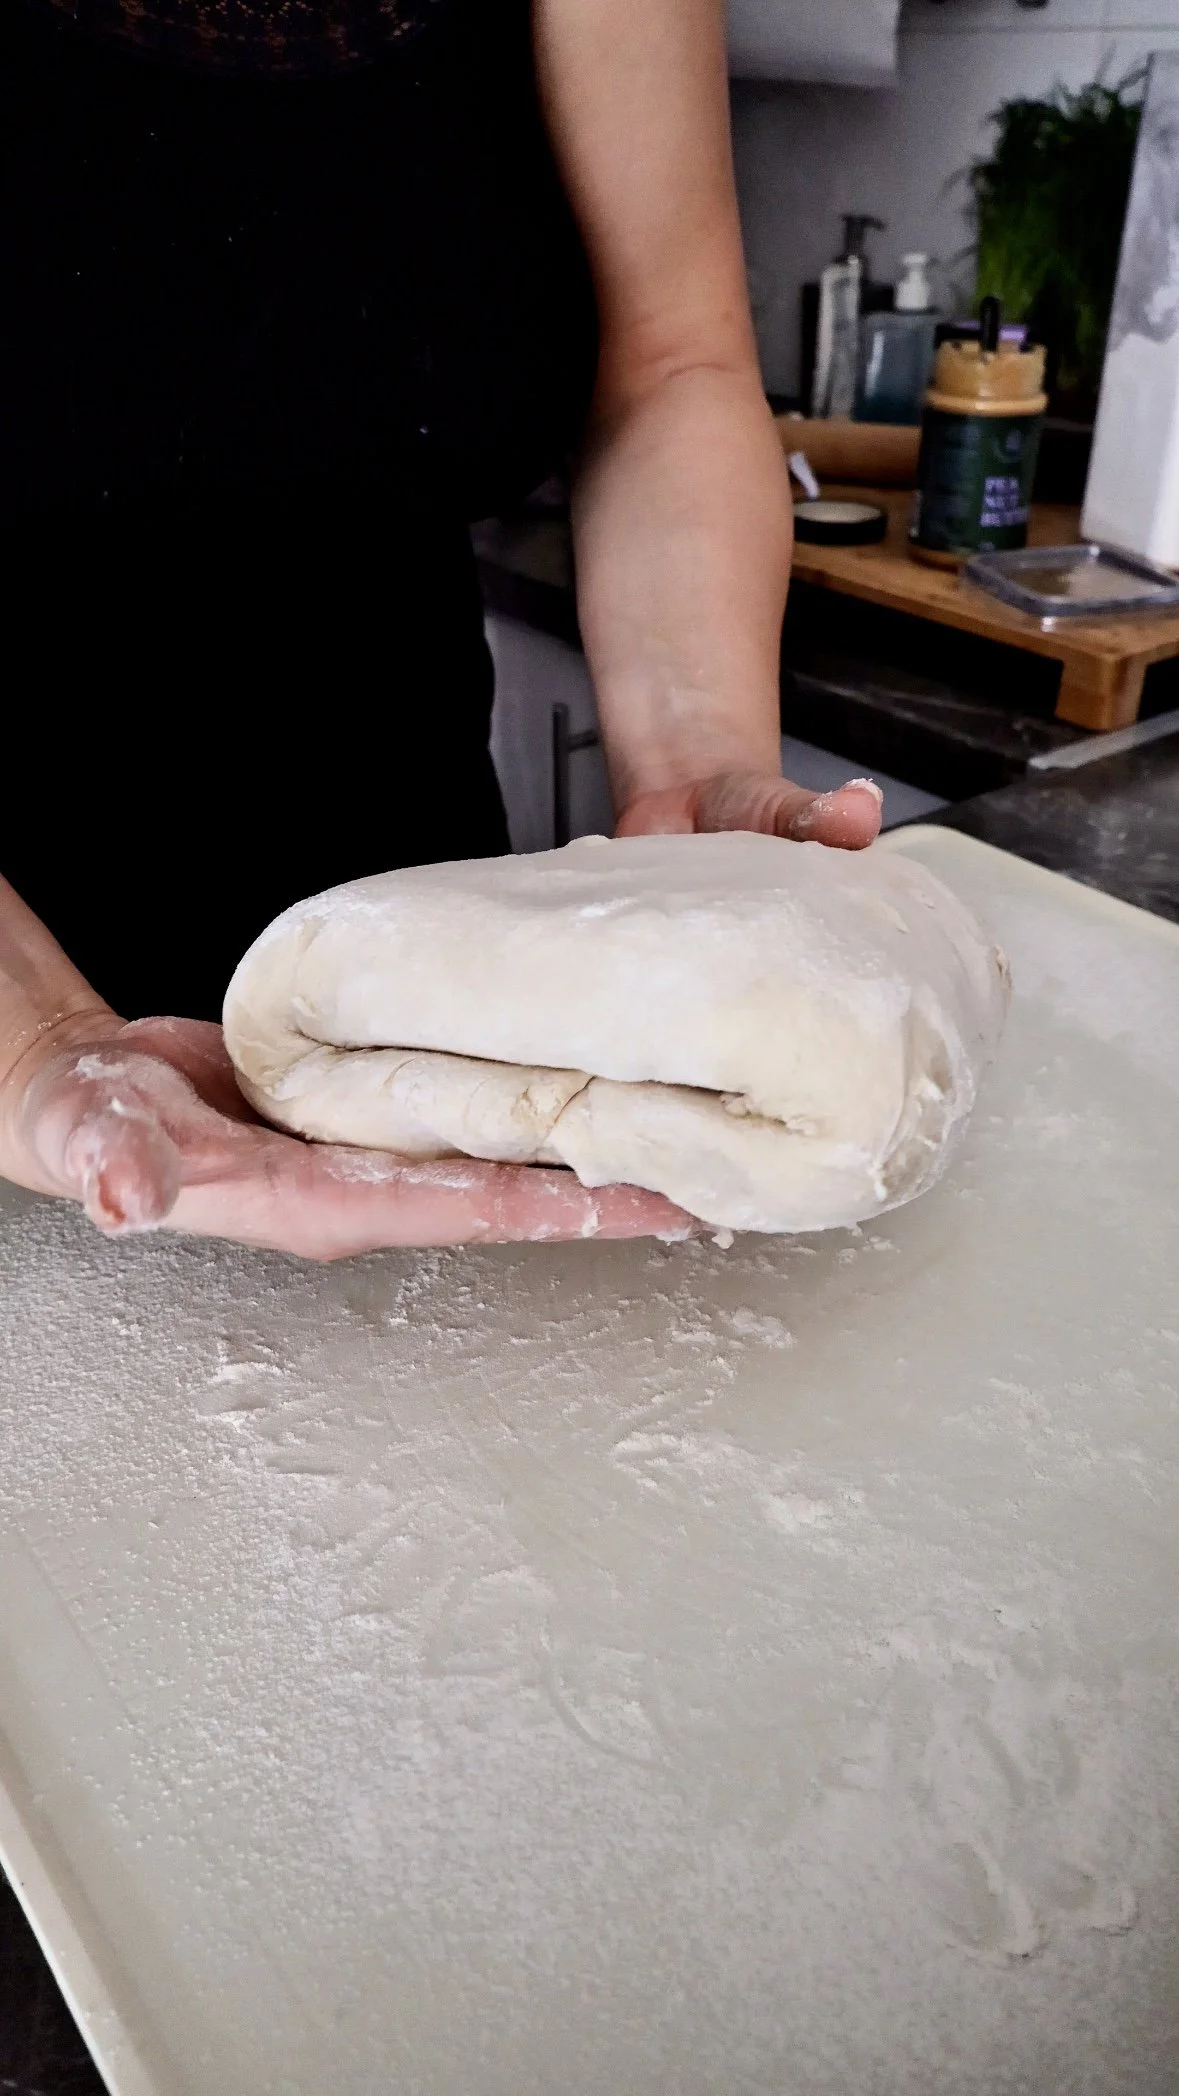
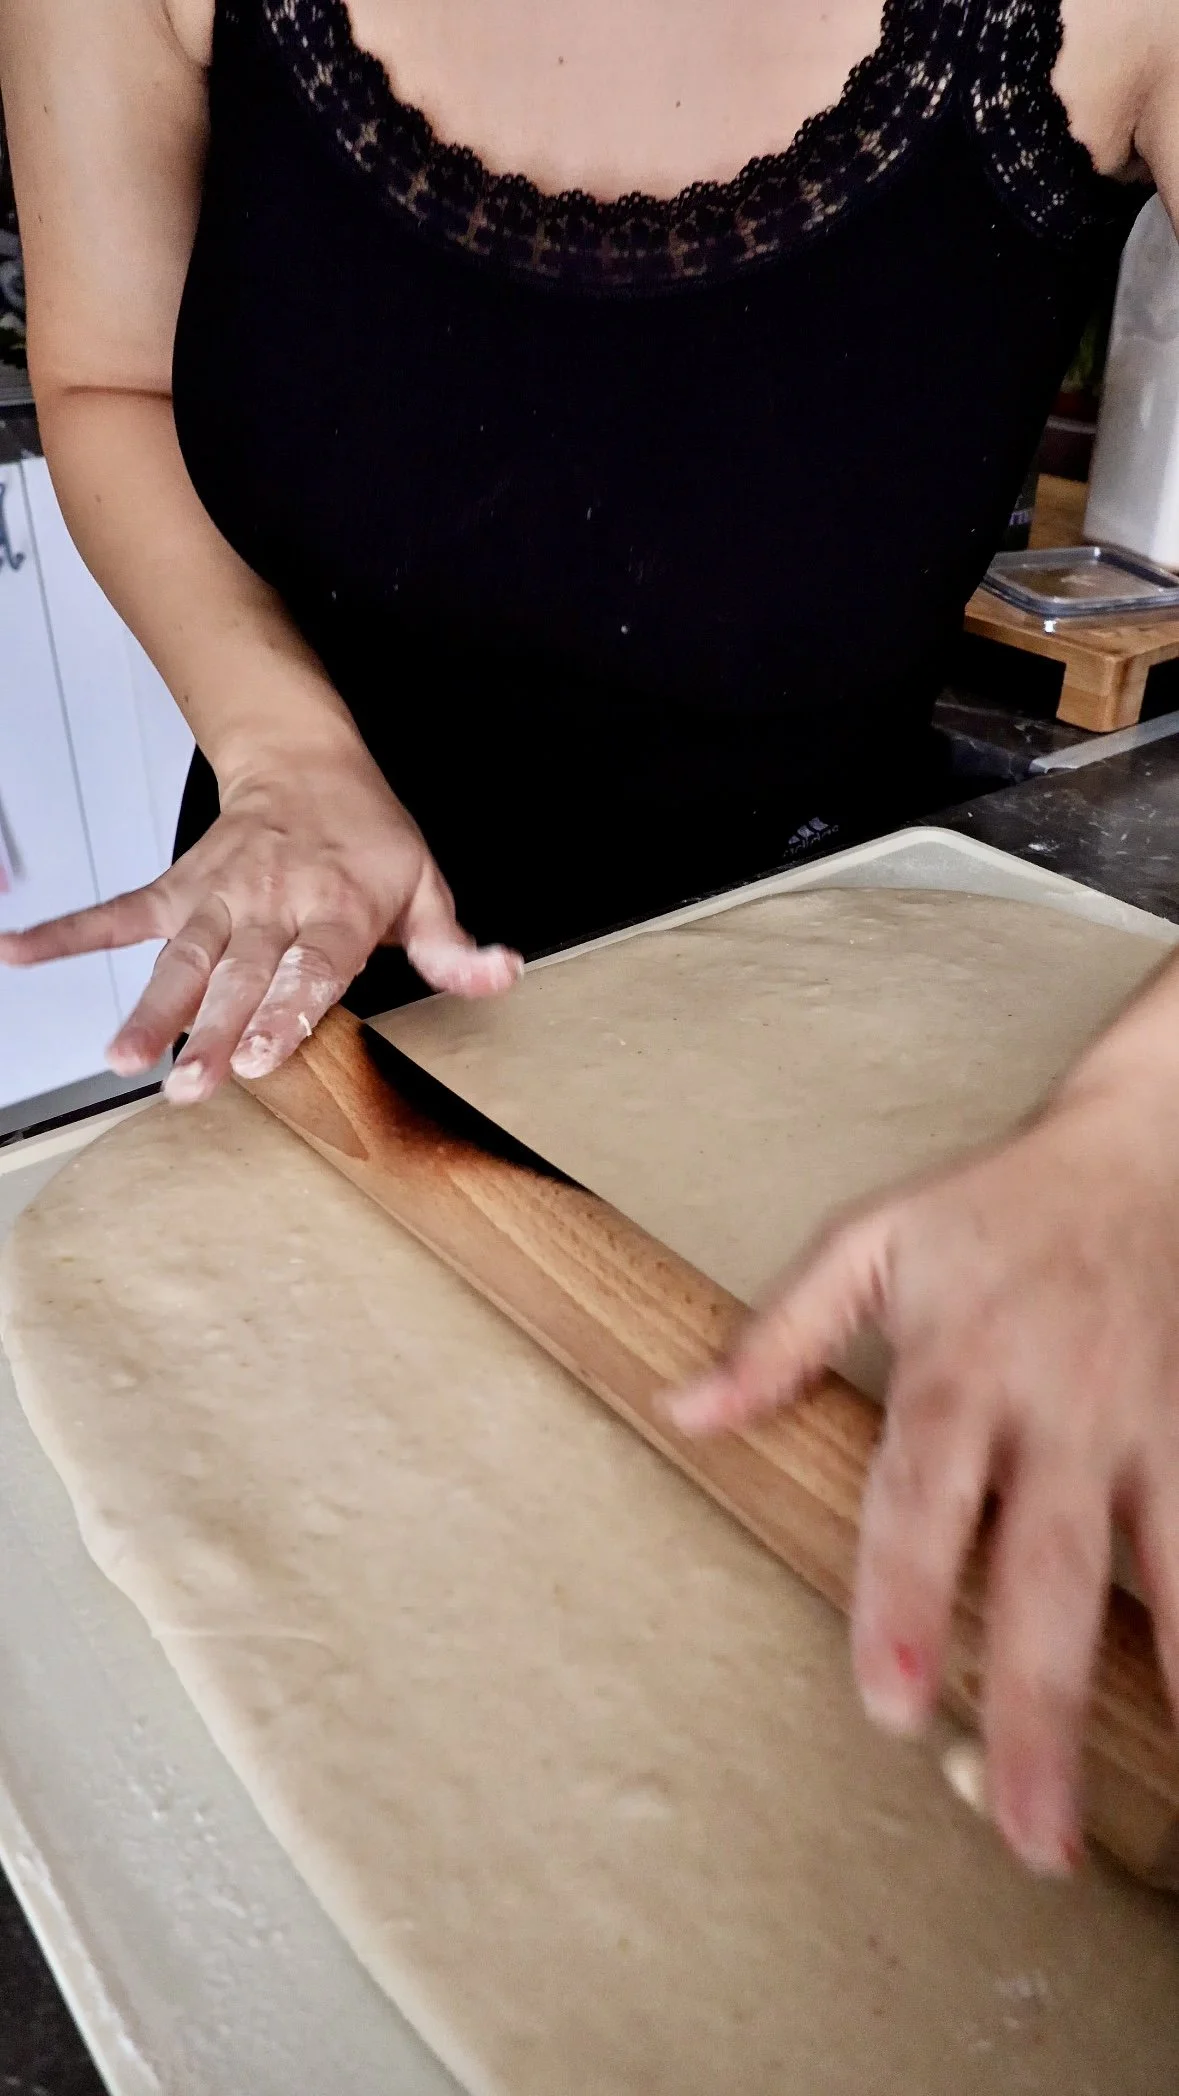
7) Chill the log (the clean-cut secret)
What you’re doing: Firming the dough to cut cleanly.
Why it matters: Warm enriched dough + jam = sticky cuts. Cold log = perfect spirals.
Chill the log 15–25 minutes.
Look for: log feels firmer; cuts don’t squish.
Common mistake: skipping this when dough is sticky.
If it happens: use dental floss and wipe blade between cuts.
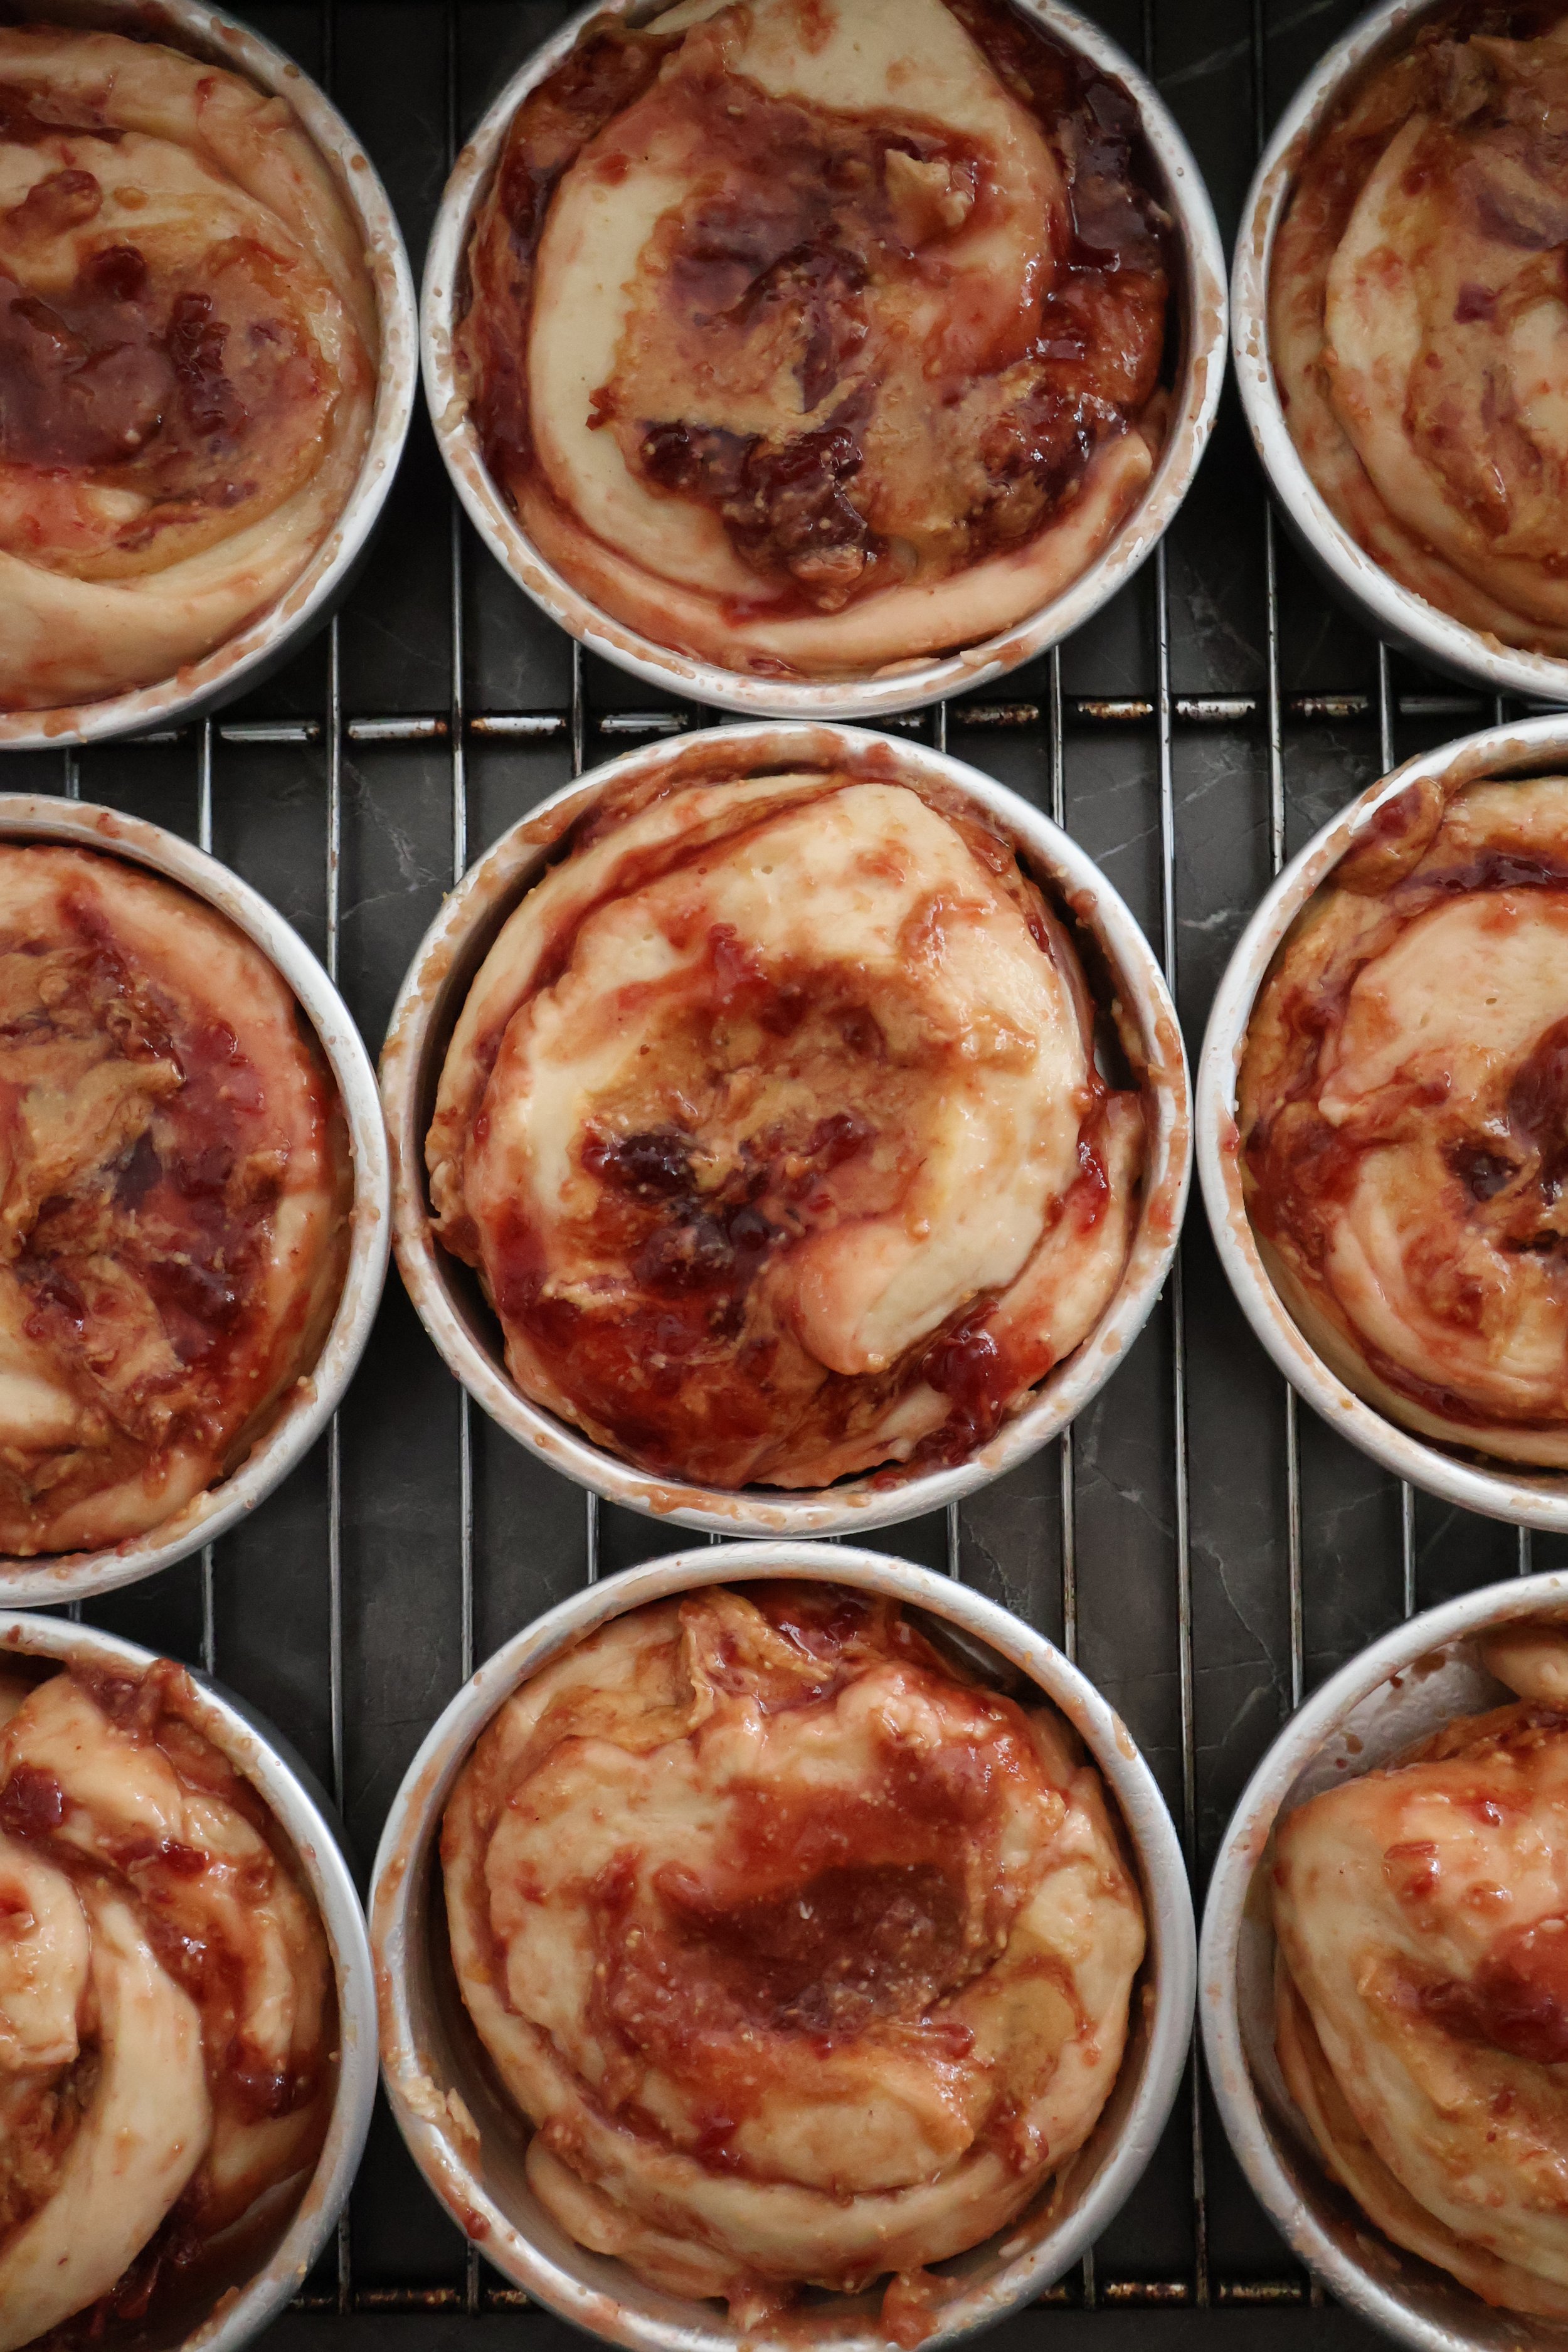
8) Slice + pan + final proof (poke test is your boss)
What you’re doing: Cutting rolls and letting them rise until bake-ready.
Why it matters: Underproofed = dense; overproofed = collapsing and leaking.
Slice into 12 rolls. Place in a parchment-lined pan.
Proof until very puffy and touching.
Timing range: 1–3 hours depending on room temp + how far bulk went.
If you let the dough double during bulk fermentation, then this stage will need much less time.
Proofing checkpoint (poke test):
Press the side gently: it should spring back slowly and leave a soft dent.
Look for: rolls noticeably airy; edges touching; slight jiggle.
Common mistake: proofing by the clock only.
If it happens: if they’re barely springing back (fragile), bake sooner.
Schedule option:
Same-day: proof at room temp.
Overnight: after slicing and panning, cover and refrigerate. Next morning, proof until puffy.
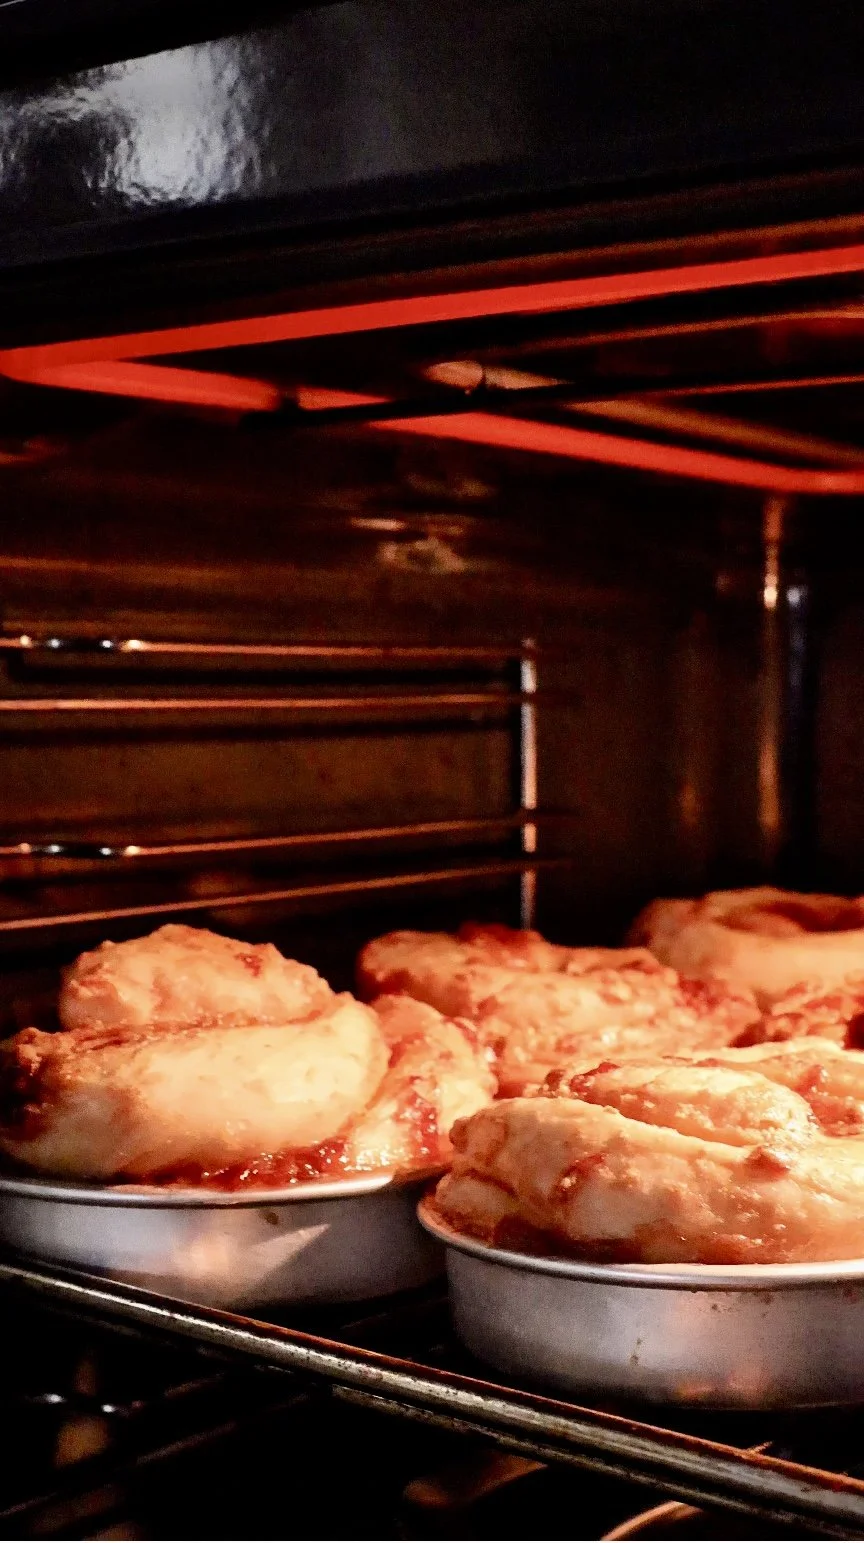
9) Bake (10–12 minutes) + optional pan-bang
We’re aiming for chewy centers. That means slightly underbaked-looking middle.
What you’re doing: Bake 6 per tray for 10–12 minutes.
Why it matters: Carryover heat finishes them; overbaking kills chew.
Look for:
Edges set and slightly darker
Top looks matte, not shiny-wet
Center still looks soft/puffy (that’s good)
Common mistake: Waiting for the center to look fully “done.”
If it happens: Pull them now; they’ll set on the tray.
Optional pan-bang : Tap tray against your counter a couple times as soon as you pull from the oven to remove ripples + flatter spread.
Optional Shaping: Use a Round cookie cutter or Glass with a diameter a little larger than your cookies. Cover your cookies and swirl them around to round the edges and make a more uniform shape. Its important you do this when cookies are straight out of the oven and still soft.
Timing range: 10–12 min depending on oven hot spots, tray color, and cookie size.
10) Bake + finish (doneness cues)
What you’re doing: Baking until the center is set and brushing for shine and softness.
Why it matters: Enriched dough browns early—don’t pull too soon.
Bake at 180°C for 22–28 minutes.
If browning early, tent loosely with foil after ~15 minutes.
Place a Pot with some water at the base of your oven. This will create steam as the rolls bake making your dough even softer.
Optional confidence: center temp ~93°C.
Finish: brush with melted butter while warm.
Look for: deep golden tops; centers set; no wet dough line.
Common mistake: pulling early because tops look done.
If it happens: return to oven 3–5 minutes; tent with foil.

Tips & Troubleshooting
-
Starter too weak / room too cold → Move to warmer spot (oven light) + extend bulk → Feed starter to peak next time
-
Over-fermented / too warm → Chill before rolling + shorten final proof → End bulk at 60–80% rise next time
-
Log too warm → Chill 15–25 min → Always chill log before slicing. Alternatively, bake rolls in individual round mini pans for perfect round shape.
-
Underproofed → Proof longer until slow spring-back → Learn poke test, not the clock
-
Overproofed → Bake immediately; don’t wait → Shorten final proof next time
QUick Saves
Rolls are messy and sticky? Chill the log and cut with floss.
Overfilled and leaking? Bake on buttered parchment paper so they dont stick
Tops brown too fast? Foil tent and keep baking until center sets.
Dough too slack to roll? 20–30 min fridge rest before rolling.
Spirals tearing? Warm the Peanutbutter slightly so it spreads without dragging.
Don’t panic, this is normal:
Enriched sourdough can feel tacky—that’s normal.
Rise time is not a fixed number—starter strength and room temp change everything.
Slight jam leakage happens—your goal is “managed,” not “zero.”
Substitutions & Variations
Flour: bread flour is best; strong AP can work but may be slightly less lofty.
Milk: whole milk for softness; 2% works; plant milk works but slightly less rich.
Butter: plant butter works; keep it soft, not melted.
Egg: if you must omit, expect texture changes (this dough is designed with egg).
Jam: thick store-bought jam is perfect; avoid runny “fruit spread” styles.
Flavor: orange zest instead of lemon; or add a pinch of cinnamon to the filling for a PB&J-cinnamon-roll crossover.
Topping: freeze-dried raspberry dust for color; toasted nuts for crunch.
Make it extra brunch: add a peanut butter drizzle and serve with fresh berries.
Commercial yeast option: not included in this version; if you add it, all fermentation times shorten significantly (bulk and proof can drop by hours).
Storage
Fridge:
store baked rolls up to 4 days in an airtight container.
Freezer:
freeze baked rolls up to 2 months (wrap individually + bag). Thaw overnight in fridge or 1–2 hours at room temp.
Reheat:
Oven: 150°C for 8–12 min, loosely covered with foil (keeps soft).
Microwave: 15–25 sec per roll (best for quick softness, less for crispness).
Make-ahead plan:
Day before: make tangzhong, mix dough, bulk ferment, shape, pan, refrigerate overnight.
Day of: proof until puffy, bake, brush with butter, finish toppings right before serving.
Hosting Notes
T-24h:
Mix dough + bulk ferment
Shape and pan the rolls
Cover tightly and refrigerate overnight
Prep toppings (freeze-dried raspberries crushed; nuts toasted)
Day-of (morning):
Pull pan from fridge
Proof 1–3 hours until slow spring-back
Bake 22–28 minutes
Butter-brush while warm
T-2h:
Set up platter + serving tools
Optional drizzle prep (if doing)
T-1h:
Bake (or rewarm if baked earlier)
Keep loosely covered so they stay soft
T-30m:
Finish garnish (fresh berries last-minute)
Slice into shareable pieces if serving buffet-style
Put a small bowl of extra jam on the side (people love options)
Batching note:
If making multiple pans, bake one pan at a time for even color, or rotate halfway through. Always put pans on a sheet tray to catch drips.
Estimated Nutrition (per serving)
Per roll (1 of 12):
Calories: ~350 kcal
Protein: ~10 g
Carbs: ~50 g
Fat: ~14 g
Assumptions: 12 rolls total; includes dough + peanut butter filling + jam (moderate amount), excludes optional drizzle and toppings. Values are estimates.
AKS RECIPE CARD
Peanut Butter & Jam Sourdough Rolls (Tangzhong)
Pillowy-soft sourdough swirl rolls with creamy PB + thick jam — stays tender longer thanks to tangzhong.
Ingredients
Tangzhong
- 25 g bread flour (strong flour)
- 125 g milk (whole or 2%)
Dough
- 325 g bread flour (strong flour)
- 60 g granulated sugar
- 6 g fine salt
- 110 g active sourdough starter (100% hydration, near peak)
- 1 large egg (~50 g without shell)
- 75 g milk
- 45 g unsalted butter (very soft, not melted)
- 5 g vanilla extract (optional)
- Zest of 1/2 lemon (optional)
Filling
- 150 g creamy peanut butter
- 30 g brown sugar
- 1 pinch fine salt
- 180–200 g thick, cold jam
Optional / To Serve
- Melted butter (for brushing after baking)
- Freeze-dried raspberries (crushed)
- Toasted chopped peanuts/pistachios
- Fresh berries (add at the last minute)
Method
- Tangzhong: Whisk flour + milk; cook 60–90 sec until paste-like. Cool 10 min.
- Mix: Combine flour+sugar+salt; add starter, egg, milk, tangzhong (vanilla/zest). Mix to cohesive dough.
- Rest: Let dough sit 10 min (helps gluten start). Then knead 6–8 min until smoother.
- Butter: Add soft butter in pieces; knead 5–8 min until glossy, elastic, slightly tacky.
- Bulk ferment: Cover and rise until puffy, ~60–80% bigger (about 3–7+ hrs, temp/starter-dependent). Optional: after 2–3 hrs (~30–40% rise), refrigerate overnight.
- Roll: Roll to ~30×45 cm rectangle. Optional envelope fold first if slack.
- Fill & roll: Spread PB + brown sugar + pinch salt (warm PB jar gently if firm). Add thick cold jam thinly (don’t pool). Roll tight; seam down.
- Chill & slice: Chill log 15–25 min. Slice 12; place in parchment-lined 23×33 cm / 9×13 pan.
- Final proof: Proof until very puffy & touching; poke test = slow spring-back (about 1–3 hrs; less if bulk went far).
- Bake: Bake at 180°C for 22–28 min. Optional: add a small pan of water in oven for steam. Tent with foil after ~15 min if browning early. Finish with melted butter.
Quick Troubleshooting
- Sticky, slack dough: Chill 20–30 min before rolling; shorten final proof.
- Dense rolls: Underproofed — proof longer until slow spring-back.
- Collapsed/pale & fragile: Overproofed — bake sooner; next time end bulk at ~60–80% rise.
- Jam leaks/burns: Use thicker jam, spread thin, avoid pooling; chill log before slicing.
- Tops brown too fast: Tent with foil and keep baking until center sets (~93°C if using thermometer).
Storage
- Fridge: Up to 4 days, airtight container.
- Freezer: Up to 2 months, wrap individually; thaw overnight.
- Reheat: 150°C oven 8–12 min (covered) to keep soft.
Estimated nutrition (per serving): ~350 kcal • P 10 g • C 50 g • F 14 g (assumes 12 rolls, moderate jam, no optional toppings/drizzle).